This isn't a book review, although the reason that I am typing this now is
because of a book, You Are Not Alone: from the creator and host of
Griefcast, Cariad Lloyd, ISBN: 978-1526621870 and I include a handful of
quotes from Cariad where there is really no better way of describing things.
Many people experience death for the first time as a child, often relating to a
family pet. Death is universal but every experience of death is unique. One of
the myths of grief is the idea of the Five Stages but this is a
misinterpretation. Denial, Anger, Bargaining, Depression and Acceptance
represent the five stage model of death and have nothing to do with
grief. The five stages were developed from studying those who are
terminally ill, the dying, not those who then grieve for the dead person and
have to go on living without them. Grief is for those who loved the person who
has died and it varies between each of those people just as people vary in how
they love someone. The Five Stages end at the moment of death, grief is what
comes next and most people do not grieve in stages, it can be more like a
tangled knot.
Death has a date and time, so that is why the last stage of the model is
Acceptance. Grief has no timetable, those who grieve will carry that grief for
the rest of their lives. Death starts the process of grief in those who go on
living just as it ends the life of the person who is loved. "Grief eases and
changes and returns but it never disappears.".
I suspect many will have already stopped reading by this point. People do not
talk about death and grief enough and this only adds to the burden of those who
carry their grief. It can be of enormous comfort to those who have carried
grief for some time to talk directly about the dead, not in vague pleasantries
but with specific and strong memories. Find a safe place without distractions
and talk with the person grieving face to face. Name the dead person. Go to
places with strong memories and be there alongside. Talk about the times with
that person before their death. Early on, everything about grief is painful and
sad. It does ease but it remains unpredictable. Closing it away in a box inside
your head (as I did at one point) is like cutting off a damaged limb but
keeping the pain in a box on the shelf. You still miss the limb and eventually,
the box starts leaking.
For me, there were family pets which died but my first job out of university
was to work in hospitals, helping the nurses manage the medication regimen and
providing specialist advice as a pharmacist. It will not be long in that
environment before everyone on the ward gets direct experience of the death of
a person. In some ways, this helped me to separate the process of death from
the process of grief. I cared for these people as patients but these were not
my loved ones. Later, I worked in specialist terminal care units, including
providing potential treatments as part of clinical trials. Here, it was not
expected for any patient to be discharged alive. The more aggressive
chemotherapies had already been tried and had failed, this was about pain
relief, symptom management and helping the loved ones. Palliative care is not
just about the patient, it involves helping the loved ones to accept what is
happening as this provides comfort to the patient by closing the loop.
Grief is stressful. One of the most common causes of personal stress is
bereavement.
The death of your loved one is outside of your control, it has happened, no
amount of regret can change that. Then come all the other stresses, maybe about
money or having somewhere to live as a result of what else has changed after
the death or having to care for other loved ones.
In the early stages, the first two years, I found it helpful to imagine my life
as a box containing a ball and a button. The button triggers new waves of pain
and loss each time it is hit. The ball bounces around the box and hits the
button at random. Initially, the button is large and the ball is enormous, so
the button is hit almost constantly. Over time, both the button and the ball
change size. Starting off at maximum, initially there is only one direction of
change. There are two problems with this analogy. First is that the grief ball
has infinite energy which does not happen in reality. The ball may get smaller
and the button harder to hit but the ball will continue bouncing. Secondly, the
life box is not a predictable shape, so the pattern of movement of the ball is
unpredictable.
A single stress is one thing, but what has happened since has just kept adding
more stress for me. Shortly before my father died 5 years ago now, I had moved
house. Then, I was made redundant on the day of the first anniversary of my
father's death. A year or so later, my long term relationship failed and a few
months after that COVID-19 appeared. As the country eased out of the pandemic
in 2021, my mother died (unrelated to COVID itself). A year after that, I had
to take early retirement. My brother and sister, of course, share a lot of
those stressors. My brother, in particular, took the responsibility for
organising both funerals and did most of the visits to my mother before her
death. The grief is different for each of the surviving family.
Cariad's book helped me understand why I was getting frequent ideas about going
back to visit places which my father and I both knew. My parents encouraged
each of us to work hard to leave Port Talbot (or Pong Toilet locally) behind,
in no small part due to the unrestrained pollution and deprivation that is
common to small industrial towns across Wales, the midlands and the north of
the UK. It wasn't that I wanted to move house back to our ancestral roots. It
was my grief leaking out of the box. Yes, I long for mountains and the sea
because I'm now living in a remorselessly flat and landlocked region after
moving here for employment. However, it was my grief driving those longings -
not for the physical surroundings but out of the shared memories with my
father. I can visit those memories without moving house, I just need to arrange
things so that I can be undisturbed and undistracted.
I am not alone with my grief and I am grateful to my friends who have helped
whilst carrying their own grief. It is necessary for everyone to think and talk
about death and grief. In respect of your own death, no matter how far ahead
that may be, consider Advance Care Planning and Expressions of Wish as well
as your Will.
Help your loved ones cope with your death by describing what you would like
to happen.
Document how your life has been arranged so that the executor of your Will
can find the right documents to inform:
your bank,
your mortgage company,
your energy company,
your mobile phone company,
your house and car insurers and the like.
If you've got a complex home setup with servers and other machines which
would be unfamiliar to the executor of your Will, then entrust someone else
with the information required to revoke your keys, access your machines etc.
and then provide the contact information for that person to your executor.
Arrange for your pets to be looked after.
Describe how you would like your belongings to be handled - do you want every
effort made to have your clothes and furnishing recycled instead of going to
landfill?
Where are the documents for the oven, the dishwasher and the central heating
system so that these can be included in the sale of your property?
If there are loans outstanding, make sure your executor or a trusted person
knows where to find the account numbers and company names.
What about organ donation? Make sure your executor knows your wishes and
make sure your loved ones either agree or are willing to respect your wishes.
Then the personal stuff, what do you want to happen to your social media
accounts, your cloud data, your games, DVD and CD collection, your photos and
other media? Some social media companies have explicit settings available in
your account to describe if you want the data deleted after a certain amount
of time, after a notification from some government service or to set up some
kind of memorialised version or hand over control of the account to a trusted
person.
Talk to people, document what you want. Your loved ones will be grateful and
they deserve that much whilst they try to cope with the first onslaught of
grief. Talk to your loved ones and get them to do the same for themselves.
Normalise talking about death with your family, especially children. None of us
are getting out of this alive and we will all leave behind people who will
grieve.
Review: The Amazing Maurice and His Educated Rodents, by Terry Pratchett
Series:
Discworld #28
Publisher:
HarperCollins
Copyright:
2001
Printing:
2008
ISBN:
0-06-001235-8
Format:
Mass market
Pages:
351
The Amazing Maurice and His Educated Rodents is the 28th Discworld
novel and the first marketed for younger readers. Although it has enough
references to establish it as taking place on Discworld, it has no obvious
connections with the other books and doesn't rely on any knowledge of the
series so far. This would not be a bad place to start with Terry
Pratchett and see if his writing style and sense of humor is for you.
Despite being marketed as young adult, and despite Pratchett's comments in
an afterward in the edition I own that writing YA novels is much harder, I
didn't think this was that different than a typical Discworld novel. The
two main human characters read as about twelve and there were some minor
changes in tone, but I'm not sure I would have immediately labeled it as
YA if I hadn't already known it was supposed to be. There are
considerably fewer obvious pop culture references than average, though; if
that's related, I think I'll prefer Pratchett's YA novels, since I think
his writing is stronger when he's not playing reference bingo.
Maurice (note to US readers: Maurice is pronounced "Morris" in the UK) is
a talking cat and the mastermind of a wandering con job. He, a
stupid-looking kid with a flute (Maurice's description), and a tribe of
talking rats travel the small towns of Discworld. The rats go in first,
making a show of breaking into the food, swimming in the cream, and
widdling on things that humans don't want widdled on. Once the
townspeople are convinced they have a plague of rats, the kid with the
flute enters the town and offers to pipe the rats away for a very
reasonable fee. He plays his flute, the rats swarm out of town, and they
take their money and move on to the next town. It's a successful life
that suits Maurice and his growing hoard of gold very well. If only the
rats would stop asking pointed questions about the ethics of this scheme.
The town of Bad Blintz is the next on their itinerary, and if the rats
have their way, will be the last. Their hope is they've gathered enough
money by now to find an island, away from humans, where they can live
their own lives. But, as is always the case for one last job in fiction,
there's something uncannily wrong about Bad Blintz. There are traps
everywhere, more brutal and dangerous ones than they've found in any other
town, and yet there is no sign of native, unintelligent rats.
Meanwhile, Maurice and the boy find a town that looks wealthy but has food
shortages, a bounty on rats that is absurdly high, and a pair of
sinister-looking rat-catchers who are bringing in collections of rat tails
that look suspiciously like bootlaces. The mayor's daughter discovers
Maurice can talk and immediately decides she has to take them in hand.
Malicia is very certain of her own opinions, not accustomed to taking no
for an answer, and is certain that the world follows the logic of stories,
even if she has to help it along.
This is truly great stuff. I think this might be my favorite Discworld
novel to date, although I do have some criticisms that I'll get to in a
moment.
The best part are the rats, and particularly the blind philosopher rat
Dangerous Beans and his assistant Peaches. In the middle of daring
infiltration of the trapped sewers in scenes reminiscent of Mission:
Impossible, the rats are also having philosophical arguments. They've
become something different than the unaltered rats that they call the
keekees, but what those differences mean is harder to understand.
The older rats are not happy about too many changes and think the rats
should keep acting like rats. The younger ones are discovering that
they're afraid of shadows because now they understand what the shadows
hint at. Dangerous Beans is trying to work out a writing system so that
they can keep important thoughts. One of their few guides is a children's
book of talking animals, although they quickly discover that the portrayed
clothing is annoyingly impractical.
But as good as the rats are, Maurice is nearly as much fun in an entirely
different way. He is unapologetically out for himself, streetwise and
canny in a way that feels apt for a cat, gets bored and mentally wanders
off in the middle of conversations, and pretends to agree with people when
that's how he can get what he wants. But he also has a weird sense of
loyalty and ethics that only shows up when something is truly important.
It's a variation on the con man with a heart of gold, but it's a very
well-done variation that weaves in a cat's impatience with and inattention
to anything that doesn't directly concern them. I was laughing throughout
the book.
Malicia is an absolute delight, the sort of character who takes over
scenes through sheer force of will, and the dumb-looking kid (whose name
turns out to be Keith) is a perfect counterbalance: a laid-back, quiet boy
who just wants to play his music and is almost entirely unflappable. It's
such a great cast.
The best part of the plot is the end. I won't spoil it, so I'll only say
that Pratchett has the characters do the work on the aftermath that a lot
of books skip over. He doesn't have any magical solutions for the world's
problems, but he's so very good at restoring one's faith that maybe
sometimes those solutions can be constructed.
My one complaint with this book is that Pratchett introduces a second
villain, and while there are good in-story justifications for it and it's
entangled with the primary plot, he added elements of (mild) supernatural
horror and evil that I thought were extraneous and unnecessary. He
already had enough of a conflict set up without adding that additional
element, and I think it undermined the moral complexity of the story. I
would have much rather he kept the social dynamics of the town at the core
of the story and used that to trigger the moments of sacrifice and
philosophy that made the climax work.
The Discworld books by this point have gotten very good, but each
book seems to have one element like that where it felt like Pratchett took
the easy way out of a plot corner or added some story element that didn't
really work. I feel like the series is on the verge of having a truly
great book that rises above the entire series to date, but never quite
gets there.
That caveat aside, I thoroughly enjoyed this and had trouble putting it
down. Mrs. Frisby and the Rats of Nimh was one of my favorite
books as a kid, and this reminded me of it in some good ways (enough so
that I think some of the references were intentional). Great stuff. If
you were to read only one Discworld book and didn't want to be confused by
all the entangled plot threads and established characters, I would
seriously consider making it this one. Recommended.
Followed by Night Watch in publication order. There doesn't appear
to be a direct plot sequel, more's the pity.
Rating: 8 out of 10
Another short note to myself, and whomever cares/searches later for
nft or nftables, tcp mss clamping.
Somewhat surprising, many/most of the instructions found by Google are
still related to iptables. I guess people stopped writing blog posts
by the time nftables became widely used?
The only official documentation I can find is in the official
wiki,
but it doesn t list/explain exactly how does this work/in which
conditions. I think this results in posts like this
one
that suggest additionally limiting the packets it acts on using a size
limiter, in order to prevent changing small packets.
Looking at the code that actually implements this, in net/netfilter/xt_TCPMSS.c (and not in the lower case-named file, which is about matching, TIL), in the function tcpmss_mangle_packet, first there is this comment:
/* Never increase MSS, even when setting it, as
 * doing so results in problems for hosts that rely
 * on MSS being set correctly.
 */
So at least the intent is that this always does the right thing (only
decrease).
Second, the code does correctly look at both directions of the packet
when using auto-clamping (set rt mtu rather than set 1452), in the
if
branch
for XT_TCPMSS_CLAMP_PMTU. This means, it s safer to use
auto-clamping, rather than manually set the value.
And finally, there is handling of some corner cases as well (syn
packet with data, syn packet without the MSS option - unlikely for
modern stacks - in which case it defaults to minimal values).
All in all, it seems to me that it should always be correct to simply
do what the wiki recommends, setting this for all packets traversing
the host:
nft add rule ip filter forward tcp flags syn tcp option maxseg size set rt mtu
Of course, if you d rather not do it always, but only for external
interfaces, make sure you set it in both directions:
nft add rule ip filter forward iifname ppp0 tcp flags syn tcp option maxseg size set rt mtu
nft add rule ip filter forward oifname ppp0 tcp flags syn tcp option maxseg size set rt mtu
And that should be it. Well, use iifgroup/oifgroup for better rules .
Probably everyone is familiar with a regular VPN. The traditional use case is to connect to a corporate or home network from a remote location, and access services as if you were there.
But these days, the notion of corporate network and home network are less based around physical location. For instance, a company may have no particular office at all, may have a number of offices plus a number of people working remotely, and so forth. A home network might have, say, a PVR and file server, while highly portable devices such as laptops, tablets, and phones may want to talk to each other regardless of location. For instance, a family member might be traveling with a laptop, another at a coffee shop, and those two devices might want to communicate, in addition to talking to the devices at home.
And, in both scenarios, there might be questions about giving limited access to friends. Perhaps you d like to give a friend access to part of your file server, or as a company, you might have contractors working on a limited project.
Pretty soon you wind up with a mess of VPNs, forwarded ports, and tricks to make it all work. With the increasing prevalence of CGNAT, a lot of times you can t even open a port to the public Internet. Each application or device probably has its own gateway just to make it visible on the Internet, some of which you pay for.
Then you add on the question of: should you really trust your LAN anyhow? With possibilities of guests using it, rogue access points, etc., the answer is probably no .
We can move the responsibility for dealing with NAT, fluctuating IPs, encryption, and authentication, from the application layer further down into the network stack. We then arrive at a much simpler picture for all.
So this page is fundamentally about making the network work, simply and effectively.
How do we make the Internet work in these scenarios?
We re going to combine three concepts:
A VPN, providing fully encrypted and authenticated communication and stable IPs
Mesh Networking, in which devices automatically discover optimal paths to reach each other
Zero-trust networking, in which we do not need to trust anything about the underlying LAN, because all our traffic uses the secure systems in points 1 and 2.
By combining these concepts, we arrive at some nice results:
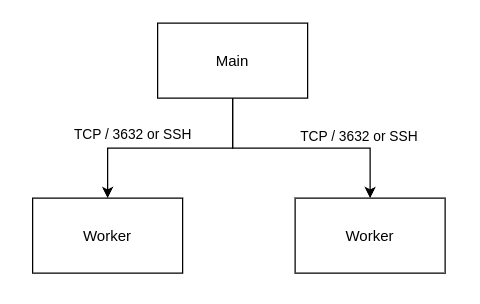
You can ssh hostname, where hostname is one of your machines (server, laptop, whatever), and as long as hostname is up, you can reach it, wherever it is, wherever you are.
Combined with mosh, these sessions will be durable even across moving to other host networks.
You could just as well use telnet, because the underlying network should be secure.
You don t have to mess with encryption keys, certs, etc., for every internal-only service. Since IPs are now trustworthy, that s all you need. hosts.allow could make a comeback!
You have a way of transiting out of extremely restrictive networks. Every tool discussed here has a way of falling back on routing things via a broker (relay) on TCP port 443 if all else fails.
There might sometimes be tradeoffs. For instance:
On LANs faster than 1Gbps, performance may degrade due to encryption and encapsulation overhead. However, these tools should let hosts discover the locality of each other and not send traffic over the Internet if the devices are local.
With some of these tools, hosts local to each other (on the same LAN) may be unable to find each other if they can t reach the control plane over the Internet (Internet is down or provider is down)
Some other features that some of the tools provide include:
Easy sharing of limited access with friends/guests
Taking care of everything you need, including SSL certs, for exposing a certain on-net service to the public Internet
Optional routing of your outbound Internet traffic via an exit node on your network. Useful, for instance, if your local network is blocking tons of stuff.
Let s dive in.
Types of Mesh VPNs
I ll go over several types of meshes in this article:
Fully decentralized with automatic hop routing
This model has no special central control plane. Nodes discover each other in various ways, and establish routes to each other. These routes can be direct connections over the Internet, or via other nodes. This approach offers the greatest resilience. Examples I ll cover include Yggdrasil and tinc.
Automatic peer-to-peer with centralized control
In this model, nodes, by default, communicate by establishing direct links between them. A regular node never carries traffic on behalf of other nodes. Special-purpose relays are used to handle cases in which NAT traversal is impossible. This approach tends to offer simple setup. Examples I ll cover include Tailscale, Zerotier, Nebula, and Netmaker.
Roll your own and hybrid approaches
This is a grab bag of other ideas; for instance, running Yggdrasil over Tailscale.
Terminology
For the sake of consistency, I m going to use common language to discuss things that have different terms in different ecosystems:
Every tool discussed here has a way of dealing with NAT traversal. It may assist with establishing direct connections (eg, STUN), and if that fails, it may simply relay traffic between nodes. I ll call such a relay a broker . This may or may not be the same system that is a control plane for a tool.
All of these systems operate over lower layers that are unencrypted. Those lower layers may be a LAN (wired or wireless, which may or may not have Internet access), or the public Internet (IPv4 and/or IPv6). I m going to call the unencrypted lower layer, whatever it is, the clearnet .
Evaluation Criteria
Here are the things I want to see from a solution:
Secure, with all communications end-to-end encrypted and authenticated, and prevention of traffic from untrusted devices.
Flexible, adapting to changes in network topology quickly and automatically.
Resilient, without single points of failure, and with devices local to each other able to communicate even if cut off from the Internet or other parts of the network.
Private, minimizing leakage of information or metadata about me and my systems
Able to traverse CGNAT without having to use a broker whenever possible
A lesser requirement for me, but still a nice to have, is the ability to include others via something like Internet publishing or inviting guests.
Fully or nearly fully Open Source
Free or very cheap for personal use
Wide operating system support, including headless Linux on x86_64 and ARM.
Fully Decentralized VPNs with Automatic Hop Routing
Two systems fit this description: Yggdrasil and Tinc. Let s dive in.
Yggdrasil
I ll start with Yggdrasil because I ve written so much about it already. It featured in prior posts such as:
Yggdrasil can be a private mesh VPN, or something more
Yggdrasil can be a private mesh VPN, just like the other tools covered here. It s unique, however, in that a key goal of the project is to also make it useful as a planet-scale global mesh network. As such, Yggdrasil is a testbed of new ideas in distributed routing designed to scale up to massive sizes and all sorts of connection conditions. As of 2023-04-10, the main global Yggdrasil mesh has over 5000 nodes in it. You can choose whether or not to participate.
Every node in a Yggdrasil mesh has a public/private keypair. Each node then has an IPv6 address (in a private address space) derived from its public key. Using these IPv6 addresses, you can communicate right away.
Yggdrasil differs from most of the other tools here in that it does not necessarily seek to establish a direct link on the clearnet between, say, host A and host G for them to communicate. It will prefer such a direct link if it exists, but it is perfectly happy if it doesn t.
The reason is that every Yggdrasil node is also a router in the Yggdrasil mesh. Let s sit with that concept for a moment. Consider:
If you have a bunch of machines on your LAN, but only one of them can peer over the clearnet, that s fine; all the other machines will discover this route to the world and use it when necessary.
All you need to run a broker is just a regular node with a public IP address. If you are participating in the global mesh, you can use one (or more) of the free public peers for this purpose.
It is not necessary for every node to know about the clearnet IP address of every other node (improving privacy). In fact, it s not even necessary for every node to know about the existence of all the other nodes, so long as it can find a route to a given node when it s asked to.
Yggdrasil can find one or more routes between nodes, and it can use this knowledge of multiple routes to aggressively optimize for varying network conditions, including combinations of, say, downloads and low-latency ssh sessions.
Behind the scenes, Yggdrasil calculates optimal routes between nodes as necessary, using a mesh-wide DHT for initial contact and then deriving more optimal paths. (You can also read more details about the routing algorithm.)
One final way that Yggdrasil is different from most of the other tools is that there is no separate control server. No node is special , in charge, the sole keeper of metadata, or anything like that. The entire system is completely distributed and auto-assembling.
Meeting neighbors
There are two ways that Yggdrasil knows about peers:
By broadcast discovery on the local LAN
By listening on a specific port (or being told to connect to a specific host/port)
Sometimes this might lead to multiple ways to connect to a node; Yggdrasil prefers the connection auto-discovered by broadcast first, then the lowest-latency of the defined path. In other words, when your laptops are in the same room as each other on your local LAN, your packets will flow directly between them without traversing the Internet.
Unique uses
Yggdrasil is uniquely suited to network-challenged situations. As an example, in a post-disaster situation, Internet access may be unavailable or flaky, yet there may be many local devices perhaps ones that had never known of each other before that could share information. Yggdrasil meets this situation perfectly. The combination of broadcast auto-detection, distributed routing, and so forth, basically means that if there is any physical path between two nodes, Yggdrasil will find and enable it.
Ad-hoc wifi is rarely used because it is a real pain. Yggdrasil actually makes it useful! Its broadcast discovery doesn t require any IP address provisioned on the interface at all (it just uses the IPv6 link-local address), so you don t need to figure out a DHCP server or some such. And, Yggdrasil will tend to perform routing along the contours of the RF path. So you could have a laptop in the middle of a long distance relaying communications from people farther out, because it could see both. Or even a chain of such things.
Yggdrasil: Security and Privacy
Yggdrasil s mesh is aggressively greedy. It will peer with any node it can find (unless told otherwise) and will find a route to anywhere it can. There are two main ways to make sure you keep unauthorized traffic out: by restricting who can talk to your mesh, and by firewalling the Yggdrasil interface. Both can be used, and they can be used simultaneously.
I ll discuss firewalling more at the end of this article. Basically, you ll almost certainly want to do this if you participate in the public mesh, because doing so is akin to having a globally-routable public IP address direct to your device.
If you want to restrict who can talk to your mesh, you just disable the broadcast feature on all your nodes (empty MulticastInterfaces section in the config), and avoid telling any of your nodes to connect to a public peer. You can set a list of authorized public keys that can connect to your nodes listening interfaces, which you ll probably want to do. You will probably want to either open up some inbound ports (if you can) or set up a node with a known clearnet IP on a place like a $5/mo VPS to help with NAT traversal (again, setting AllowedPublicKeys as appropriate). Yggdrasil doesn t allow filtering multicast clients by public key, only by network interface, so that s why we disable broadcast discovery. You can easily enough teach Yggdrasil about static internal LAN IPs of your nodes and have things work that way. (Or, set up an internal gateway node or two, that the clients just connect to when they re local). But fundamentally, you need to put a bit more thought into this with Yggdrasil than with the other tools here, which are closed-only.
Compared to some of the other tools here, Yggdrasil is better about information leakage; nodes only know details, such as clearnet IPs, of directly-connected peers. You can obtain the list of directly-connected peers of any known node in the mesh but that list is the public keys of the directly-connected peers, not the clearnet IPs.
Some of the other tools contain a limited integrated firewall of sorts (with limited ACLs and such). Yggdrasil does not, but is fully compatible with on-host firewalls. I recommend these anyway even with many other tools.
Yggdrasil: Connectivity and NAT traversal
Compared to the other tools, Yggdrasil is an interesting mix. It provides a fully functional mesh and facilitates connectivity in situations in which no other tool can. Yet its NAT traversal, while it exists and does work, results in using a broker under some of the more challenging CGNAT situations more often than some of the other tools, which can impede performance.
Yggdrasil s underlying protocol is TCP-based. Before you run away screaming that it must be slow and unreliable like OpenVPN over TCP it s not, and it is even surprisingly good around bufferbloat. I ve found its performance to be on par with the other tools here, and it works as well as I d expect even on flaky 4G links.
Overall, the NAT traversal story is mixed. On the one hand, you can run a node that listens on port 443 and Yggdrasil can even make it speak TLS (even though that s unnecessary from a security standpoint), so you can likely get out of most restrictive firewalls you will ever encounter. If you join the public mesh, know that plenty of public peers do listen on port 443 (and other well-known ports like 53, plus random high-numbered ones).
If you connect your system to multiple public peers, there is a chance though a very small one that some public transit traffic might be routed via it. In practice, public peers hopefully are already peered with each other, preventing this from happening (you can verify this with yggdrasilctl debug_remotegetpeers key=ABC...). I have never experienced a problem with this. Also, since latency is a factor in routing for Yggdrasil, it is highly unlikely that random connections we use are going to be competitive with datacenter peers.
Yggdrasil: Sharing with friends
If you re open to participating in the public mesh, this is one of the easiest things of all. Have your friend install Yggdrasil, point them to a public peer, give them your Yggdrasil IP, and that s it. (Well, presumably you also open up your firewall you did follow my advice to set one up, right?)
If your friend is visiting at your location, they can just hop on your wifi, install Yggdrasil, and it will automatically discover a route to you. Yggdrasil even has a zero-config mode for ephemeral nodes such as certain Docker containers.
Yggdrasil doesn t directly support publishing to the clearnet, but it is certainly possible to proxy (or even NAT) to/from the clearnet, and people do.
Yggdrasil: DNS
There is no particular extra DNS in Yggdrasil. You can, of course, run a DNS server within Yggdrasil, just as you can anywhere else. Personally I just add relevant hosts to /etc/hosts and leave it at that, but it s up to you.
Yggdrasil: Source code, pricing, and portability
Yggdrasil is fully open source (LGPLv3 plus additional permissions in an exception) and highly portable. It is written in Go, and has prebuilt binaries for all major platforms (including a Debian package which I made).
There is no charge for anything with Yggdrasil. Listed public peers are free and run by volunteers. You can run your own peers if you like; they can be public and unlisted, public and listed (just submit a PR to get it listed), or private (accepting connections only from certain nodes keys). A peer in this case is just a node with a known clearnet IP address.
Yggdrasil encourages use in other projects. For instance, NNCP integrates a Yggdrasil node for easy communication with other NNCP nodes.
Yggdrasil conclusions
Yggdrasil is tops in reliability (having no single point of failure) and flexibility. It will maintain opportunistic connections between peers even if the Internet is down.
The unique added feature of being able to be part of a global mesh is a nice one.
The tradeoffs include being more prone to need to use a broker in restrictive CGNAT environments. Some other tools have clients that override the OS DNS resolver to also provide resolution of hostnames of member nodes; Yggdrasil doesn t, though you can certainly run your own DNS infrastructure over Yggdrasil (or, for that matter, let public DNS servers provide Yggdrasil answers if you wish).
There is also a need to pay more attention to firewalling or maintaining separation from the public mesh. However, as I explain below, many other options have potential impacts if the control plane, or your account for it, are compromised, meaning you ought to firewall those, too. Still, it may be a more immediate concern with Yggdrasil.
Although Yggdrasil is listed as experimental, I have been using it for over a year and have found it to be rock-solid. They did change how mesh IPs were calculated when moving from 0.3 to 0.4, causing a global renumbering, so just be aware that this is a possibility while it is experimental.
tinc
tinc is the oldest tool on this list; version 1.0 came out in 2003! You can think of tinc as something akin to an older Yggdrasil without the public option.
I will be discussing tinc 1.0.36, the latest stable version, which came out in 2019. The development branch, 1.1, has been going since 2011 and had its latest release in 2021. The last commit to the Github repo was in June 2022.
Tinc is the only tool here to support both tun and tap style interfaces. I go into the difference more in the Zerotier review below. Tinc actually provides a better tap implementation than Zerotier, with various sane options for broadcasts, but I still think the call for an Ethernet, as opposed to IP, VPN is small.
To configure tinc, you generate a per-host configuration and then distribute it to every tinc node. It contains a host s public key. Therefore, adding a host to the mesh means distributing its key everywhere; de-authorizing it means removing its key everywhere. This makes it rather unwieldy.
tinc can do LAN broadcast discovery and mesh routing, but generally speaking you must manually teach it where to connect initially. Somewhat confusingly, the examples all mention listing a public address for a node. This doesn t make sense for a laptop, and I suspect you d just omit it. I think that address is used for something akin to a Yggdrasil peer with a clearnet IP.
Unlike all of the other tools described here, tinc has no tool to inspect the running state of the mesh.
Some of the properties of tinc made it clear I was unlikely to adopt it, so this review wasn t as thorough as that of Yggdrasil.
tinc: Security and Privacy
As mentioned above, every host in the tinc mesh is authenticated based on its public key. However, to be more precise, this key is validated only at the point it connects to its next hop peer. (To be sure, this is also the same as how the list of allowed pubkeys works in Yggdrasil.) Since IPs in tinc are not derived from their key, and any host can assign itself whatever mesh IP it likes, this implies that a compromised host could impersonate another.
It is unclear whether packets are end-to-end encrypted when using a tinc node as a router. The fact that they can be routed at the kernel level by the tun interface implies that they may not be.
tinc: Connectivity and NAT traversal
I was unable to find much information about NAT traversal in tinc, other than that it does support it. tinc can run over UDP or TCP and auto-detects which to use, preferring UDP.
tinc: Sharing with friends
tinc has no special support for this, and the difficulty of configuration makes it unlikely you d do this with tinc.
tinc: Source code, pricing, and portability
tinc is fully open source (GPLv2). It is written in C and generally portable. It supports some very old operating systems. Mobile support is iffy.
tinc does not seem to be very actively maintained.
tinc conclusions
I haven t mentioned performance in my other reviews (see the section at the end of this post). But, it is so poor as to only run about 300Mbps on my 2.5Gbps network. That s 1/3 the speed of Yggdrasil or Tailscale. Combine that with the unwieldiness of adding hosts and some uncertainties in security, and I m not going to be using tinc.
Automatic Peer-to-Peer Mesh VPNs with centralized control
These tend to be the options that are frequently discussed. Let s talk about the options.
Tailscale
Tailscale is a popular choice in this type of VPN. To use Tailscale, you first sign up on tailscale.com. Then, you install the tailscale client on each machine. On first run, it prints a URL for you to click on to authorize the client to your mesh ( tailnet ). Tailscale assigns a mesh IP to each system. The Tailscale client lets the Tailscale control plane gather IP information about each node, including all detectable public and private clearnet IPs.
When you attempt to contact a node via Tailscale, the client will fetch the known contact information from the control plane and attempt to establish a link. If it can contact over the local LAN, it will (it doesn t have broadcast autodetection like Yggdrasil; the information must come from the control plane). Otherwise, it will try various NAT traversal options. If all else fails, it will use a broker to relay traffic; Tailscale calls a broker a DERP relay server. Unlike Yggdrasil, a Tailscale node never relays traffic for another; all connections are either direct P2P or via a broker.
Tailscale, like several others, is based around Wireguard; though wireguard-go rather than the in-kernel Wireguard.
Tailscale has a number of somewhat unique features in this space:
Funnel, which lets you expose ports on your system to the public Internet via the VPN.
Exit nodes, which automate the process of routing your public Internet traffic over some other node in the network. This is possible with every tool mentioned here, but Tailscale makes switching it on or off a couple of quick commands away.
Node sharing, which lets you share a subset of your network with guests
Funnel, in particular, is interesting. With a couple of tailscale serve -style commands, you can expose a directory tree (or a development webserver) to the world. Tailscale gives you a public hostname, obtains a cert for it, and proxies inbound traffic to you. This is subject to some unspecified bandwidth limits, and you can only choose from three public ports, so it s not really a production solution but as a quick and easy way to demonstrate something cool to a friend, it s a neat feature.
Tailscale: Security and Privacy
With Tailscale, as with the other tools in this category, one of the main threats to consider is the control plane. What are the consequences of a compromise of Tailscale s control plane, or of the credentials you use to access it?
Let s begin with the credentials used to access it. Tailscale operates no identity system itself, instead relying on third parties. For individuals, this means Google, Github, or Microsoft accounts; Okta and other SAML and similar identity providers are also supported, but this runs into complexity and expense that most individuals aren t wanting to take on. Unfortunately, all three of those types of accounts often have saved auth tokens in a browser. Personally I would rather have a separate, very secure, login.
If a person does compromise your account or the Tailscale servers themselves, they can t directly eavesdrop on your traffic because it is end-to-end encrypted. However, assuming an attacker obtains access to your account, they could:
Tamper with your Tailscale ACLs, permitting new actions
Add new nodes to the network
Forcibly remove nodes from the network
Enable or disable optional features
Of note is that they cannot just commandeer an existing IP. I would say the riskiest possibility here is that could add new nodes to the mesh. Because they could also tamper with your ACLs, they could then proceed to attempt to access all your internal services. They could even turn on service collection and have Tailscale tell them what and where all the services are.
Therefore, as with other tools, I recommend a local firewall on each machine with Tailscale. More on that below.
Tailscale has a new alpha feature called tailnet lock which helps with this problem. It requires existing nodes in the mesh to sign a request for a new node to join. Although this doesn t address ACL tampering and some of the other things, it does represent a significant help with the most significant concern. However, tailnet lock is in alpha, only available on the Enterprise plan, and has a waitlist, so I have been unable to test it.
Any Tailscale node can request the IP addresses belonging to any other Tailscale node. The Tailscale control plane captures, and exposes to you, this information about every node in your network: the OS hostname, IP addresses and port numbers, operating system, creation date, last seen timestamp, and NAT traversal parameters. You can optionally enable service data capture as well, which sends data about open ports on each node to the control plane.
Tailscale likes to highlight their key expiry and rotation feature. By default, all keys expire after 180 days, and traffic to and from the expired node will be interrupted until they are renewed (basically, you re-login with your provider and do a renew operation). Unfortunately, the only mention I can see of warning of impeding expiration is in the Windows client, and even there you need to edit a registry key to get the warning more than the default 24 hours in advance. In short, it seems likely to cut off communications when it s most important. You can disable key expiry on a per-node basis in the admin console web interface, and I mostly do, due to not wanting to lose connectivity at an inopportune time.
Tailscale: Connectivity and NAT traversal
When thinking about reliability, the primary consideration here is being able to reach the Tailscale control plane. While it is possible in limited circumstances to reach nodes without the Tailscale control plane, it is a fairly brittle setup and notably will not survive a client restart. So if you use Tailscale to reach other nodes on your LAN, that won t work unless your Internet is up and the control plane is reachable.
Assuming your Internet is up and Tailscale s infrastructure is up, there is little to be concerned with. Your own comfort level with cloud providers and your Internet should guide you here.
Tailscale wrote a fantastic article about NAT traversal and they, predictably, do very well with it. Tailscale prefers UDP but falls back to TCP if needed. Broker (DERP) servers step in as a last resort, and Tailscale clients automatically select the best ones. I m not aware of anything that is more successful with NAT traversal than Tailscale. This maximizes the situations in which a direct P2P connection can be used without a broker.
I have found Tailscale to be a bit slow to notice changes in network topography compared to Yggdrasil, and sometimes needs a kick in the form of restarting the client process to re-establish communications after a network change. However, it s possible (maybe even probable) that if I d waited a bit longer, it would have sorted this all out.
Tailscale: Sharing with friends
I touched on the funnel feature earlier. The sharing feature lets you give an invite to an outsider. By default, a person accepting a share can make only outgoing connections to the network they re invited to, and cannot receive incoming connections from that network this makes sense. When sharing an exit node, you get a checkbox that lets you share access to the exit node as well. Of course, the person accepting the share needs to install the Tailnet client. The combination of funnel and sharing make Tailscale the best for ad-hoc sharing.
Tailscale: DNS
Tailscale s DNS is called MagicDNS. It runs as a layer atop your standard DNS taking over /etc/resolv.conf on Linux and provides resolution of mesh hostnames and some other features. This is a concept that is pretty slick.
It also is a bit flaky on Linux; dueling programs want to write to /etc/resolv.conf. I can t really say this is entirely Tailscale s fault; they document the problem and some workarounds.
I would love to be able to add custom records to this service; for instance, to override the public IP for a service to use the in-mesh IP. Unfortunately, that s not yet possible. However, MagicDNS can query existing nameservers for certain domains in a split DNS setup.
Tailscale: Source code, pricing, and portability
Tailscale is almost fully open source and the client is highly portable. The client is open source (BSD 3-clause) on open source platforms, and closed source on closed source platforms. The DERP servers are open source. The coordination server is closed source, although there is an open source coordination server called Headscale (also BSD 3-clause) made available with Tailscale s blessing and informal support. It supports most, but not all, features in the Tailscale coordination server.
Tailscale s pricing (which does not apply when using Headscale) provides a free plan for 1 user with up to 20 devices. A Personal Pro plan expands that to 100 devices for $48 per year - not a bad deal at $4/mo. A Community on Github plan also exists, and then there are more business-oriented plans as well. See the pricing page for details.
As a small note, I appreciated Tailscale s install script. It properly added Tailscale s apt key in a way that it can only be used to authenticate the Tailscale repo, rather than as a systemwide authenticator. This is a nice touch and speaks well of their developers.
Tailscale conclusions
Tailscale is tops in sharing and has a broad feature set and excellent documentation. Like other solutions with a centralized control plane, device communications can stop working if the control plane is unreachable, and the threat model of the control plane should be carefully considered.
Zerotier
Zerotier is a close competitor to Tailscale, and is similar to it in a lot of ways. So rather than duplicate all of the Tailscale information here, I m mainly going to describe how it differs from Tailscale.
The primary difference between the two is that Zerotier emulates an Ethernet network via a Linux tap interface, while Tailscale emulates a TCP/IP network via a Linux tun interface.
However, Zerotier has a number of things that make it be a somewhat imperfect Ethernet emulator. For one, it has a problem with broadcast amplification; the machine sending the broadcast sends it to all the other nodes that should receive it (up to a set maximum). I wouldn t want to have a lot of programs broadcasting on a slow link. While in theory this could let you run Netware or DECNet across Zerotier, I m not really convinced there s much call for that these days, and Zerotier is clearly IP-focused as it allocates IP addresses and such anyhow. Zerotier provides special support for emulated ARP (IPv4) and NDP (IPv6). While you could theoretically run Zerotier as a bridge, this eliminates the zero trust principle, and Tailscale supports subnet routers, which provide much of the same feature set anyhow.
A somewhat obscure feature, but possibly useful, is Zerotier s built-in support for multipath WAN for the public interface. This actually lets you do a somewhat basic kind of channel bonding for WAN.
Zerotier: Security and Privacy
The picture here is similar to Tailscale, with the difference that you can create a Zerotier-local account rather than relying on cloud authentication. I was unable to find as much detail about Zerotier as I could about Tailscale - notably I couldn t find anything about how sticky an IP address is. However, the configuration screen lets me delete a node and assign additional arbitrary IPs within a subnet to other nodes, so I think the assumption here is that if your Zerotier account (or the Zerotier control plane) is compromised, an attacker could remove a legit device, add a malicious one, and assign the previous IP of the legit device to the malicious one. I m not sure how to mitigate against that risk, as firewalling specific IPs is ineffective if an attacker can simply take them over. Zerotier also lacks anything akin to Tailnet Lock.
For this reason, I didn t proceed much further in my Zerotier evaluation.
Zerotier: Connectivity and NAT traversal
Like Tailscale, Zerotier has NAT traversal with STUN. However, it looks like it s more limited than Tailscale s, and in particular is incompatible with double NAT that is often seen these days. Zerotier operates brokers ( root servers ) that can do relaying, including TCP relaying. So you should be able to connect even from hostile networks, but you are less likely to form a P2P connection than with Tailscale.
Zerotier: Sharing with friends
I was unable to find any special features relating to this in the Zerotier documentation. Therefore, it would be at the same level as Yggdrasil: possible, maybe even not too difficult, but without any specific help.
Zerotier: DNS
Unlike Tailscale, Zerotier does not support automatically adding DNS entries for your hosts. Therefore, your options are approximately the same as Yggdrasil, though with the added option of pushing configuration pointing to your own non-Zerotier DNS servers to the client.
Zerotier: Source code, pricing, and portability
The client ZeroTier One is available on Github under a custom business source license which prevents you from using it in certain settings. This license would preclude it being included in Debian. Their library, libzt, is available under the same license. The pricing page mentions a community edition for self hosting, but the documentation is sparse and it was difficult to understand what its feature set really is.
The free plan lets you have 1 user with up to 25 devices. Paid plans are also available.
Zerotier conclusions
Frankly I don t see much reason to use Zerotier. The virtual Ethernet model seems to be a weird hybrid that doesn t bring much value. I m concerned about the implications of a compromise of a user account or the control plane, and it lacks a lot of Tailscale features (MagicDNS and sharing). The only thing it may offer in particular is multipath WAN, but that s esoteric enough and also solvable at other layers that it doesn t seem all that compelling to me. Add to that the strange license and, to me anyhow, I don t see much reason to bother with it.
Netmaker
Netmaker is one of the projects that is making noise these days. Netmaker is the only one here that is a wrapper around in-kernel Wireguard, which can make a performance difference when talking to peers on a 1Gbps or faster link. Also, unlike other tools, it has an ingress gateway feature that lets people that don t have the Netmaker client, but do have Wireguard, participate in the VPN. I believe I also saw a reference somewhere to nodes as routers as with Yggdrasil, but I m failing to dig it up now.
The project is in a bit of an early state; you can sign up for an upcoming closed beta with a SaaS host, but really you are generally pointed to self-hosting using the code in the github repo. There are community and enterprise editions, but it s not clear how to actually choose. The server has a bunch of components: binary, CoreDNS, database, and web server. It also requires elevated privileges on the host, in addition to a container engine. Contrast that to the single binary that some others provide.
It looks like releases are frequent, but sometimes break things, and have a somewhat more laborious upgrade processes than most.
I don t want to spend a lot of time managing my mesh. So because of the heavy needs of the server, the upgrades being labor-intensive, it taking over iptables and such on the server, I didn t proceed with a more in-depth evaluation of Netmaker. It has a lot of promise, but for me, it doesn t seem to be in a state that will meet my needs yet.
Nebula
Nebula is an interesting mesh project that originated within Slack, seems to still be primarily sponsored by Slack, but is also being developed by Defined Networking (though their product looks early right now). Unlike the other tools in this section, Nebula doesn t have a web interface at all. Defined Networking looks likely to provide something of a SaaS service, but for now, you will need to run a broker ( lighthouse ) yourself; perhaps on a $5/mo VPS.
Due to the poor firewall traversal properties, I didn t do a full evaluation of Nebula, but it still has a very interesting design.
Nebula: Security and Privacy
Since Nebula lacks a traditional control plane, the root of trust in Nebula is a CA (certificate authority). The documentation gives this example of setting it up:
So the cert contains your IP, hostname, and group allocation. Each host in the mesh gets your CA certificate, and the per-host cert and key generated from each of these steps.
This leads to a really nice security model. Your CA is the gatekeeper to what is trusted in your mesh. You can even have it airgapped or something to make it exceptionally difficult to breach the perimeter.
Nebula contains an integrated firewall. Because the ability to keep out unwanted nodes is so strong, I would say this may be the one mesh VPN you might consider using without bothering with an additional on-host firewall.
You can define static mappings from a Nebula mesh IP to a clearnet IP. I haven t found information on this, but theoretically if NAT traversal isn t required, these static mappings may allow Nebula nodes to reach each other even if Internet is down. I don t know if this is truly the case, however.
Nebula: Connectivity and NAT traversal
This is a weak point of Nebula. Nebula sends all traffic over a single UDP port; there is no provision for using TCP. This is an issue at certain hotel and other public networks which open only TCP egress ports 80 and 443.
I couldn t find a lot of detail on what Nebula s NAT traversal is capable of, but according to a certain Github issue, this has been a sore spot for years and isn t as capable as Tailscale.
You can designate nodes in Nebula as brokers (relays). The concept is the same as Yggdrasil, but it s less versatile. You have to manually designate what relay to use. It s unclear to me what happens if different nodes designate different relays. Keep in mind that this always happens over a UDP port.
Nebula: Sharing with friends
There is no particular support here.
Nebula: DNS
Nebula has experimental DNS support. In contrast with Tailscale, which has an internal DNS server on every node, Nebula only runs a DNS server on a lighthouse. This means that it can t forward requests to a DNS server that s upstream for your laptop s particular current location. Actually, Nebula s DNS server doesn t forward at all. It also doesn t resolve its own name.
The Nebula documentation makes reference to using multiple lighthouses, which you may want to do for DNS redundancy or performance, but it s unclear to me if this would make each lighthouse form a complete picture of the network.
Nebula: Source code, pricing, and portability
Nebula is fully open source (MIT). It consists of a single Go binary and configuration. It is fairly portable.
Nebula conclusions
I am attracted to Nebula s unique security model. I would probably be more seriously considering it if not for the lack of support for TCP and poor general NAT traversal properties. Its datacenter connectivity heritage does show through.
Roll your own and hybrid
Here is a grab bag of ideas:
Running Yggdrasil over Tailscale
One possibility would be to use Tailscale for its superior NAT traversal, then allow Yggdrasil to run over it. (You will need a firewall to prevent Tailscale from trying to run over Yggdrasil at the same time!) This creates a closed network with all the benefits of Yggdrasil, yet getting the NAT traversal from Tailscale.
Drawbacks might be the overhead of the double encryption and double encapsulation. A good Yggdrasil peer may wind up being faster than this anyhow.
Public VPN provider for NAT traversal
A public VPN provider such as Mullvad will often offer incoming port forwarding and nodes in many cities. This could be an attractive way to solve a bunch of NAT traversal problems: just use one of those services to get you an incoming port, and run whatever you like over that.
Be aware that a number of public VPN clients have a kill switch to prevent any traffic from egressing without using the VPN; see, for instance, Mullvad s. You ll need to disable this if you are running a mesh atop it.
Other
Combining with local firewalls
For most of these tools, I recommend using a local firewal in conjunction with them. I have been using firehol and find it to be quite nice. This means you don t have to trust the mesh, the control plane, or whatever. The catch is that you do need your mesh VPN to provide strong association between IP address and node. Most, but not all, do.
Performance
I tested some of these for performance using iperf3 on a 2.5Gbps LAN. Here are the results. All speeds are in Mbps.
Tool
iperf3 (default)
iperf3 -P 10
iperf3 -R
Direct (no VPN)
2406
2406
2764
Wireguard (kernel)
1515
1566
2027
Yggdrasil
892
1126
1105
Tailscale
950
1034
1085
Tinc
296
300
277
You can see that Wireguard was significantly faster than the other options. Tailscale and Yggdrasil were roughly comparable, and Tinc was terrible.
IP collisions
When you are communicating over a network such as these, you need to trust that the IP address you are communicating with belongs to the system you think it does. This protects against two malicious actor scenarios:
Someone compromises one machine on your mesh and reconfigures it to impersonate a more important one
Someone connects an unauthorized system to the mesh, taking over a trusted IP, and uses the privileges of the trusted IP to access resources
To summarize the state of play as highlighted in the reviews above:
Yggdrasil derives IPv6 addresses from a public key
tinc allows any node to set any IP
Tailscale IPs aren t user-assignable, but the assignment algorithm is unknown
Zerotier allows any IP to be allocated to any node at the control plane
I don t know what Netmaker does
Nebula IPs are baked into the cert and signed by the CA, but I haven t verified the enforcement algorithm
So this discussion really only applies to Yggdrasil and Tailscale. tinc and Zerotier lack detailed IP security, while Nebula expects IP allocations to be handled outside of the tool and baked into the certs (therefore enforcing rigidity at that level).
So the question for Yggdrasil and Tailscale is: how easy is it to commandeer a trusted IP?
Yggdrasil has a brief discussion of this. In short, Yggdrasil offers you both a dedicated IP and a rarely-used /64 prefix which you can delegate to other machines on your LAN. Obviously by taking the dedicated IP, a lot more bits are available for the hash of the node s public key, making collisions technically impractical, if not outright impossible. However, if you use the /64 prefix, a collision may be more possible. Yggdrasil s hashing algorithm includes some optimizations to make this more difficult. Yggdrasil includes a genkeys tool that uses more CPU cycles to generate keys that are maximally difficult to collide with.
Tailscale doesn t document their IP assignment algorithm, but I think it is safe to say that the larger subnet you use, the better. If you try to use a /24 for your mesh, it is certainly conceivable that an attacker could remove your trusted node, then just manually add the 240 or so machines it would take to get that IP reassigned. It might be a good idea to use a purely IPv6 mesh with Tailscale to minimize this problem as well.
So, I think the risk is low in the default configurations of both Yggdrasil and Tailscale (certainly lower than with tinc or Zerotier). You can drive the risk even lower with both.
Final thoughts
For my own purposes, I suspect I will remain with Yggdrasil in some fashion. Maybe I will just take the small performance hit that using a relay node implies. Or perhaps I will get clever and use an incoming VPN port forward or go over Tailscale.
Tailscale was the other option that seemed most interesting. However, living in a region with Internet that goes down more often than I d like, I would like to just be able to send as much traffic over a mesh as possible, trusting that if the LAN is up, the mesh is up.
I have one thing that really benefits from performance in excess of Yggdrasil or Tailscale: NFS. That s between two machines that never leave my LAN, so I will probably just set up a direct Wireguard link between them. Heck of a lot easier than trying to do Kerberos!
Finally, I wrote this intending to be useful. I dealt with a lot of complexity and under-documentation, so it s possible I got something wrong somewhere. Please let me know if you find any errors.
This blog post is a copy of a page on my website. That page may be periodically updated.
Twenty years A seemingly big, very round number, at least for me.
I can recall several very well-known songs mentioning this
timespan:
It was twenty years ago today Sgt. Pepper taught the band to
play , sang four youth idols in 1967 for whom said timespan was
not-quite-but-almost their full lifes so far.
Si las cosas que uno quiere se pudieran alcanzar, t me quisieras
lo mismo que veinte a os atr s (if what one wants could be
achieved, you would love me the same as twenty years ago), says a
heartbroken song by Mar a Teresa Vera where she is resigned not to
recover the love of a former lover.
Volver con la frente marchita, las nieves del tiempo platearon mi
sien. Sentir que es un soplo la vida, que veinte a os no es nada,
que febril la mirada, errante en las sombras te busca y te nombra
(To return, with a withered forehead, the snows of time have
silvered my temples. To feel that life is but a wind blow, that
twenty years is like nothing, how feverish the look, wandering in
the shadows, it looks for you and names you) says one of the best
known tangos, written by Carlos Gardel, Fernando Maldonado and
Alfredo Le Pera, where the singer returns after 20 years, tired and
beaten, but still with some hope of finding his long-lost love.
A quick Internet search yields many more And yes, in human
terms 20 years is quite a big deal. And, of course, I have been
long waiting for the right time to write this post.
Because twenty years ago, I got the mail.
Of course, the mail notifying me I had successfully finished my NM
process and, as of April 2003, could consider myself to be a
full-fledged Debian Project member.
Maybe by sheer chance it was today also that we spent the evening at
Max s house I never worked directly with Max, but we both worked at
Universidad Pedag gica Nacional at the same time back then.
But Of course, a single twentyversary is not enough!
I don t have the exact date, but I guess I might be off by some two or
three months due to other things I remember from back then.
This year, I am forty years old as an Emacs and TeX user!
Back in 1983, on Friday nights, I went with my father to IIMAS (where
I m currently adscribed to as a PhD student, and where he was a
researcher between 1971 and the mid-1990s) and used the computer
one of the two big computers they had in the Institute. And what could
a seven-year-old boy do? Of course use the programs this great
Foonly F2 system had. Emacs and TeX (this is still before LaTeX).
40 years And I still use the same base tools for my daily work, day
in, day out.
I ve used hardware-backed OpenPGP keys since 2006 when I imported newly generated rsa1024 subkeys to a FSFE Fellowship card. This worked well for several years, and I recall buying more ZeitControl cards for multi-machine usage and backup purposes. As a side note, I recall being unsatisfied with the weak 1024-bit RSA subkeys at the time my primary key was a somewhat stronger 1280-bit RSA key created back in 2002 but OpenPGP cards at the time didn t support more than 1024 bit RSA, and were (and still often are) also limited to power-of-two RSA key sizes which I dislike.
I had my master key on disk with a strong password for a while, mostly to refresh expiration time of the subkeys and to sign other s OpenPGP keys. At some point I stopped carrying around encrypted copies of my master key. That was my main setup when I migrated to a new stronger RSA 3744 bit key with rsa2048 subkeys on a YubiKey NEO back in 2014. At that point, signing other s OpenPGP keys was a rare enough occurrence that I settled with bringing out my offline machine to perform this operation, transferring the public key to sign on USB sticks. In 2019 I re-evaluated my OpenPGP setup and ended up creating a offline Ed25519 key with subkeys on a FST-01G running Gnuk. My approach for signing other s OpenPGP keys were still to bring out my offline machine and sign things using the master secret using USB sticks for storage and transport. Which meant I almost never did that, because it took too much effort. So my 2019-era Ed25519 key still only has a handful of signatures on it, since I had essentially stopped signing other s keys which is the traditional way of getting signatures in return.
None of this caused any critical problem for me because I continued to use my old 2014-era RSA3744 key in parallel with my new 2019-era Ed25519 key, since too many systems didn t handle Ed25519. However, during 2022 this changed, and the only remaining environment that I still used my RSA3744 key for was in Debian and they require OpenPGP signatures on the new key to allow it to replace an older key. I was in denial about this sub-optimal solution during 2022 and endured its practical consequences, having to use the YubiKey NEO (which I had replaced with a permanently inserted YubiKey Nano at some point) for Debian-related purposes alone.
In December 2022 I bought a new laptop and setup a FST-01SZ with my Ed25519 key, and while I have taken a vacation from Debian, I continue to extend the expiration period on the old RSA3744-key in case I will ever have to use it again, so the overall OpenPGP setup was still sub-optimal. Having two valid OpenPGP keys at the same time causes people to use both for email encryption (leading me to have to use both devices), and the WKD Key Discovery protocol doesn t like two valid keys either. At FOSDEM 23 I ran into Andre Heinecke at GnuPG and I couldn t help complain about how complex and unsatisfying all OpenPGP-related matters were, and he mildly ignored my rant and asked why I didn t put the master key on another smartcard. The comment sunk in when I came home, and recently I connected all the dots and this post is a summary of what I did to move my offline OpenPGP master key to a Nitrokey Start.
First a word about device choice, I still prefer to use hardware devices that are as compatible with free software as possible, but the FST-01G or FST-01SZ are no longer easily available for purchase. I got a comment about Nitrokey start in my last post, and had two of them available to experiment with. There are things to dislike with the Nitrokey Start compared to the YubiKey (e.g., relative insecure chip architecture, the bulkier form factor and lack of FIDO/U2F/OATH support) but as far as I know there is no more widely available owner-controlled device that is manufactured for an intended purpose of implementing an OpenPGP card. Thus it hits the sweet spot for me.
Nitrokey Start
The first step is to run latest firmware on the Nitrokey Start for bug-fixes and important OpenSSH 9.0 compatibility and there are reproducible-built firmware published that you can install using pynitrokey. I run Trisquel 11 aramo on my laptop, which does not include the Python Pip package (likely because it promotes installing non-free software) so that was a slight complication. Building the firmware locally may have worked, and I would like to do that eventually to confirm the published firmware, however to save time I settled with installing the Ubuntu 22.04 packages on my machine:
$ sha256sum python3-pip*
ded6b3867a4a4cbaff0940cab366975d6aeecc76b9f2d2efa3deceb062668b1c  python3-pip_22.0.2+dfsg-1ubuntu0.2_all.deb
e1561575130c41dc3309023a345de337e84b4b04c21c74db57f599e267114325  python3-pip-whl_22.0.2+dfsg-1ubuntu0.2_all.deb
$ doas dpkg -i python3-pip*
...
$ doas apt install -f
...
$
Installing pynitrokey downloaded a bunch of dependencies, and it would be nice to audit the license and security vulnerabilities for each of them. (Verbose output below slightly redacted.)
jas@kaka:~$ pip3 install --user pynitrokey
Collecting pynitrokey
  Downloading pynitrokey-0.4.34-py3-none-any.whl (572 kB)
Collecting frozendict~=2.3.4
  Downloading frozendict-2.3.5-cp310-cp310-manylinux_2_17_x86_64.manylinux2014_x86_64.whl (113 kB)
Requirement already satisfied: click<9,>=8.0.0 in /usr/lib/python3/dist-packages (from pynitrokey) (8.0.3)
Collecting ecdsa
  Downloading ecdsa-0.18.0-py2.py3-none-any.whl (142 kB)
Collecting python-dateutil~=2.7.0
  Downloading python_dateutil-2.7.5-py2.py3-none-any.whl (225 kB)
Collecting fido2<2,>=1.1.0
  Downloading fido2-1.1.0-py3-none-any.whl (201 kB)
Collecting tlv8
  Downloading tlv8-0.10.0.tar.gz (16 kB)
  Preparing metadata (setup.py) ... done
Requirement already satisfied: certifi>=14.5.14 in /usr/lib/python3/dist-packages (from pynitrokey) (2020.6.20)
Requirement already satisfied: pyusb in /usr/lib/python3/dist-packages (from pynitrokey) (1.2.1.post1)
Collecting urllib3~=1.26.7
  Downloading urllib3-1.26.15-py2.py3-none-any.whl (140 kB)
Collecting spsdk<1.8.0,>=1.7.0
  Downloading spsdk-1.7.1-py3-none-any.whl (684 kB)
Collecting typing_extensions~=4.3.0
  Downloading typing_extensions-4.3.0-py3-none-any.whl (25 kB)
Requirement already satisfied: cryptography<37,>=3.4.4 in /usr/lib/python3/dist-packages (from pynitrokey) (3.4.8)
Collecting intelhex
  Downloading intelhex-2.3.0-py2.py3-none-any.whl (50 kB)
Collecting nkdfu
  Downloading nkdfu-0.2-py3-none-any.whl (16 kB)
Requirement already satisfied: requests in /usr/lib/python3/dist-packages (from pynitrokey) (2.25.1)
Collecting tqdm
  Downloading tqdm-4.65.0-py3-none-any.whl (77 kB)
Collecting nrfutil<7,>=6.1.4
  Downloading nrfutil-6.1.7.tar.gz (845 kB)
  Preparing metadata (setup.py) ... done
Requirement already satisfied: cffi in /usr/lib/python3/dist-packages (from pynitrokey) (1.15.0)
Collecting crcmod
  Downloading crcmod-1.7.tar.gz (89 kB)
  Preparing metadata (setup.py) ... done
Collecting libusb1==1.9.3
  Downloading libusb1-1.9.3-py3-none-any.whl (60 kB)
Collecting pc_ble_driver_py>=0.16.4
  Downloading pc_ble_driver_py-0.17.0-cp310-cp310-manylinux_2_17_x86_64.manylinux2014_x86_64.whl (2.9 MB)
Collecting piccata
  Downloading piccata-2.0.3-py3-none-any.whl (21 kB)
Collecting protobuf<4.0.0,>=3.17.3
  Downloading protobuf-3.20.3-cp310-cp310-manylinux_2_12_x86_64.manylinux2010_x86_64.whl (1.1 MB)
Collecting pyserial
  Downloading pyserial-3.5-py2.py3-none-any.whl (90 kB)
Collecting pyspinel>=1.0.0a3
  Downloading pyspinel-1.0.3.tar.gz (58 kB)
  Preparing metadata (setup.py) ... done
Requirement already satisfied: pyyaml in /usr/lib/python3/dist-packages (from nrfutil<7,>=6.1.4->pynitrokey) (5.4.1)
Requirement already satisfied: six>=1.5 in /usr/lib/python3/dist-packages (from python-dateutil~=2.7.0->pynitrokey) (1.16.0)
Collecting pylink-square<0.11.9,>=0.8.2
  Downloading pylink_square-0.11.1-py2.py3-none-any.whl (78 kB)
Collecting jinja2<3.1,>=2.11
  Downloading Jinja2-3.0.3-py3-none-any.whl (133 kB)
Collecting bincopy<17.11,>=17.10.2
  Downloading bincopy-17.10.3-py3-none-any.whl (17 kB)
Collecting fastjsonschema>=2.15.1
  Downloading fastjsonschema-2.16.3-py3-none-any.whl (23 kB)
Collecting astunparse<2,>=1.6
  Downloading astunparse-1.6.3-py2.py3-none-any.whl (12 kB)
Collecting oscrypto~=1.2
  Downloading oscrypto-1.3.0-py2.py3-none-any.whl (194 kB)
Collecting deepmerge==0.3.0
  Downloading deepmerge-0.3.0-py2.py3-none-any.whl (7.6 kB)
Collecting pyocd<=0.31.0,>=0.28.3
  Downloading pyocd-0.31.0-py3-none-any.whl (12.5 MB)
Collecting click-option-group<0.6,>=0.3.0
  Downloading click_option_group-0.5.5-py3-none-any.whl (12 kB)
Collecting pycryptodome<4,>=3.9.3
  Downloading pycryptodome-3.17-cp35-abi3-manylinux_2_17_x86_64.manylinux2014_x86_64.whl (2.1 MB)
Collecting pyocd-pemicro<1.2.0,>=1.1.1
  Downloading pyocd_pemicro-1.1.5-py3-none-any.whl (9.0 kB)
Requirement already satisfied: colorama<1,>=0.4.4 in /usr/lib/python3/dist-packages (from spsdk<1.8.0,>=1.7.0->pynitrokey) (0.4.4)
Collecting commentjson<1,>=0.9
  Downloading commentjson-0.9.0.tar.gz (8.7 kB)
  Preparing metadata (setup.py) ... done
Requirement already satisfied: asn1crypto<2,>=1.2 in /usr/lib/python3/dist-packages (from spsdk<1.8.0,>=1.7.0->pynitrokey) (1.4.0)
Collecting pypemicro<0.2.0,>=0.1.9
  Downloading pypemicro-0.1.11-py3-none-any.whl (5.7 MB)
Collecting libusbsio>=2.1.11
  Downloading libusbsio-2.1.11-py3-none-any.whl (247 kB)
Collecting sly==0.4
  Downloading sly-0.4.tar.gz (60 kB)
  Preparing metadata (setup.py) ... done
Collecting ruamel.yaml<0.18.0,>=0.17
  Downloading ruamel.yaml-0.17.21-py3-none-any.whl (109 kB)
Collecting cmsis-pack-manager<0.3.0
  Downloading cmsis_pack_manager-0.2.10-py2.py3-none-manylinux1_x86_64.whl (25.1 MB)
Collecting click-command-tree==1.1.0
  Downloading click_command_tree-1.1.0-py3-none-any.whl (3.6 kB)
Requirement already satisfied: bitstring<3.2,>=3.1 in /usr/lib/python3/dist-packages (from spsdk<1.8.0,>=1.7.0->pynitrokey) (3.1.7)
Collecting hexdump~=3.3
  Downloading hexdump-3.3.zip (12 kB)
  Preparing metadata (setup.py) ... done
Collecting fire
  Downloading fire-0.5.0.tar.gz (88 kB)
  Preparing metadata (setup.py) ... done
Requirement already satisfied: wheel<1.0,>=0.23.0 in /usr/lib/python3/dist-packages (from astunparse<2,>=1.6->spsdk<1.8.0,>=1.7.0->pynitrokey) (0.37.1)
Collecting humanfriendly
  Downloading humanfriendly-10.0-py2.py3-none-any.whl (86 kB)
Collecting argparse-addons>=0.4.0
  Downloading argparse_addons-0.12.0-py3-none-any.whl (3.3 kB)
Collecting pyelftools
  Downloading pyelftools-0.29-py2.py3-none-any.whl (174 kB)
Collecting milksnake>=0.1.2
  Downloading milksnake-0.1.5-py2.py3-none-any.whl (9.6 kB)
Requirement already satisfied: appdirs>=1.4 in /usr/lib/python3/dist-packages (from cmsis-pack-manager<0.3.0->spsdk<1.8.0,>=1.7.0->pynitrokey) (1.4.4)
Collecting lark-parser<0.8.0,>=0.7.1
  Downloading lark-parser-0.7.8.tar.gz (276 kB)
  Preparing metadata (setup.py) ... done
Requirement already satisfied: MarkupSafe>=2.0 in /usr/lib/python3/dist-packages (from jinja2<3.1,>=2.11->spsdk<1.8.0,>=1.7.0->pynitrokey) (2.0.1)
Collecting asn1crypto<2,>=1.2
  Downloading asn1crypto-1.5.1-py2.py3-none-any.whl (105 kB)
Collecting wrapt
  Downloading wrapt-1.15.0-cp310-cp310-manylinux_2_5_x86_64.manylinux1_x86_64.manylinux_2_17_x86_64.manylinux2014_x86_64.whl (78 kB)
Collecting future
  Downloading future-0.18.3.tar.gz (840 kB)
  Preparing metadata (setup.py) ... done
Collecting psutil>=5.2.2
  Downloading psutil-5.9.4-cp36-abi3-manylinux_2_12_x86_64.manylinux2010_x86_64.manylinux_2_17_x86_64.manylinux2014_x86_64.whl (280 kB)
Collecting capstone<5.0,>=4.0
  Downloading capstone-4.0.2-py2.py3-none-manylinux1_x86_64.whl (2.1 MB)
Collecting naturalsort<2.0,>=1.5
  Downloading naturalsort-1.5.1.tar.gz (7.4 kB)
  Preparing metadata (setup.py) ... done
Collecting prettytable<3.0,>=2.0
  Downloading prettytable-2.5.0-py3-none-any.whl (24 kB)
Collecting intervaltree<4.0,>=3.0.2
  Downloading intervaltree-3.1.0.tar.gz (32 kB)
  Preparing metadata (setup.py) ... done
Collecting ruamel.yaml.clib>=0.2.6
  Downloading ruamel.yaml.clib-0.2.7-cp310-cp310-manylinux_2_17_x86_64.manylinux2014_x86_64.manylinux_2_24_x86_64.whl (485 kB)
Collecting termcolor
  Downloading termcolor-2.2.0-py3-none-any.whl (6.6 kB)
Collecting sortedcontainers<3.0,>=2.0
  Downloading sortedcontainers-2.4.0-py2.py3-none-any.whl (29 kB)
Requirement already satisfied: wcwidth in /usr/lib/python3/dist-packages (from prettytable<3.0,>=2.0->pyocd<=0.31.0,>=0.28.3->spsdk<1.8.0,>=1.7.0->pynitrokey) (0.2.5)
Building wheels for collected packages: nrfutil, crcmod, sly, tlv8, commentjson, hexdump, pyspinel, fire, intervaltree, lark-parser, naturalsort, future
  Building wheel for nrfutil (setup.py) ... done
  Created wheel for nrfutil: filename=nrfutil-6.1.7-py3-none-any.whl size=898520 sha256=de6f8803f51d6c26d24dc7df6292064a468ff3f389d73370433fde5582b84a10
  Stored in directory: /home/jas/.cache/pip/wheels/39/2b/9b/98ab2dd716da746290e6728bdb557b14c1c9a54cb9ed86e13b
  Building wheel for crcmod (setup.py) ... done
  Created wheel for crcmod: filename=crcmod-1.7-cp310-cp310-linux_x86_64.whl size=31422 sha256=5149ac56fcbfa0606760eef5220fcedc66be560adf68cf38c604af3ad0e4a8b0
  Stored in directory: /home/jas/.cache/pip/wheels/85/4c/07/72215c529bd59d67e3dac29711d7aba1b692f543c808ba9e86
  Building wheel for sly (setup.py) ... done
  Created wheel for sly: filename=sly-0.4-py3-none-any.whl size=27352 sha256=f614e413918de45c73d1e9a8dca61ca07dc760d9740553400efc234c891f7fde
  Stored in directory: /home/jas/.cache/pip/wheels/a2/23/4a/6a84282a0d2c29f003012dc565b3126e427972e8b8157ea51f
  Building wheel for tlv8 (setup.py) ... done
  Created wheel for tlv8: filename=tlv8-0.10.0-py3-none-any.whl size=11266 sha256=3ec8b3c45977a3addbc66b7b99e1d81b146607c3a269502b9b5651900a0e2d08
  Stored in directory: /home/jas/.cache/pip/wheels/e9/35/86/66a473cc2abb0c7f21ed39c30a3b2219b16bd2cdb4b33cfc2c
  Building wheel for commentjson (setup.py) ... done
  Created wheel for commentjson: filename=commentjson-0.9.0-py3-none-any.whl size=12092 sha256=28b6413132d6d7798a18cf8c76885dc69f676ea763ffcb08775a3c2c43444f4a
  Stored in directory: /home/jas/.cache/pip/wheels/7d/90/23/6358a234ca5b4ec0866d447079b97fedf9883387d1d7d074e5
  Building wheel for hexdump (setup.py) ... done
  Created wheel for hexdump: filename=hexdump-3.3-py3-none-any.whl size=8913 sha256=79dfadd42edbc9acaeac1987464f2df4053784fff18b96408c1309b74fd09f50
  Stored in directory: /home/jas/.cache/pip/wheels/26/28/f7/f47d7ecd9ae44c4457e72c8bb617ef18ab332ee2b2a1047e87
  Building wheel for pyspinel (setup.py) ... done
  Created wheel for pyspinel: filename=pyspinel-1.0.3-py3-none-any.whl size=65033 sha256=01dc27f81f28b4830a0cf2336dc737ef309a1287fcf33f57a8a4c5bed3b5f0a6
  Stored in directory: /home/jas/.cache/pip/wheels/95/ec/4b/6e3e2ee18e7292d26a65659f75d07411a6e69158bb05507590
  Building wheel for fire (setup.py) ... done
  Created wheel for fire: filename=fire-0.5.0-py2.py3-none-any.whl size=116951 sha256=3d288585478c91a6914629eb739ea789828eb2d0267febc7c5390cb24ba153e8
  Stored in directory: /home/jas/.cache/pip/wheels/90/d4/f7/9404e5db0116bd4d43e5666eaa3e70ab53723e1e3ea40c9a95
  Building wheel for intervaltree (setup.py) ... done
  Created wheel for intervaltree: filename=intervaltree-3.1.0-py2.py3-none-any.whl size=26119 sha256=5ff1def22ba883af25c90d90ef7c6518496fcd47dd2cbc53a57ec04cd60dc21d
  Stored in directory: /home/jas/.cache/pip/wheels/fa/80/8c/43488a924a046b733b64de3fac99252674c892a4c3801c0a61
  Building wheel for lark-parser (setup.py) ... done
  Created wheel for lark-parser: filename=lark_parser-0.7.8-py2.py3-none-any.whl size=62527 sha256=3d2ec1d0f926fc2688d40777f7ef93c9986f874169132b1af590b6afc038f4be
  Stored in directory: /home/jas/.cache/pip/wheels/29/30/94/33e8b58318aa05cb1842b365843036e0280af5983abb966b83
  Building wheel for naturalsort (setup.py) ... done
  Created wheel for naturalsort: filename=naturalsort-1.5.1-py3-none-any.whl size=7526 sha256=bdecac4a49f2416924548cae6c124c85d5333e9e61c563232678ed182969d453
  Stored in directory: /home/jas/.cache/pip/wheels/a6/8e/c9/98cfa614fff2979b457fa2d9ad45ec85fa417e7e3e2e43be51
  Building wheel for future (setup.py) ... done
  Created wheel for future: filename=future-0.18.3-py3-none-any.whl size=492037 sha256=57a01e68feca2b5563f5f624141267f399082d2f05f55886f71b5d6e6cf2b02c
  Stored in directory: /home/jas/.cache/pip/wheels/5e/a9/47/f118e66afd12240e4662752cc22cefae5d97275623aa8ef57d
Successfully built nrfutil crcmod sly tlv8 commentjson hexdump pyspinel fire intervaltree lark-parser naturalsort future
Installing collected packages: tlv8, sortedcontainers, sly, pyserial, pyelftools, piccata, naturalsort, libusb1, lark-parser, intelhex, hexdump, fastjsonschema, crcmod, asn1crypto, wrapt, urllib3, typing_extensions, tqdm, termcolor, ruamel.yaml.clib, python-dateutil, pyspinel, pypemicro, pycryptodome, psutil, protobuf, prettytable, oscrypto, milksnake, libusbsio, jinja2, intervaltree, humanfriendly, future, frozendict, fido2, ecdsa, deepmerge, commentjson, click-option-group, click-command-tree, capstone, astunparse, argparse-addons, ruamel.yaml, pyocd-pemicro, pylink-square, pc_ble_driver_py, fire, cmsis-pack-manager, bincopy, pyocd, nrfutil, nkdfu, spsdk, pynitrokey
  WARNING: The script nitropy is installed in '/home/jas/.local/bin' which is not on PATH.
  Consider adding this directory to PATH or, if you prefer to suppress this warning, use --no-warn-script-location.
Successfully installed argparse-addons-0.12.0 asn1crypto-1.5.1 astunparse-1.6.3 bincopy-17.10.3 capstone-4.0.2 click-command-tree-1.1.0 click-option-group-0.5.5 cmsis-pack-manager-0.2.10 commentjson-0.9.0 crcmod-1.7 deepmerge-0.3.0 ecdsa-0.18.0 fastjsonschema-2.16.3 fido2-1.1.0 fire-0.5.0 frozendict-2.3.5 future-0.18.3 hexdump-3.3 humanfriendly-10.0 intelhex-2.3.0 intervaltree-3.1.0 jinja2-3.0.3 lark-parser-0.7.8 libusb1-1.9.3 libusbsio-2.1.11 milksnake-0.1.5 naturalsort-1.5.1 nkdfu-0.2 nrfutil-6.1.7 oscrypto-1.3.0 pc_ble_driver_py-0.17.0 piccata-2.0.3 prettytable-2.5.0 protobuf-3.20.3 psutil-5.9.4 pycryptodome-3.17 pyelftools-0.29 pylink-square-0.11.1 pynitrokey-0.4.34 pyocd-0.31.0 pyocd-pemicro-1.1.5 pypemicro-0.1.11 pyserial-3.5 pyspinel-1.0.3 python-dateutil-2.7.5 ruamel.yaml-0.17.21 ruamel.yaml.clib-0.2.7 sly-0.4 sortedcontainers-2.4.0 spsdk-1.7.1 termcolor-2.2.0 tlv8-0.10.0 tqdm-4.65.0 typing_extensions-4.3.0 urllib3-1.26.15 wrapt-1.15.0
jas@kaka:~$
Then upgrading the device worked remarkable well, although I wish that the tool would have printed URLs and checksums for the firmware files to allow easy confirmation.
jas@kaka:~$ PATH=$PATH:/home/jas/.local/bin
jas@kaka:~$ nitropy start list
Command line tool to interact with Nitrokey devices 0.4.34
:: 'Nitrokey Start' keys:
FSIJ-1.2.15-5D271572: Nitrokey Nitrokey Start (RTM.12.1-RC2-modified)
jas@kaka:~$ nitropy start update
Command line tool to interact with Nitrokey devices 0.4.34
Nitrokey Start firmware update tool
Platform: Linux-5.15.0-67-generic-x86_64-with-glibc2.35
System: Linux, is_linux: True
Python: 3.10.6
Saving run log to: /tmp/nitropy.log.gc5753a8
Admin PIN:
Firmware data to be used:
- FirmwareType.REGNUAL: 4408, hash: ...b'72a30389' valid (from ...built/RTM.13/regnual.bin)
- FirmwareType.GNUK: 129024, hash: ...b'25a4289b' valid (from ...prebuilt/RTM.13/gnuk.bin)
Currently connected device strings:
Device:
    Vendor: Nitrokey
   Product: Nitrokey Start
    Serial: FSIJ-1.2.15-5D271572
  Revision: RTM.12.1-RC2-modified
    Config: *:*:8e82
       Sys: 3.0
     Board: NITROKEY-START-G
initial device strings: [ 'name': '', 'Vendor': 'Nitrokey', 'Product': 'Nitrokey Start', 'Serial': 'FSIJ-1.2.15-5D271572', 'Revision': 'RTM.12.1-RC2-modified', 'Config': '*:*:8e82', 'Sys': '3.0', 'Board': 'NITROKEY-START-G' ]
Please note:
- Latest firmware available is:
  RTM.13 (published: 2022-12-08T10:59:11Z)
- provided firmware: None
- all data will be removed from the device!
- do not interrupt update process - the device may not run properly!
- the process should not take more than 1 minute
Do you want to continue? [yes/no]: yes
...
Starting bootloader upload procedure
Device: Nitrokey Start FSIJ-1.2.15-5D271572
Connected to the device
Running update!
Do NOT remove the device from the USB slot, until further notice
Downloading flash upgrade program...
Executing flash upgrade...
Waiting for device to appear:
  Wait 20 seconds.....
Downloading the program
Protecting device
Finish flashing
Resetting device
Update procedure finished. Device could be removed from USB slot.
Currently connected device strings (after upgrade):
Device:
    Vendor: Nitrokey
   Product: Nitrokey Start
    Serial: FSIJ-1.2.19-5D271572
  Revision: RTM.13
    Config: *:*:8e82
       Sys: 3.0
     Board: NITROKEY-START-G
device can now be safely removed from the USB slot
final device strings: [ 'name': '', 'Vendor': 'Nitrokey', 'Product': 'Nitrokey Start', 'Serial': 'FSIJ-1.2.19-5D271572', 'Revision': 'RTM.13', 'Config': '*:*:8e82', 'Sys': '3.0', 'Board': 'NITROKEY-START-G' ]
finishing session 2023-03-16 21:49:07.371291
Log saved to: /tmp/nitropy.log.gc5753a8
jas@kaka:~$
jas@kaka:~$ nitropy start list
Command line tool to interact with Nitrokey devices 0.4.34
:: 'Nitrokey Start' keys:
FSIJ-1.2.19-5D271572: Nitrokey Nitrokey Start (RTM.13)
jas@kaka:~$
Before importing the master key to this device, it should be configured. Note the commands in the beginning to make sure scdaemon/pcscd is not running because they may have cached state from earlier cards. Change PIN code as you like after this, my experience with Gnuk was that the Admin PIN had to be changed first, then you import the key, and then you change the PIN.
jas@kaka:~$ gpg-connect-agent "SCD KILLSCD" "SCD BYE" /bye
OK
ERR 67125247 Slut p  fil <GPG Agent>
jas@kaka:~$ ps auxww grep -e pcsc -e scd
jas        11651  0.0  0.0   3468  1672 pts/0    R+   21:54   0:00 grep --color=auto -e pcsc -e scd
jas@kaka:~$ gpg --card-edit
Reader ...........: 20A0:4211:FSIJ-1.2.19-5D271572:0
Application ID ...: D276000124010200FFFE5D2715720000
Application type .: OpenPGP
Version ..........: 2.0
Manufacturer .....: unmanaged S/N range
Serial number ....: 5D271572
Name of cardholder: [not set]
Language prefs ...: [not set]
Salutation .......:
URL of public key : [not set]
Login data .......: [not set]
Signature PIN ....: forced
Key attributes ...: rsa2048 rsa2048 rsa2048
Max. PIN lengths .: 127 127 127
PIN retry counter : 3 3 3
Signature counter : 0
KDF setting ......: off
Signature key ....: [none]
Encryption key....: [none]
Authentication key: [none]
General key info..: [none]
gpg/card> admin
Admin commands are allowed
gpg/card> kdf-setup
gpg/card> passwd
gpg: OpenPGP card no. D276000124010200FFFE5D2715720000 detected
1 - change PIN
2 - unblock PIN
3 - change Admin PIN
4 - set the Reset Code
Q - quit
Your selection? 3
PIN changed.
1 - change PIN
2 - unblock PIN
3 - change Admin PIN
4 - set the Reset Code
Q - quit
Your selection? q
gpg/card> name
Cardholder's surname: Josefsson
Cardholder's given name: Simon
gpg/card> lang
Language preferences: sv
gpg/card> sex
Salutation (M = Mr., F = Ms., or space): m
gpg/card> login
Login data (account name): jas
gpg/card> url
URL to retrieve public key: https://josefsson.org/key-20190320.txt
gpg/card> forcesig
gpg/card> key-attr
Changing card key attribute for: Signature key
Please select what kind of key you want:
   (1) RSA
   (2) ECC
Your selection? 2
Please select which elliptic curve you want:
   (1) Curve 25519
   (4) NIST P-384
Your selection? 1
The card will now be re-configured to generate a key of type: ed25519
Note: There is no guarantee that the card supports the requested size.
      If the key generation does not succeed, please check the
      documentation of your card to see what sizes are allowed.
Changing card key attribute for: Encryption key
Please select what kind of key you want:
   (1) RSA
   (2) ECC
Your selection? 2
Please select which elliptic curve you want:
   (1) Curve 25519
   (4) NIST P-384
Your selection? 1
The card will now be re-configured to generate a key of type: cv25519
Changing card key attribute for: Authentication key
Please select what kind of key you want:
   (1) RSA
   (2) ECC
Your selection? 2
Please select which elliptic curve you want:
   (1) Curve 25519
   (4) NIST P-384
Your selection? 1
The card will now be re-configured to generate a key of type: ed25519
gpg/card>
jas@kaka:~$ gpg --card-edit
Reader ...........: 20A0:4211:FSIJ-1.2.19-5D271572:0
Application ID ...: D276000124010200FFFE5D2715720000
Application type .: OpenPGP
Version ..........: 2.0
Manufacturer .....: unmanaged S/N range
Serial number ....: 5D271572
Name of cardholder: Simon Josefsson
Language prefs ...: sv
Salutation .......: Mr.
URL of public key : https://josefsson.org/key-20190320.txt
Login data .......: jas
Signature PIN ....: not forced
Key attributes ...: ed25519 cv25519 ed25519
Max. PIN lengths .: 127 127 127
PIN retry counter : 3 3 3
Signature counter : 0
KDF setting ......: on
Signature key ....: [none]
Encryption key....: [none]
Authentication key: [none]
General key info..: [none]
jas@kaka:~$
Once setup, bring out your offline machine and boot it and mount your USB stick with the offline key. The paths below will be different, and this is using a somewhat unorthodox approach of working with fresh GnuPG configuration paths that I chose for the USB stick.
jas@kaka:/media/jas/2c699cbd-b77e-4434-a0d6-0c4965864296$ cp -a gnupghome-backup-masterkey gnupghome-import-nitrokey-5D271572
jas@kaka:/media/jas/2c699cbd-b77e-4434-a0d6-0c4965864296$ gpg --homedir $PWD/gnupghome-import-nitrokey-5D271572 --edit-key B1D2BD1375BECB784CF4F8C4D73CF638C53C06BE
gpg (GnuPG) 2.2.27; Copyright (C) 2021 Free Software Foundation, Inc.
This is free software: you are free to change and redistribute it.
There is NO WARRANTY, to the extent permitted by law.
Secret key is available.
sec  ed25519/D73CF638C53C06BE
     created: 2019-03-20  expired: 2019-10-22  usage: SC
     trust: ultimate      validity: expired
[ expired] (1). Simon Josefsson <simon@josefsson.org>
gpg> keytocard
Really move the primary key? (y/N) y
Please select where to store the key:
   (1) Signature key
   (3) Authentication key
Your selection? 1
sec  ed25519/D73CF638C53C06BE
     created: 2019-03-20  expired: 2019-10-22  usage: SC
     trust: ultimate      validity: expired
[ expired] (1). Simon Josefsson <simon@josefsson.org>
gpg>
Save changes? (y/N) y
jas@kaka:/media/jas/2c699cbd-b77e-4434-a0d6-0c4965864296$
At this point it is useful to confirm that the Nitrokey has the master key available and that is possible to sign statements with it, back on your regular machine:
jas@kaka:~$ gpg --card-status
Reader ...........: 20A0:4211:FSIJ-1.2.19-5D271572:0
Application ID ...: D276000124010200FFFE5D2715720000
Application type .: OpenPGP
Version ..........: 2.0
Manufacturer .....: unmanaged S/N range
Serial number ....: 5D271572
Name of cardholder: Simon Josefsson
Language prefs ...: sv
Salutation .......: Mr.
URL of public key : https://josefsson.org/key-20190320.txt
Login data .......: jas
Signature PIN ....: not forced
Key attributes ...: ed25519 cv25519 ed25519
Max. PIN lengths .: 127 127 127
PIN retry counter : 3 3 3
Signature counter : 1
KDF setting ......: on
Signature key ....: B1D2 BD13 75BE CB78 4CF4  F8C4 D73C F638 C53C 06BE
      created ....: 2019-03-20 23:37:24
Encryption key....: [none]
Authentication key: [none]
General key info..: pub  ed25519/D73CF638C53C06BE 2019-03-20 Simon Josefsson <simon@josefsson.org>
sec>  ed25519/D73CF638C53C06BE  created: 2019-03-20  expires: 2023-09-19
                                card-no: FFFE 5D271572
ssb>  ed25519/80260EE8A9B92B2B  created: 2019-03-20  expires: 2023-09-19
                                card-no: FFFE 42315277
ssb>  ed25519/51722B08FE4745A2  created: 2019-03-20  expires: 2023-09-19
                                card-no: FFFE 42315277
ssb>  cv25519/02923D7EE76EBD60  created: 2019-03-20  expires: 2023-09-19
                                card-no: FFFE 42315277
jas@kaka:~$ echo foo gpg -a --sign gpg --verify
gpg: Signature made Thu Mar 16 22:11:02 2023 CET
gpg:                using EDDSA key B1D2BD1375BECB784CF4F8C4D73CF638C53C06BE
gpg: Good signature from "Simon Josefsson <simon@josefsson.org>" [ultimate]
jas@kaka:~$
Finally to retrieve and sign a key, for example Andre Heinecke s that I could confirm the OpenPGP key identifier from his business card.
jas@kaka:~$ gpg --locate-external-keys aheinecke@gnupg.com
gpg: key 1FDF723CF462B6B1: public key "Andre Heinecke <aheinecke@gnupg.com>" imported
gpg: Total number processed: 1
gpg:               imported: 1
gpg: marginals needed: 3  completes needed: 1  trust model: pgp
gpg: depth: 0  valid:   2  signed:   7  trust: 0-, 0q, 0n, 0m, 0f, 2u
gpg: depth: 1  valid:   7  signed:  64  trust: 7-, 0q, 0n, 0m, 0f, 0u
gpg: next trustdb check due at 2023-05-26
pub   rsa3072 2015-12-08 [SC] [expires: 2025-12-05]
      94A5C9A03C2FE5CA3B095D8E1FDF723CF462B6B1
uid           [ unknown] Andre Heinecke <aheinecke@gnupg.com>
sub   ed25519 2017-02-13 [S]
sub   ed25519 2017-02-13 [A]
sub   rsa3072 2015-12-08 [E] [expires: 2025-12-05]
sub   rsa3072 2015-12-08 [A] [expires: 2025-12-05]
jas@kaka:~$ gpg --edit-key "94A5C9A03C2FE5CA3B095D8E1FDF723CF462B6B1"
gpg (GnuPG) 2.2.27; Copyright (C) 2021 Free Software Foundation, Inc.
This is free software: you are free to change and redistribute it.
There is NO WARRANTY, to the extent permitted by law.
pub  rsa3072/1FDF723CF462B6B1
     created: 2015-12-08  expires: 2025-12-05  usage: SC
     trust: unknown       validity: unknown
sub  ed25519/2978E9D40CBABA5C
     created: 2017-02-13  expires: never       usage: S
sub  ed25519/DC74D901C8E2DD47
     created: 2017-02-13  expires: never       usage: A
The following key was revoked on 2017-02-23 by RSA key 1FDF723CF462B6B1 Andre Heinecke <aheinecke@gnupg.com>
sub  cv25519/1FFE3151683260AB
     created: 2017-02-13  revoked: 2017-02-23  usage: E
sub  rsa3072/8CC999BDAA45C71F
     created: 2015-12-08  expires: 2025-12-05  usage: E
sub  rsa3072/6304A4B539CE444A
     created: 2015-12-08  expires: 2025-12-05  usage: A
[ unknown] (1). Andre Heinecke <aheinecke@gnupg.com>
gpg> sign
pub  rsa3072/1FDF723CF462B6B1
     created: 2015-12-08  expires: 2025-12-05  usage: SC
     trust: unknown       validity: unknown
 Primary key fingerprint: 94A5 C9A0 3C2F E5CA 3B09  5D8E 1FDF 723C F462 B6B1
     Andre Heinecke <aheinecke@gnupg.com>
This key is due to expire on 2025-12-05.
Are you sure that you want to sign this key with your
key "Simon Josefsson <simon@josefsson.org>" (D73CF638C53C06BE)
Really sign? (y/N) y
gpg> quit
Save changes? (y/N) y
jas@kaka:~$
This is on my day-to-day machine, using the NitroKey Start with the offline key. No need to boot the old offline machine just to sign keys or extend expiry anymore! At FOSDEM 23 I managed to get at least one DD signature on my new key, and the Debian keyring maintainers accepted my Ed25519 key. Hopefully I can now finally let my 2014-era RSA3744 key expire in 2023-09-19 and not extend it any further. This should finish my transition to a simpler OpenPGP key setup, yay!
The nineteenth release of littler as a
CRAN package
landed this morning, following in the now seventeen year history (!!) as
a package started by Jeff in 2006, and joined
by me a few weeks later.
littler
is the first command-line interface for R as it predates
Rscript. It allows for piping as well for shebang
scripting via #!, uses command-line arguments more
consistently and still starts
faster. It also always loaded the methods package which
Rscript only began to do in recent years.
littler
lives on Linux and Unix, has its difficulties on macOS due to
yet-another-braindeadedness there (who ever thought case-insensitive
filesystems as a default were a good idea?) and simply does not exist on
Windows (yet the build system could be extended see RInside for
an existence proof, and volunteers are welcome!). See the FAQ
vignette on how to add it to your PATH. A few examples
are highlighted at the Github repo, as well
as in the examples
vignette.
This release is somewhat unique is not having any maintenance of the
small core but rather focussing exclusively on changes to the (many !!)
scripts collected in examples/scripts/.
We added new ones and extended several existing ones including
install2.r thanks to patches by @eitsupi. Of the new scripts, I already
use tttl.r quite a bit for tests on co-maintained packages
that use testthat (but as I have made known before my heart
belongs firmly to tinytest as nobody should need thirty-plus
recursive dependencies to run a few test predicates) as well as the
very new installRub.r to directly add r-universe Ubuntu binaries
onto an r2u systems as
demonstrated in a first
and second
tweet (and corresponding toot) this week.
The full change description follows.
Changes in littler
version 0.3.18 (2023-03-25)
Changes in examples scripts
roxy.r can now set an additional
--libpath
getRStudioDesktop.r and
getRStudioServer.r have updated default download
file
install2.r and installGithub.r can set
--type
r2u.r now has a --suffix
option
tt.r removes a redundant library
call
tttl.r has been added for
testthat::test_local()
installRub.r has been added to install r-universe
binaries on Ubuntu
install2.r has updated error capture messages
(Tatsuya Shima and Dirk in #104)
My CRANberries
service provides a comparison to the
previous release. Full details for the littler
release are provided as usual at the ChangeLog
page, and also on the package docs website.
The code is available via the GitHub repo, from
tarballs and now of course also from its CRAN
page and via install.packages("littler"). Binary
packages are available directly in Debian (currently in experimental
due to a release freeze) as well as (in a day or two) Ubuntu binaries at
CRAN thanks to the tireless Michael Rutter and of course via r2u following its next
refresh.
Comments and suggestions are welcome at the GitHub repo.
If you like this or other open-source work I do, you can now sponsor me at
GitHub.
Review: The Kaiju Preservation Society, by John Scalzi
Publisher:
Tor
Copyright:
2022
ISBN:
0-7653-8913-4
Format:
Kindle
Pages:
264
As this novel opens, Jamie Gray, our first-person narrator, is working for
the business side of a startup food delivery service named f dm d. He's
up for his six month performance review and has some great ideas for how
to improve the company's market standing going into pandemic lockdown.
His boss has other ideas: Jamie at the bottom of the corporate ladder,
delivering food door-to-door.
Tom is working for a semi-secret organization with a last-minute,
COVID-induced worker shortage. He needs someone who can lift things.
Jamie used to go to some of the same parties, can lift things, and is
conveniently available. And that's how Jamie ends up joining the Kaiju
Preservation Society, because it turns out the things that need lifting
are in a different dimension.
This book was so bad. I think this may be the worst-written novel at a
technical level that I have read since I started writing book reviews.
It's become trendy in some circles to hate Scalzi, so I want to be clear
that I normally get along fine with his writing. Scalzi is an unabashedly
commercial writer of light, occasionally humorous popcorn SF. It's not
great literature, and he's unlikely to write a new favorite novel, but his
books are easy to read and reliably deliver a few hours of comfortable
entertainment. The key word is "reliably"; Scalzi doesn't have a lot of
dynamic range, but you know what you're getting and can decide to read him
when that matches your mood.
When I give a book a bad review, it's usually because I found the ideas
deeply unpleasant (genocidal theology, for
instance, or creepy voyeuristic sexism). That's
not the problem here. The ideas are fine: a variation on the
Jurassic Park setup but with
kaiju and less commercialism,
an everyman narrator to look at everything for the reader, a few assholes
thrown in to provide some conflict sure, sign me up, sounds like the
kind of light entertainment I expect from a Scalzi novel. The excuse for
interdimensional portals was clever (and consistent with kaiju story
themes), and the biological handwaving created a lot of good story hooks.
The material for a fun novel is all present.
The problem, instead, is that this book was not finished. It's the bare
skeleton of a story with almost-nonexistent characters and plot, stuck in
a novel-shaped box and filled in with repetitive banter and dad jokes of
the approximate consistency of styrofoam packing material.
When I complain about the characterization, I fear people who haven't read
the book won't understand what I mean. He's always had dialogue quirks
that tend to show up in all of his characters and make them sound similar.
I noticed this in other books, but it wasn't a
big deal.
The characterization problems in this book are a big deal.
I can identify four characters, total, from the entire novel: the
first-person protagonist, the villain, the pilot, and the woman who does
the forest floor safety training. None of those characters are memorable
or interesting, but at least they're somewhat distinct. Apart from them,
you could write a computer program that randomly selected character names
for each dialogue line and I wouldn't be able to tell the
difference. I have never given up on character identity and started
ignoring all the dialogue tags in a book before. Everyone says the same
thing, makes the same jokes, has the same emotional reactions, and has the
same total lack of interiority or distinguishing characteristics. The
only way I can imagine telling the characters apart is if you memorized
the association between names and professions, and I have no idea why
you'd bother.
The descriptions are, if anything, worse. Scalzi is not a heavily
descriptive author, but usually he gives me something to hang my
imagination on. You would think that if you were writing a book about
kaiju one where kaiju are quite actively involved in the story,
fighting, roaring, menacing, being central to the plot you would
describe a kaiju at some point during the novel. They're visually
impressive giant monsters! This is an inherently visual story genre! And
at no point in this entire novel does Scalzi ever describe a kaiju in any
detail. Not once! The most we get is that one has tentacles and a sort
of eye spot. And sometimes there are wings. There are absolutely no
overall impressions, comparisons, attempts to sketch what the characters
are seeing, nothing.
Or, for another example, consider the base, the place where the characters
live for most of the story and where much of the dialogue happens. Here
is the sum total of all sensory information I can recall about the
characters' home: it has stairs, and there's a plant in Jamie's room.
(The person who left the plant, who never appears on screen, gets more
characterization in two pages than anyone else gets in the whole novel.)
What does the base look like from the outside? The inside? How many
stories does it have? What are the common spaces like? What does it
smell like? Does it feel institutional, or welcoming, or dirty, or
sparkling? How long does it take to get from one end of it to the other?
Does it make weird noises at night? I have no impressions of this place
whatsoever. Maybe a few of these things were mentioned in passing and I
missed them, but that's because the narrator of this book never describes
his surroundings in detail, stops to look at something eye-catching,
thinks about how he feels about a place, or otherwise gives the reader any
meaningful emotional engagement with the spaces around him.
And it's not like this story was instead stuffed with action. There is
barely a novelette's worth of plot and most of that is predictable: the
setup, the initial confrontation, the discovery of the evil plan, the
final confrontation. For most of the book, nothing of any consequence
happens. It's just endless pages of vaguely bantering dialogue between
totally indistinguishable characters while Jamie repeats "I lift things."
(That was funny the first couple of times; by the fifth time, the funny
wore off.) The climax, when it finally happens, is mostly monologuing and
half-hearted repartee that is cringeworthy and vaguely embarrassing for
everyone involved.
I don't really blame Scalzi for this book. I wish he had realized that it
was half-baked at best and needed some major revisions, but the author's
note at the end makes it clear that the process of bringing this book into
the world was a train wreck. It was written in two months, in a rush,
after Scalzi had already missed a deadline for a different book that
failed to come together. Life happens, and in 2020 and early 2021 a whole
lot of life was happening. The tone of the author's note is vaguely
apologetic; I think Scalzi realizes at some level that this is not his
best work.
The person I do blame is Patrick Nielsen Hayden, Scalzi's editor,
who is a multiple-Hugo-award-winning book editor and the managing editor
of science fiction at Tor and absolutely should have known better. It was
his responsibility to look at this book and say "this is not ready yet";
this is part of the function of the traditional publishing apparatus.
This could have been a good book. The ideas and the hook were there; it
just needed some actual substance in the middle and a whole lot of
character work. Instead, he was the one who made the decision to publish
the book in this state.
But, well, the joke's on me, because The Kaiju Preservation Society
sold a ton of copies, got nominated for several awards, won an
Alex Award, and made
Amazon's best of 2022 list, so I guess this was a brilliant publishing
decision and the book was everything it needed to be? Maybe I'm just bad
at reading and have no sense of humor? I have no explanation; I am truly
and completely baffled.
There are books that I don't like but that have obvious merits for people
who are not me. There are styles of writing that I don't like and other
people do. But I would have sworn this book was objectively unfinished
and half-assed at a craft and construction level, in ways that don't
depend as much on personal taste. I recommend quietly forgetting it was
ever published and waiting for a better Scalzi novel, but it has a 4.04
star rating on Goodreads with nearly 32,000 reviews, so what do I know.
Anyway, I was warned that I wasn't going to like this book and I read it
anyway for silly reasons because I figured it was a Scalzi novel and how
bad could it be, really. I brought this on myself, and I at least got the
fun of ranting about it. Apparently this book found its people and they
got a lot of joy out of it, and good for them.
Rating: 2 out of 10
US-11604662-B2I m happy to announce, that after a long wait, patent US-11604662-B2 has been issued.I want to thank and recognize my co-inventors, Div Prakash and Subin George, who I m privileged to be on paper with.The effort that led to this work involved a group of engineers, many phone calls, some nerve-wracking presentations, culminating in a fantastic hackathon-winning outcome for a young and talented team, which I was proud to be a part of and privileged to lead.
The Framework is a 13.5" laptop body with swappable parts, which
makes it somewhat future-proof and certainly easily repairable,
scoring an "exceedingly rare" 10/10 score from ifixit.com.
There are two generations of the laptop's main board (both compatible
with the same body): the Intel 11th and 12th gen chipsets.
I have received my Framework, 12th generation "DIY", device in late
September 2022 and will update this page as I go along in the process
of ordering, burning-in, setting up and using the device over the
years.
Overall, the Framework is a good laptop. I like the keyboard, the
touch pad, the expansion cards. Clearly there's been some good work
done on industrial design, and it's the most repairable laptop I've
had in years. Time will tell, but it looks sturdy enough to survive me
many years as well.
This is also one of the most powerful devices I ever lay my hands
on. I have managed, remotely, more powerful servers, but this is the
fastest computer I have ever owned, and it fits in this tiny case. It
is an amazing machine.
On the downside, there's a bit of proprietary firmware required (WiFi,
Bluetooth, some graphics) and the Framework ships with a proprietary
BIOS, with currently no Coreboot support. Expect to need the
latest kernel, firmware, and hacking around a bunch of things to get
resolution and keybindings working right.
Like others, I have first found significant power management issues,
but many issues can actually be solved with some configuration. Some
of the expansion ports (HDMI, DP, MicroSD, and SSD) use power when
idle, so don't expect week-long suspend, or "full day" battery while
those are plugged in.
Finally, the expansion ports are nice, but there's only four of
them. If you plan to have a two-monitor setup, you're likely going to
need a dock.
Read on for the detailed review. For context, I'm moving from the
Purism Librem 13v4 because it
basically exploded on me. I
had, in the meantime, reverted back to an old ThinkPad X220, so I
sometimes compare the Framework with that venerable laptop as well.
This blog post has been maturing for months now. It started in
September 2022 and I declared it completed in March 2023. It's the
longest single article on this entire website, currently clocking at
about 13,000 words. It will take an average reader a full hour to go
through this thing, so I don't expect anyone to actually do
that. This introduction should be good enough for most people, read
the first section if you intend to actually buy a Framework. Jump
around the table of contents as you see fit for after you did buy the
laptop, as it might include some crucial hints on how to make it work
best for you, especially on (Debian) Linux.
Advice for buyers
Those are things I wish I would have known before buying:
consider buying 4 USB-C expansion cards, or at least a mix of 4
USB-A or USB-C cards, as they use less power than other cards and
you do want to fill those expansion slots otherwise they snag
around and feel insecure
you will likely need a dock or at least a USB hub if you want a
two-monitor setup, otherwise you'll run out of ports
you have to do some serious tuning to get proper (10h+ idle, 10
days suspend) power savings
in particular, beware that the HDMI, DisplayPort and
particularly the SSD and MicroSD cards take a significant amount
power, even when sleeping, up to 2-6W for the latter two
beware that the MicroSD card is what it says: Micro, normal SD
cards won't fit, and while there might be full sized one
eventually, it's currently only at the prototyping stage
Current status
I have the framework! It's setup with a fresh new Debian bookworm
installation. I've ran through a large number of tests and burn in.
I have decided to use the Framework as my daily driver, and had to buy
a USB-C dock to get my two monitors
connected, which was own adventure.
Update: Framework just (2023-03-23) just announced a whole bunch of
new stuff:
The recording is available in this video and it's not your
typical keynote. It starts ~25 minutes late, audio is crap, lightning
and camera are crap, clapping seems to be from whatever staff they
managed to get together in a room, decor is bizarre, colors are
shit. It's amazing.
Specifications
Those are the specifications of the 12th gen, in general terms. Your
build will of course vary according to your needs.
CPU: i5-1240P, i7-1260P, or i7-1280P (Up to 4.4-4.8 GHz, 4+8
cores), Iris Xe graphics
4 x USB-C user-selectable expansion ports, including
USB-C
USB-A
HDMI
DP
Ethernet
MicroSD
250-1000GB SSD
3.5mm combo headphone jack
Kill switches for microphone and camera
Battery: 55Wh
Camera: 1080p 60fps
Biometrics: Fingerprint Reader
Backlit keyboard
Power Adapter: 60W USB-C (or bring your own)
ships with a screwdriver/spludger
1 year warranty
base price: 1000$CAD, but doesn't give you much, typical builds
around 1500-2000$CAD
Actual build
This is the actual build I ordered. Amounts in CAD. (1CAD =
~0.75EUR/USD.)
Base configuration
CPU: Intel Core i5-1240P (AKA Alder Lake P 8 4.4GHz
P-threads, 8 3.2GHz E-threads, 16 total, 28-64W), 1079$
Memory: 16GB (1 x 16GB) DDR4-3200, 104$
Customization
Keyboard: US English, included
Expansion Cards
2 USB-C $24
3 USB-A $36
2 HDMI $50
1 DP $50
1 MicroSD $25
1 Storage 1TB $199
Sub-total: 384$
Accessories
Power Adapter - US/Canada $64.00
Total
Before tax: 1606$
After tax and duties: 1847$
Free shipping
Quick evaluation
This is basically the TL;DR: here, just focusing on broad pros/cons of
the laptop.
Pros
easily repairable (complete with QR codes pointing to repair
guides!), the 11th gen received a 10/10 score from
ifixit.com, which they call "exceedingly rare", the 12th gen
has a similar hardware design and would probably rate similarly
replaceable motherboard!!! can be reused as a NUC-like device, with a
3d-printed case, 12th gen board can be bought standalone and
retrofitted into an 11th gen case
not a passing fad: they made a first laptop with the 11th gen Intel
chipset in 2021, and a second motherboard with the 12th Intel
chipset in 2022
four modular USB-C ports which can fit HDMI, USB-C (pass-through,
can provide power on both sides), USB-A, DisplayPort, MicroSD,
external storage (250GB, 1TB), active modding community
nice power led indicating power level (charging, charged, etc) when
plugged
they used to have some difficulty keeping up with the orders: first
two batches shipped, third batch sold out, fourth batch should have
shipped in October 2021. they generally seem to keep up with
shipping. update (august 2022): they rolled out a second line of
laptops (12th gen), first batch shipped, second batch shipped
late, September 2022 batch was generally on time, see this
spreadsheet for a crowdsourced effort to track those
supply chain issues seem to be under control as of early 2023. I
got the Ethernet expansion card shipped within a week.
compared to my previous laptop (Purism Librem
13v4), it feels strangely
bulkier and heavier; it's actually lighter than the purism (1.3kg
vs 1.4kg) and thinner (15.85mm vs 18mm) but the design of the
Purism laptop (tapered edges) makes it feel thinner
no space for a 2.5" drive
rather bright LED around power button, but can be dimmed in the
BIOS (not low enough to my taste) I got used to it
fan quiet when idle, but can be noisy when running, for example if
you max a CPU for a while
battery described as "mediocre" by Ars Technica (above), confirmed
poor in my tests (see below)
no RJ-45 port, and attempts at designing ones are failing
because the modular plugs are too thin to fit (according to Linux
After Dark), so unlikely to have one in the future
Update: they cracked that nut and ship an 2.5 gbps Ethernet
expansion card with a realtek chipset, without any
firmware blob
a bit pricey for the performance, especially when compared to the
competition (e.g. Dell XPS, Apple M1)
12th gen Intel has glitchy graphics, seems like Intel hasn't fully
landed proper Linux support for that chipset yet
Initial hardware setup
A breeze.
Accessing the board
The internals are accessed through five TorX screws, but there's a nice
screwdriver/spudger that works well enough. The screws actually hold in
place so you can't even lose them.
The first setup is a bit counter-intuitive coming from the Librem
laptop, as I expected the back cover to lift and give me access to the
internals. But instead the screws is release the keyboard and touch
pad assembly, so you actually need to flip the laptop back upright and
lift the assembly off to get access to the internals. Kind of
scary.
I also actually unplugged a connector in lifting the assembly because
I lifted it towards the monitor, while you actually need to lift it
to the right. Thankfully, the connector didn't break, it just
snapped off and I could plug it back in, no harm done.
Once there, everything is well indicated, with QR codes all over the
place supposedly leading to online instructions.
Bad QR codes
Unfortunately, the QR codes I tested (in the expansion card slot, the
memory slot and CPU slots) did not actually work so I wonder how
useful those actually are.
After all, they need to point to something and that means a URL, a
running website that will answer those requests forever. I bet those
will break sooner than later and in fact, as far as I can tell, they
just don't work at all. I prefer the approach taken by the MNT reform
here which designed (with the 100 rabbits folks) an actual paper
handbook (PDF).
The first QR code that's immediately visible from the back of the
laptop, in an expansion cord slot, is a 404. It seems to be some
serial number URL, but I can't actually tell because, well, the page
is a 404.
I was expecting that bar code to lead me to an introduction page,
something like "how to setup your Framework laptop". Support actually
confirmed that it should point a quickstart guide. But in a
bizarre twist, they somehow sent me the URL with the plus (+) signs
escaped, like this:
(They have also "let the team know about this for feedback and help
resolve the problem with the link" which is a support code word for
"ha-ha! nope! not my problem right now!" Trust me, I know, my own
code word is "can you please make a ticket?")
Seating disks and memory
The "DIY" kit doesn't actually have that much of a setup. If you
bought RAM, it's shipped outside the laptop in a little plastic case,
so you just seat it in as usual.
Then you insert your NVMe drive, and, if that's your fancy, you also
install your own mPCI WiFi card. If you ordered one (which was my
case), it's pre-installed.
Closing the laptop is also kind of amazing, because the keyboard
assembly snaps into place with magnets. I have actually used the
laptop with the keyboard unscrewed as I was putting the drives in and
out, and it actually works fine (and will probably void your warranty,
so don't do that). (But you can.) (But don't, really.)
Hardware review
Keyboard and touch pad
The keyboard feels nice, for a laptop. I'm used to mechanical keyboard
and I'm rather violent with those poor things. Yet the key travel is
nice and it's clickety enough that I don't feel too disoriented.
At first, I felt the keyboard as being more laggy than my normal
workstation setup, but it turned out this was a graphics driver
issues. After enabling a composition manager, everything feels snappy.
The touch pad feels good. The double-finger scroll works well enough,
and I don't have to wonder too much where the middle button is, it
just works.
Taps don't work, out of the box: that needs to be enabled in Xorg,
with something like this:
But be aware that once you enable that tapping, you'll need to deal
with palm detection... So I have not actually enabled this in the end.
Power button
The power button is a little dangerous. It's quite easy to hit, as
it's right next to one expansion card where you are likely to plug in
a cable power. And because the expansion cards are kind of hard to
remove, you might squeeze the laptop (and the power key) when trying
to remove the expansion card next to the power button.
So obviously, don't do that. But that's not very helpful.
An alternative is to make the power button do something else. With
systemd-managed systems, it's actually quite easy. Add a
HandlePowerKey stanza to (say)
/etc/systemd/logind.conf.d/power-suspends.conf:
And the power button will suspend! Long-press to power off doesn't
actually work as the laptop immediately suspends...
Note that there's probably half a dozen other ways of doing this,
see this, this, or that.
Special keybindings
There is a series of "hidden" (as in: not labeled on the key)
keybindings related to the fn keybinding that I actually
find quite useful.
Key
Equivalent
Effect
Command
p
Pause
lock screen
xset s activate
b
Break
?
?
k
ScrLk
switch keyboard layout
N/A
It looks like those are defined in the microcontroller so it
would be possible to add some. For example, the SysRq key
is almost bound to fns in there.
Note that most other shortcuts like this are clearly documented
(volume, brightness, etc). One key that's less obvious is
F12 that only has the Framework logo on it. That actually
calls the keysym XF86AudioMedia which, interestingly, does
absolutely nothing here. By default, on Windows, it opens your
browser to the Framework website and, on Linux, your "default
media player".
The keyboard backlight can be cycled with fn-space. The
dimmer version is dim enough, and the keybinding is easy to find in
the dark.
A skinny elephant would be performed with altPrtScr (above F11) KEY, so for
example altfnF11b
should do a hard reset. This comment suggests you need to hold
the fnonly if "function lock" is on, but that's
actually the opposite of my experience.
Out of the box, some of the fn keys don't work. Mute,
volume up/down, brightness, monitor changes, and the airplane mode key
all do basically nothing. They don't send proper keysyms to Xorg at
all.
This is a known problem and it's related to the fact that the
laptop has light sensors to adjust the brightness
automatically. Somehow some of those keys (e.g. the brightness
controls) are supposed to show up as a different input device, but
don't seem to work correctly. It seems like the solution is for the
Framework team to write a driver specifically for this, but so far no
progress since July 2022.
In the meantime, the fancy functionality can be supposedly disabled with:
echo 'blacklist hid_sensor_hub' sudo tee /etc/modprobe.d/framework-als-blacklist.conf
Kill switches
The Framework has two "kill switches": one for the camera and the
other for the microphone. The camera one actually disconnects the USB
device when turned off, and the mic one seems to cut the circuit. It
doesn't show up as muted, it just stops feeding the sound.
Both kill switches are around the main camera, on top of the monitor,
and quite discreet. Then turn "red" when enabled (i.e. "red" means
"turned off").
Monitor
The monitor looks pretty good to my untrained eyes. I have yet to do
photography work on it, but some photos I looked at look sharp and the
colors are bright and lively. The blacks are dark and the screen is
bright.
I have yet to use it in full sunlight.
The dimmed light is very dim, which I like.
Screen backlight
I bind brightness keys to xbacklight in i3, but out of the box I get
this error:
sep 29 22:09:14 angela i3[5661]: No outputs have backlight property
It just requires this blob in /etc/X11/xorg.conf.d/backlight.conf:
This way I can control the actual backlight power with the brightness
keys, and they do significantly reduce power usage.
Multiple monitor support
I have been able to hook up my two old monitors to the HDMI and
DisplayPort expansion cards on the laptop. The lid closes without
suspending the machine, and everything works great.
I actually run out of ports, even with a 4-port USB-A hub, which gives
me a total of 7 ports:
power (USB-C)
monitor 1 (DisplayPort)
monitor 2 (HDMI)
USB-A hub, which adds:
keyboard (USB-A)
mouse (USB-A)
Yubikey
external sound card
Now the latter, I might be able to get rid of if I switch to a
combo-jack headset, which I do have (and still need to test).
But still, this is a problem. I'll probably need a powered USB-C dock
and better monitors, possibly with some Thunderbolt chaining, to
save yet more ports.
But that means more money into this setup, argh. And figuring out my
monitor situation is the kind of thing I'm not that big
of a fan of. And neither is shopping for USB-C (or is it Thunderbolt?)
hubs.
My normal autorandr setup doesn't work: I have tried saving a
profile and it doesn't get autodetected, so I also first need to do:
autorandr -l framework-external-dual-lg-acer
The magic:
autorandr -l horizontal
... also works well.
The worst problem with those monitors right now is that they have a
radically smaller resolution than the main screen on the laptop, which
means I need to reset the font scaling to normal every time I switch
back and forth between those monitors and the laptop, which means I
actually need to do this:
Expansion ports
I ordered a total of 10 expansion ports.
I did manage to initialize the 1TB drive as an encrypted storage,
mostly to keep photos as this is something that takes a massive amount
of space (500GB and counting) and that I (unfortunately) don't work on
very often (but still carry around).
The expansion ports are fancy and nice, but not actually that
convenient. They're a bit hard to take out: you really need to crimp
your fingernails on there and pull hard to take them out. There's a
little button next to them to release, I think, but at first it feels
a little scary to pull those pucks out of there. You get used to it
though, and it's one of those things you can do without looking
eventually.
There's only four expansion ports. Once you have two monitors, the
drive, and power plugged in, bam, you're out of ports; there's nowhere
to plug my Yubikey. So if this is going to be my daily driver, with a
dual monitor setup, I will need a dock, which means more crap firmware
and uncertainty, which isn't great. There are actually plans to make a
dual-USB card, but that is blocked on designing an actual
board for this.
I can't wait to see more expansion ports produced. There's a ethernet
expansion card which quickly went out of stock basically the day
it was announced, but was eventually restocked.
I would like to see a proper SD-card reader. There's a MicroSD card
reader, but that obviously doesn't work for normal SD cards, which
would be more broadly compatible anyways (because you can have a
MicroSD to SD card adapter, but I have never heard of the
reverse). Someone actually found a SD card reader that fits and
then someone else managed to cram it in a 3D printed case, which
is kind of amazing.
Still, I really like that idea that I can carry all those little
adapters in a pouch when I travel and can basically do anything I
want. It does mean I need to shuffle through them to find the right
one which is a little annoying. I have an elastic band to keep them
lined up so that all the ports show the same side, to make it easier
to find the right one. But that quickly gets undone and instead I have
a pouch full of expansion cards.
Another awesome thing with the expansion cards is that they don't just
work on the laptop: anything that takes USB-C can take those cards,
which means you can use it to connect an SD card to your phone, for
backups, for example. Heck, you could even connect an external display
to your phone that way, assuming that's supported by your phone of
course (and it probably isn't).
The expansion ports do take up some power, even when idle. See the
power management section below, and particularly the power usage
tests for details.
USB-C charging
One thing that is really a game changer for me is USB-C charging. It's
hard to overstate how convenient this is. I often have a USB-C cable
lying around to charge my phone, and I can just grab that thing and
pop it in my laptop. And while it will obviously not charge as fast as
the provided charger, it will stop draining the battery at least.
(As I wrote this, I had the laptop plugged in the Samsung charger that
came with a phone, and it was telling me it would take 6 hours to
charge the remaining 15%. With the provided charger, that flew down to
15 minutes. Similarly, I can power the laptop from the power grommet
on my desk, reducing clutter as I have that single wire out there
instead of the bulky power adapter.)
I also really like the idea that I can charge my laptop with a power
bank or, heck, with my phone, if push comes to shove. (And
vice-versa!)
This is awesome. And it works from any of the expansion ports, of
course. There's a little led next to the expansion ports as well,
which indicate the charge status:
red/amber: charging
white: charged
off: unplugged
I couldn't find documentation about this, but the forum
answered.
This is something of a recurring theme with the Framework. While it
has a good knowledge base and repair/setup guides (and the
forum is awesome) but it doesn't have a good "owner manual" that
shows you the different parts of the laptop and what they do. Again,
something the MNT reform did well.
Another thing that people are asking about is an external sleep
indicator: because the power LED is on the main keyboard assembly,
you don't actually see whether the device is active or not when the
lid is closed.
Finally, I wondered what happens when you plug in multiple power
sources and it turns out the charge controller is actually pretty
smart: it will pick the best power source and use it. The only
downside is it can't use multiple power sources, but that seems like
a bit much to ask.
Multimedia and other devices
Those things also work:
webcam: splendid, best webcam I've ever had (but my standards are
really low)
onboard mic: works well, good gain (maybe a bit much)
onboard speakers: sound okay, a little metal-ish, loud enough to be
annoying, see this thread for benchmarks, apparently pretty
good speakers
Combo jack mic tests
The Framework laptop ships with a combo jack on the left side, which
allows you to plug in a CTIA (source) headset. In human
terms, it's a device that has both a stereo output and a mono input,
typically a headset or ear buds with a microphone somewhere.
It works, which is better than the Purism (which only had audio
out), but is on par for the course for that kind of onboard
hardware. Because of electrical interference, such sound cards very
often get lots of noise from the board.
With a Jabra Evolve 40, the built-in USB sound card generates
basically zero noise on silence (invisible down to -60dB in Audacity)
while plugging it in directly generates a solid -30dB hiss. There is
a noise-reduction system in that sound card, but the difference is
still quite striking.
On a comparable setup (curie, a 2017 Intel NUC), there is
also a his with the Jabra headset, but it's quieter, more in the order
of -40/-50 dB, a noticeable difference. Interestingly, testing with my
Mee Audio Pro M6 earbuds leads to a little more hiss on curie, more on
the -35/-40 dB range, close to the Framework.
Also note that another sound card, the Antlion USB adapter that comes
with the ModMic 4, also gives me pretty close to silence on a quiet
recording, picking up less than -50dB of background noise. It's
actually probably picking up the fans in the office, which do make
audible noises.
In other words, the hiss of the sound card built in the Framework
laptop is so loud that it makes more noise than the quiet fans in the
office. Or, another way to put it is that two USB sound cards (the
Jabra and the Antlion) are able to pick up ambient noise in my office
but not the Framework laptop.
See also my audio page.
Performance tests
Compiling Linux 5.19.11
On a single core, compiling the Debian version of the Linux kernel
takes around 100 minutes:
I had to plug the normal power supply after a few minutes because
battery would actually run out using my desk's power grommet (34
watts).
During compilation, fans were spinning really hard, quite noisy, but
not painfully so.
The laptop was sucking 55 watts of power, steadily:
  Time    User  Nice   Sys  Idle    IO  Run Ctxt/s  IRQ/s Fork Exec Exit  Watts
-------- ----- ----- ----- ----- ----- ---- ------ ------ ---- ---- ---- ------
 Average  87.9   0.0  10.7   1.4   0.1 17.8 6583.6 5054.3 233.0 223.9 233.1  55.96
 GeoMean  87.9   0.0  10.6   1.2   0.0 17.6 6427.8 5048.1 227.6 218.7 227.7  55.96
  StdDev   1.4   0.0   1.2   0.6   0.2  3.0 1436.8  255.5 50.0 47.5 49.7   0.20
-------- ----- ----- ----- ----- ----- ---- ------ ------ ---- ---- ---- ------
 Minimum  85.0   0.0   7.8   0.5   0.0 13.0 3594.0 4638.0 117.0 111.0 120.0  55.52
 Maximum  90.8   0.0  12.9   3.5   0.8 38.0 10174.0 5901.0 374.0 362.0 375.0  56.41
-------- ----- ----- ----- ----- ----- ---- ------ ------ ---- ---- ---- ------
Summary:
CPU:  55.96 Watts on average with standard deviation 0.20
Note: power read from RAPL domains: package-0, uncore, package-0, core, psys.
These readings do not cover all the hardware in this device.
memtest86+
I ran Memtest86+ v6.00b3. It shows something like this:
Software setup
Once I had everything in the hardware setup, I figured, voil , I'm
done, I'm just going to boot this beautiful machine and I can get back
to work.
I don't understand why I am so na ve some times. It's mind boggling.
Obviously, it didn't happen that way at all, and I spent the best of
the three following days tinkering with the laptop.
Secure boot and EFI
First, I couldn't boot off of the NVMe drive I transferred from the
previous laptop (the Purism) and the
BIOS was not very helpful: it was just complaining about not finding
any boot device, without dropping me in the real BIOS.
At first, I thought it was a problem with my NVMe drive, because it's
not listed in the compatible SSD drives from upstream. But I
figured out how to enter BIOS (press F2 manically, of
course), which showed the NVMe drive was actually detected. It just
didn't boot, because it was an old (2010!!) Debian install without
EFI.
So from there, I disabled secure boot, and booted a grml image to
try to recover. And by "boot" I mean, I managed to get to the grml
boot loader which promptly failed to load its own root file system
somehow. I still have to investigate exactly what happened there, but
it failed some time after the initrd load with:
Unable to find medium containing a live file system
This, it turns out, was fixed in Debian lately, so a daily GRML
build will not have this problems. The upcoming 2022 release
(likely 2022.10 or 2022.11) will also get the fix.
I did manage to boot the development version of the Debian
installer which was a surprisingly good experience: it mounted the
encrypted drives and did everything pretty smoothly. It even offered
me to reinstall the boot loader, but that ultimately (and correctly, as
it turns out) failed because I didn't have a /boot/efi partition.
At this point, I realized there was no easy way out of this, and I
just proceeded to completely reinstall Debian. I had a spare NVMe
drive lying around (backups FTW!) so I just swapped that in, rebooted
in the Debian installer, and did a clean install. I wanted to switch
to bookworm anyways, so I guess that's done too.
Storage limitations
Another thing that happened during setup is that I tried to copy over
the internal 2.5" SSD drive from the Purism to the Framework 1TB
expansion card. There's no 2.5" slot in the new laptop, so that's
pretty much the only option for storage expansion.
I was tired and did something wrong. I ended up wiping the partition
table on the original 2.5" drive.
Oops.
It might be recoverable, but just restoring the partition table
didn't work either, so I'm not sure how I recover the data
there. Normally, everything on my laptops and workstations is designed
to be disposable, so that wasn't that big of a problem. I did manage
to recover most of the data thanks to git-annexreinit, but
that was a little hairy.
Bootstrapping Puppet
Once I had some networking, I had to install all the packages I
needed. The time I spent setting up my workstations with Puppet has
finally paid off. What I actually did was to restore two critical
directories:
/etc/ssh
/var/lib/puppet
So that I would keep the previous machine's identity. That way I could
contact the Puppet server and install whatever was missing. I used my
Puppet optimization
trick to do a batch
install and then I had a good base setup, although not exactly as it
was before. 1700 packages were installed manually on angela before
the reinstall, and not in Puppet.
I did not inspect each one individually, but I did go through /etc
and copied over more SSH keys, for backups and SMTP over SSH.
LVFS support
It looks like there's support for the (de-facto) standard LVFS
firmware update system. At least I was able to update the UEFI
firmware with a simple:
Those instructions come from the beta forum post. I performed the
BIOS update on 2023-01-16T16:00-0500.
Resolution tweaks
The Framework laptop resolution (2256px X 1504px) is big enough to
give you a pretty small font size, so welcome to the marvelous world
of "scaling".
The Debian wiki page has a few tricks for this.
Console
This will make the console and grub fonts more readable:
Xorg
Adding this to your .Xresources will make everything look much bigger:
! 1.5*96
Xft.dpi: 144
Apparently, some of this can also help:
! These might also be useful depending on your monitor and personal preference:
Xft.autohint: 0
Xft.lcdfilter:  lcddefault
Xft.hintstyle:  hintfull
Xft.hinting: 1
Xft.antialias: 1
Xft.rgba: rgb
It my experience it also makes things look a little fuzzier, which is
frustrating because you have this awesome monitor but everything looks
out of focus. Just bumping Xft.dpi by a 1.5 factor looks good to me.
The Debian Wiki has a page on HiDPI, but it's not as good as the
Arch Wiki, where the above blurb comes from. I am not using the
latter because I suspect it's causing some of the "fuzziness".
TODO: find the equivalent of this GNOME hack in i3? (gsettings set
org.gnome.mutter experimental-features
"['scale-monitor-framebuffer']"), taken from this Framework
guide
Issues
BIOS configuration
The Framework BIOS has some minor issues. One issue I personally
encountered is that I had disabled Quick boot and Quiet boot in
the BIOS to diagnose the above boot issues. This, in turn, triggers a
bug where the BIOS boot manager (F12) would just hang
completely. It would also fail to boot from an external USB drive.
The current fix (as of BIOS 3.03) is to re-enable both Quick
boot and Quiet boot. Presumably this is something that will get
fixed in a future BIOS update.
Note that the following keybindings are active in the BIOS POST
check:
Key
Meaning
F2
Enter BIOS setup menu
F12
Enter BIOS boot manager
Delete
Enter BIOS setup menu
WiFi compatibility issues
I couldn't make WiFi work at first. Obviously, the default Debian
installer doesn't ship with proprietary firmware (although that might
change soon) so the WiFi card didn't work out of the box. But even
after copying the firmware through a USB stick, I couldn't quite
manage to find the right combination of ip/iw/wpa-supplicant
(yes, after repeatedly copying a bunch more packages over to get
those bootstrapped). (Next time I should probably try something like
this post.)
Thankfully, I had a little USB-C dongle with a RJ-45 jack lying
around. That also required a firmware blob, but it was a single
package to copy over, and with that loaded, I had network.
Eventually, I did managed to make WiFi work; the problem was more on
the side of "I forgot how to configure a WPA network by hand from the
commandline" than anything else. NetworkManager worked fine and got
WiFi working correctly.
Note that this is with Debian bookworm, which has the 5.19 Linux
kernel, and with the firmware-nonfree (firmware-iwlwifi,
specifically) package.
Battery life
I was having between about 7 hours of battery on the Purism Librem
13v4, and that's after a year or two of battery life. Now, I still
have about 7 hours of battery life, which is nicer than my old
ThinkPad X220 (20 minutes!) but really, it's not that good for a new
generation laptop. The 12th generation Intel chipset probably improved
things compared to the previous one Framework laptop, but I don't have
a 11th gen Framework to compare with).
(Note that those are estimates from my status bar, not wall clock
measurements. They should still be comparable between the Purism and
Framework, that said.)
The battery life doesn't seem up to, say, Dell XPS 13, ThinkPad X1, and
of course not the Apple M1, where I would expect 10+ hours of battery
life out of the box.
That said, I do get those kind estimates when the machine is fully
charged and idle. In fact, when everything is quiet and nothing is
plugged in, I get dozens of hours of battery life estimated (I've
seen 25h!). So power usage fluctuates quite a bit depending on usage,
which I guess is expected.
Concretely, so far, light web browsing, reading emails and writing
notes in Emacs (e.g. this file) takes about 8W of power:
Expansion cards matter a lot in the battery life (see below for a
thorough discussion), my normal setup is 2xUSB-C and 1xUSB-A (yes,
with an empty slot, and yes, to save power).
Interestingly, playing a video in a (720p) window in a window takes up
more power (10.5W) than in full screen (9.5W) but I blame that on my
desktop setup (i3 + compton)... Not sure if mpv hits the
VA-API, maybe not in windowed mode. Similar results with 1080p,
interestingly, except the window struggles to keep up altogether. Full
screen playback takes a relatively comfortable 9.5W, which means a
solid 5h+ of playback, which is fine by me.
Fooling around the web, small edits, youtube-dl, and I'm at around 80%
battery after about an hour, with an estimated 5h left, which is a
little disappointing. I had a 7h remaining estimate before I started
goofing around Discourse, so I suspect the website is a pretty
big battery drain, actually. I see about 10-12 W, while I was probably at
half that (6-8W) just playing music with mpv in the background...
In other words, it looks like editing posts in Discourse with Firefox
takes a solid 4-6W of power. Amazing and gross.
(When writing about abusive power usage generates more power usage, is
that an heisenbug? Or schr dinbug?)
Power management
Compared to the Purism Librem 13v4, the ongoing power usage seems to
be slightly better. An anecdotal metric is that the Purism would take
800mA idle, while the more powerful Framework manages a little over
500mA as I'm typing this, fluctuating between 450 and 600mA. That is
without any active expansion card, except the storage. Those numbers
come from the output of tlp-stat -b and, unfortunately, the "ampere"
unit makes it quite hard to compare those, because voltage is not
necessarily the same between the two platforms.
TODO: i915 driver has a lot of parameters, including some about
power saving, see, again, the arch wiki, and particularly
enable_fbc=1
TL:DR; power management on the laptop is an issue, but there's various
tweaks you can make to improve it. Try:
powertop --auto-tune
apt install tlp && systemctl enable tlp
nvme.noacpi=1 mem_sleep_default=deep on the kernel command line
may help with standby power usage
keep only USB-C expansion cards plugged in, all others suck power
even when idle
consider upgrading the BIOS to latest beta (3.06 at the time of
writing), unverified power savings
latest Linux kernels (6.2) promise power savings as well
(unverified)
Update: also try to follow the official optimization guide. It
was made for Ubuntu but will probably also work for your distribution
of choice with a few tweaks. They recommend using tlpui but it's
not packaged in Debian. There is, however, a Flatpak
release. In my case, it resulted in the following diff to
tlp.conf: tlp.patch.
Background on CPU architecture
There were power problems in the 11th gen Framework laptop, according
to this report from Linux After Dark, so the issues with power
management on the Framework are not new.
The 12th generation Intel CPU (AKA "Alder Lake") is a big-little
architecture with "power-saving" and "performance" cores. There
used to be performance problems introduced by the scheduler in Linux
5.16 but those were eventually fixed in 5.18, which uses
Intel's hardware as an "intelligent, low-latency hardware-assisted
scheduler". According to Phoronix, the 5.19 release improved the
power saving, at the cost of some penalty cost. There were also patch
series to make the scheduler configurable, but it doesn't look
those have been merged as of 5.19. There was also a session about this
at the 2022 Linux Plumbers, but they stopped short of
talking more about the specific problems Linux is facing in Alder
lake:
Specifically, the kernel's energy-aware scheduling heuristics don't
work well on those CPUs. A number of features present there
complicate the energy picture; these include SMT, Intel's "turbo
boost" mode, and the CPU's internal power-management mechanisms. For
many workloads, running on an ostensibly more power-hungry Pcore can
be more efficient than using an Ecore. Time for discussion of the
problem was lacking, though, and the session came to a close.
All this to say that the 12gen Intel line shipped with this Framework
series should have better power management thanks to its
power-saving cores. And Linux has had the scheduler changes to make
use of this (but maybe is still having trouble). In any case, this
might not be the source of power management problems on my laptop,
quite the opposite.
Also note that the firmware updates for various chipsets are
supposed to improve things eventually.
On the other hand, The Verge simply declared the whole P-series
a mistake...
Attempts at improving power usage
I did try to follow some of the tips in this forum post. The
tricks powertop --auto-tune and tlp's
PCIE_ASPM_ON_BAT=powersupersave basically did nothing: I was stuck
at 10W power usage in powertop (600+mA in tlp-stat).
Apparently, I should be able to reach the C8 CPU power state (or
even C9, C10) in powertop, but I seem to be stock at
C7. (Although I'm not sure how to read that tab in powertop: in the
Core(HW) column there's only C3/C6/C7 states, and most cores are 85%
in C7 or maybe C6. But the next column over does show many CPUs in
C10 states...
As it turns out, the graphics card actually takes up a good chunk of
power unless proper power management is enabled (see below). After
tweaking this, I did manage to get down to around 7W power usage in
powertop.
Expansion cards actually do take up power, and so does the screen,
obviously. The fully-lit screen takes a solid 2-3W of power compared
to the fully dimmed screen. When removing all expansion cards and
making the laptop idle, I can spin it down to 4 watts power usage at
the moment, and an amazing 2 watts when the screen turned off.
Caveats
Abusive (10W+) power usage that I initially found could be a problem
with my desktop configuration: I have this silly status bar that
updates every second and probably causes redraws... The CPU certainly
doesn't seem to spin down below 1GHz. Also note that this is with an
actual desktop running with everything: it could very well be that
some things (I'm looking at you Signal Desktop) take up unreasonable
amount of power on their own (hello, 1W/electron, sheesh). Syncthing
and containerd (Docker!) also seem to take a good 500mW just sitting
there.
Beyond my desktop configuration, this could, of course, be a
Debian-specific problem; your favorite distribution might be better at
power management.
Idle power usage tests
Some expansion cards waste energy, even when unused. Here is a summary
of the findings from the powerstat page. I also include other
devices tested in this page for completeness:
Device
Minimum
Average
Max
Stdev
Note
Screen, 100%
2.4W
2.6W
2.8W
N/A
Screen, 1%
30mW
140mW
250mW
N/A
Backlight 1
290mW
?
?
?
fairly small, all things considered
Backlight 2
890mW
1.2W
3W?
460mW?
geometric progression
Backlight 3
1.69W
1.5W
1.8W?
390mW?
significant power use
Radios
100mW
250mW
N/A
N/A
USB-C
N/A
N/A
N/A
N/A
negligible power drain
USB-A
10mW
10mW
?
10mW
almost negligible
DisplayPort
300mW
390mW
600mW
N/A
not passive
HDMI
380mW
440mW
1W?
20mW
not passive
1TB SSD
1.65W
1.79W
2W
12mW
significant, probably higher when busy
MicroSD
1.6W
3W
6W
1.93W
highest power usage, possibly even higher when busy
Ethernet
1.69W
1.64W
1.76W
N/A
comparable to the SSD card
So it looks like all expansion cards but the USB-C ones are active,
i.e. they draw power with idle. The USB-A cards are the least concern,
sucking out 10mW, pretty much within the margin of error. But both the
DisplayPort and HDMI do take a few hundred miliwatts. It looks like
USB-A connectors have this fundamental flaw that they necessarily draw
some powers because they lack the power negotiation features of
USB-C. At least according to this post:
It seems the USB A must have power going to it all the time, that
the old USB 2 and 3 protocols, the USB C only provides power when
there is a connection. Old versus new.
Apparently, this is a problem specific to the USB-C to USB-A
adapter that ships with the Framework. Some people have actually
changed their orders to all USB-C because of this problem, but I'm
not sure the problem is as serious as claimed in the forums. I
couldn't reproduce the "one watt" power drains suggested elsewhere,
at least not repeatedly. (A previous version of this post did show
such a power drain, but it was in a less controlled test
environment than the series of more rigorous tests above.)
The worst offenders are the storage cards: the SSD drive takes at
least one watt of power and the MicroSD card seems to want to take all
the way up to 6 watts of power, both just sitting there doing
nothing. This confirms claims of 1.4W for the SSD (but not
5W) power usage found elsewhere. The former post has
instructions on how to disable the card in software. The MicroSD card
has been reported as using 2 watts, but I've seen it as high as 6
watts, which is pretty damning.
The Framework team has a beta update for the DisplayPort adapter
but currently only for Windows (LVFS technically possible, "under
investigation"). A USB-A firmware update is alsounder
investigation. It is therefore likely at least some of those power
management issues will eventually be fixed.
Note that the upcoming Ethernet card has a reported 2-8W power usage,
depending on traffic. I did my own power usage tests in
powerstat-wayland and they seem lower than 2W.
The upcoming 6.2 Linux kernel might also improve battery usage when
idle, see this Phoronix article for details, likely in early
2023.
Idle power usage tests under Wayland
Update: I redid those tests under Wayland, see powerstat-wayland
for details. The TL;DR: is that power consumption is either smaller or
similar.
Idle power usage tests, 3.06 beta BIOS
I redid the idle tests after the 3.06 beta BIOS update and ended
up with this results:
Device
Minimum
Average
Max
Stdev
Note
Baseline
1.96W
2.01W
2.11W
30mW
1 USB-C, screen off, backlight off, no radios
2 USB-C
1.95W
2.16W
3.69W
430mW
USB-C confirmed as mostly passive...
3 USB-C
1.95W
2.16W
3.69W
430mW
... although with extra stdev
1TB SSD
3.72W
3.85W
4.62W
200mW
unchanged from before upgrade
1 USB-A
1.97W
2.18W
4.02W
530mW
unchanged
2 USB-A
1.97W
2.00W
2.08W
30mW
unchanged
3 USB-A
1.94W
1.99W
2.03W
20mW
unchanged
MicroSD w/o card
3.54W
3.58W
3.71W
40mW
significant improvement! 2-3W power saving!
MicroSD w/ card
3.53W
3.72W
5.23W
370mW
new measurement! increased deviation
DisplayPort
2.28W
2.31W
2.37W
20mW
unchanged
1 HDMI
2.43W
2.69W
4.53W
460mW
unchanged
2 HDMI
2.53W
2.59W
2.67W
30mW
unchanged
External USB
3.85W
3.89W
3.94W
30mW
new result
Ethernet
3.60W
3.70W
4.91W
230mW
unchanged
Note that the table summary is different than the previous table: here
we show the absolute numbers while the previous table was doing a
confusing attempt at showing relative (to the baseline) numbers.
Conclusion: the 3.06 BIOS update did not significantly change idle
power usage stats except for the MicroSD card which has
significantly improved.
The new "external USB" test is also interesting: it shows how the
provided 1TB SSD card performs (admirably) compared to existing
devices. The other new result is the MicroSD card with a card which,
interestingly, uses less power than the 1TB SSD drive.
That's 8mAh per 10 minutes (and 2 seconds), or 48mA, or, with this
battery, about 127 hours or roughly 5 days of standby. Not bad!
In comparison, here is my really old x220, before:
sep 29 22:13:54 emma systemd-sleep[176315]: /sys/class/power_supply/BAT0/energy_now = 5070 [mWh]
... after:
sep 29 22:23:54 emma systemd-sleep[176486]: /sys/class/power_supply/BAT0/energy_now = 4980 [mWh]
... which is 90 mwH in 10 minutes, or a whopping 540mA, which was
possibly okay when this battery was new (62000 mAh, so about 100
hours, or about 5 days), but this battery is almost dead and has
only 5210 mAh when full, so only 10 hours standby.
And here is the Framework performing a similar test, before:
... which is 49mAh in a little over 10 minutes (and 4 seconds), or
292mA, much more than the Purism, but half of the X220. At this rate,
the battery would last on standby only 12 hours!! That is pretty
bad.
Note that this was done with the following expansion cards:
2 USB-C
1 1TB SSD drive
1 USB-A with a hub connected to it, with keyboard and LAN
Preliminary tests without the hub (over one minute) show that it
doesn't significantly affect this power consumption (300mA).
This guide also suggests booting with nvme.noacpi=1 but this
still gives me about 5mAh/min (or 300mA).
Adding mem_sleep_default=deep to the kernel command line does make a
difference. Before:
... which is 2mAh in 74 seconds, which is 97mA, brings us to a more
reasonable 36 hours, or a day and a half. It's still above the x220
power usage, and more than an order of magnitude more than the Purism
laptop. It's also far from the 0.4% promised by upstream, which
would be 14mA for the 3500mAh battery.
It should also be noted that this "deep" sleep mode is a little more
disruptive than regular sleep. As you can see by the timing, it took
more than 10 seconds for the laptop to resume, which feels a little
alarming as your banging the keyboard to bring it back to life.
You can confirm the current sleep mode with:
# cat /sys/power/mem_sleep
s2idle [deep]
In the above, deep is selected. You can change it on the fly with:
... better! 6 mAh in about 6 minutes, works out to 63.5mA, so more
than two days standby.
A longer test:
oct 01 09:22:56 angela systemd-sleep[62978]: /sys/class/power_supply/BAT1/charge_now                     =   3327 [mAh]
oct 01 12:47:35 angela systemd-sleep[63219]: /sys/class/power_supply/BAT1/charge_now                     =   3147 [mAh]
That's 180mAh in about 3.5h, 52mA! Now at 66h, or almost 3 days.
I wasn't sure why I was seeing such fluctuations in those tests, but
as it turns out, expansion card power tests show that they do
significantly affect power usage, especially the SSD drive, which can
take up to two full watts of power even when idle. I didn't control
for expansion cards in the above tests running them with whatever
card I had plugged in without paying attention so it's likely the
cause of the high power usage and fluctuations.
It might be possible to work around this problem by disabling USB
devices before suspend. TODO. See also this post.
In the meantime, I have been able to get much better suspend
performance by unplugging all modules. Then I get this result:
oct 04 11:15:38 angela systemd-sleep[257571]: /sys/class/power_supply/BAT1/charge_now                     =   3203 [mAh]
oct 04 15:09:32 angela systemd-sleep[257866]: /sys/class/power_supply/BAT1/charge_now                     =   3145 [mAh]
Which is 14.8mA! Almost exactly the number promised by Framework! With
a full battery, that means a 10 days suspend time. This is actually
pretty good, and far beyond what I was expecting when starting down
this journey.
So, once the expansion cards are unplugged, suspend power usage is
actually quite reasonable. More detailed standby tests are available
in the standby-tests page, with a summary below.
There is also some hope that the Chromebook edition
specifically designed with a specification of 14 days standby
time could bring some firmware improvements back down to the
normal line. Some of those issues were reported upstream in April
2022, but there doesn't seem to have been any progress there
since.
TODO: one final solution here is suspend-then-hibernate, which
Windows uses for this
TODO: consider implementing the S0ix sleep states , see also troubleshooting
TODO: consider https://github.com/intel/pm-graph
Standby expansion cards test results
This table is a summary of the more extensive standby-tests I have performed:
Device
Wattage
Amperage
Days
Note
baseline
0.25W
16mA
9
sleep=deep nvme.noacpi=1
s2idle
0.29W
18.9mA
~7
sleep=s2idle nvme.noacpi=1
normal nvme
0.31W
20mA
~7
sleep=s2idle without nvme.noacpi=1
1 USB-C
0.23W
15mA
~10
2 USB-C
0.23W
14.9mA
same as above
1 USB-A
0.75W
48.7mA
3
+500mW (!!) for the first USB-A card!
2 USB-A
1.11W
72mA
2
+360mW
3 USB-A
1.48W
96mA
<2
+370mW
1TB SSD
0.49W
32mA
<5
+260mW
MicroSD
0.52W
34mA
~4
+290mW
DisplayPort
0.85W
55mA
<3
+620mW (!!)
1 HDMI
0.58W
38mA
~4
+250mW
2 HDMI
0.65W
42mA
<4
+70mW
Conclusions:
USB-C cards take no extra power on suspend, possibly less
than empty slots, more testing required
USB-A cards take a lot more power on suspend
(300-500mW) than on regular idle (~10mW, almost negligible)
1TB SSD and MicroSD cards seem to take a reasonable
amount of power (260-290mW), compared to their runtime
equivalents (1-6W!)
DisplayPort takes a surprising lot of power (620mW), almost
double its average runtime usage (390mW)
HDMI cards take, surprisingly, less power (250mW) in
standby than the DP card (620mW)
and oddly, a second card adds less power usage (70mW?!) than the
first, maybe a circuit is used by both?
Standby expansion cards test results, 3.06 beta BIOS
Framework recently (2022-11-07) announced that they will publish
a firmware upgrade to address some of the USB-C issues, including
power management. This could positively affect the above result,
improving both standby and runtime power usage.
The update came out in December 2022 and I redid my analysis with
the following results:
Device
Wattage
Amperage
Days
Note
baseline
0.25W
16mA
9
no cards, same as before upgrade
1 USB-C
0.25W
16mA
9
same as before
2 USB-C
0.25W
16mA
9
same
1 USB-A
0.80W
62mA
3
+550mW!! worse than before
2 USB-A
1.12W
73mA
<2
+320mW, on top of the above, bad!
Ethernet
0.62W
40mA
3-4
new result, decent
1TB SSD
0.52W
34mA
4
a bit worse than before (+2mA)
MicroSD
0.51W
22mA
4
same
DisplayPort
0.52W
34mA
4+
upgrade improved by 300mW
1 HDMI
?
38mA
?
same
2 HDMI
?
45mA
?
a bit worse than before (+3mA)
Normal
1.08W
70mA
~2
Ethernet, 2 USB-C, USB-A
Full results in standby-tests-306. The big takeaway for me is that
the update did not improve power usage on the USB-A ports which is a
big problem for my use case. There is a notable improvement on the
DisplayPort power consumption which brings it more in line with the
HDMI connector, but it still doesn't properly turn off on suspend
either.
Even worse, the USB-A ports now sometimes fails to resume after
suspend, which is pretty annoying. This is a known problem
that will hopefully get fixed in the final release.
I looked at building this myself but failed to run it. I opened a
RFP in Debian so that we can ship this in Debian, and also documented
my work there.
Note that there is now a counter that tracks charge/discharge
cycles. It's visible in tlp-stat -b, which is a nice
improvement:
Ethernet expansion card
The Framework ethernet expansion card is a fancy little doodle:
"2.5Gbit/s and 10/100/1000Mbit/s Ethernet", the "clear housing lets
you peek at the RTL8156 controller that powers it". Which is another
way to say "we didn't completely finish prod on this one, so it kind
of looks like we 3D-printed this in the shop"....
The card is a little bulky, but I guess that's inevitable considering
the RJ-45 form factor when compared to the thin Framework laptop.
I have had a serious issue when trying it at first: the link LEDs
just wouldn't come up. I made a full bug report in the forum and
with upstream support, but eventually figured it out on my own. It's
(of course) a power saving issue: if you reboot the machine, the links
come up when the laptop is running the BIOS POST check and even when
the Linux kernel boots.
I first thought that the problem is likely related to the
powertop service which I run at boot time to tweak some power saving
settings.
It seems like this:
By default, USB power saving is active in the kernel, but not
force-enabled for incompatible drivers. That is, devices that
support suspension will suspend, drivers that do not, will not.
So the fix is actually to uninstall tlp or disable that setting by
adding this to /etc/tlp.conf:
USB_AUTOSUSPEND=0
... but that disables auto-suspend on all USB devices, which may
hurt other power usage performance. I have found that a a
combination of:
USB_AUTOSUSPEND=1
USB_DENYLIST="0bda:8156"
and this on the kernel commandline:
usbcore.quirks=0bda:8156:k
... actually does work correctly. I now have this in my
/etc/default/grub.d/framework-tweaks.cfg file:
# net.ifnames=0: normal interface names ffs (e.g. eth0, wlan0, not wlp166
s0)
# nvme.noacpi=1: reduce SSD disk power usage (not working)
# mem_sleep_default=deep: reduce power usage during sleep (not working)
# usbcore.quirk is a workaround for the ethernet card suspend bug: https:
//guides.frame.work/Guide/Fedora+37+Installation+on+the+Framework+Laptop/
108?lang=en
GRUB_CMDLINE_LINUX="net.ifnames=0 nvme.noacpi=1 mem_sleep_default=deep usbcore.quirks=0bda:8156:k"
# fix the resolution in grub for fonts to not be tiny
GRUB_GFXMODE=1024x768
Other than that, I haven't been able to max out the card because I
don't have other 2.5Gbit/s equipment at home, which is strangely
satisfying. But running against my Turris Omnia
router, I could pretty much max a gigabit fairly easily:
The card doesn't require any proprietary firmware blobs which is
surprising. Other than the power saving issues, it just works.
In my power tests (see powerstat-wayland), the Ethernet card seems
to use about 1.6W of power idle, without link, in the above "quirky"
configuration where the card is functional but without autosuspend.
Proprietary firmware blobs
The framework does need proprietary firmware to operate. Specifically:
the WiFi network card shipped with the DIY kit is a AX210 card that
requires a 5.19 kernel or later, and the firmware-iwlwifi non-free firmware package
the Bluetooth adapter also loads the firmware-iwlwifi
package (untested)
the graphics work out of the box without firmware, but certain
power management features come only with special proprietary
firmware, normally shipped in the firmware-misc-nonfree
but currently missing from the package
Note that, at the time of writing, the latest i915 firmware from
linux-firmware has a serious bug where loading all the
accessible firmware results in noticeable I estimate 200-500ms lag
between the keyboard (not the mouse!) and the display. Symptoms also
include tearing and shearing of windows, it's pretty nasty.
One workaround is to delete the two affected firmware files:
cd /lib/firmware && rm adlp_guc_70.1.1.bin adlp_guc_69.0.3.bin
update-initramfs -u
You will get the following warning during build, which is good as
it means the problematic firmware is disabled:
W: Possible missing firmware /lib/firmware/i915/adlp_guc_69.0.3.bin for module i915
W: Possible missing firmware /lib/firmware/i915/adlp_guc_70.1.1.bin for module i915
But then it also means that critical firmware isn't loaded, which
means, among other things, a higher battery drain. I was able to move
from 8.5-10W down to the 7W range after making the firmware work
properly. This is also after turning the backlight all the way down,
as that takes a solid 2-3W in full blast.
The proper fix is to use some compositing manager. I ended up using
compton with the following systemd unit:
compton is orphaned however, so you might be tempted to use
picom instead, but in my experience the latter uses much
more power (1-2W extra, similar experience). I also tried
compiz but it would just crash with:
anarcat@angela:~$ compiz --replace
compiz (core) - Warn: No XI2 extension
compiz (core) - Error: Another composite manager is already running on screen: 0
compiz (core) - Fatal: No manageable screens found on display :0
When running from the base session, I would get this instead:
Also note that the iwlwifi firmware also looks incomplete. Even with
the package installed, I get those errors in dmesg:
[   19.534429] Intel(R) Wireless WiFi driver for Linux
[   19.534691] iwlwifi 0000:a6:00.0: enabling device (0000 -> 0002)
[   19.541867] iwlwifi 0000:a6:00.0: firmware: failed to load iwlwifi-ty-a0-gf-a0-72.ucode (-2)
[   19.541881] iwlwifi 0000:a6:00.0: firmware: failed to load iwlwifi-ty-a0-gf-a0-72.ucode (-2)
[   19.541882] iwlwifi 0000:a6:00.0: Direct firmware load for iwlwifi-ty-a0-gf-a0-72.ucode failed with error -2
[   19.541890] iwlwifi 0000:a6:00.0: firmware: failed to load iwlwifi-ty-a0-gf-a0-71.ucode (-2)
[   19.541895] iwlwifi 0000:a6:00.0: firmware: failed to load iwlwifi-ty-a0-gf-a0-71.ucode (-2)
[   19.541896] iwlwifi 0000:a6:00.0: Direct firmware load for iwlwifi-ty-a0-gf-a0-71.ucode failed with error -2
[   19.541903] iwlwifi 0000:a6:00.0: firmware: failed to load iwlwifi-ty-a0-gf-a0-70.ucode (-2)
[   19.541907] iwlwifi 0000:a6:00.0: firmware: failed to load iwlwifi-ty-a0-gf-a0-70.ucode (-2)
[   19.541908] iwlwifi 0000:a6:00.0: Direct firmware load for iwlwifi-ty-a0-gf-a0-70.ucode failed with error -2
[   19.541913] iwlwifi 0000:a6:00.0: firmware: failed to load iwlwifi-ty-a0-gf-a0-69.ucode (-2)
[   19.541916] iwlwifi 0000:a6:00.0: firmware: failed to load iwlwifi-ty-a0-gf-a0-69.ucode (-2)
[   19.541917] iwlwifi 0000:a6:00.0: Direct firmware load for iwlwifi-ty-a0-gf-a0-69.ucode failed with error -2
[   19.541922] iwlwifi 0000:a6:00.0: firmware: failed to load iwlwifi-ty-a0-gf-a0-68.ucode (-2)
[   19.541926] iwlwifi 0000:a6:00.0: firmware: failed to load iwlwifi-ty-a0-gf-a0-68.ucode (-2)
[   19.541927] iwlwifi 0000:a6:00.0: Direct firmware load for iwlwifi-ty-a0-gf-a0-68.ucode failed with error -2
[   19.541933] iwlwifi 0000:a6:00.0: firmware: failed to load iwlwifi-ty-a0-gf-a0-67.ucode (-2)
[   19.541937] iwlwifi 0000:a6:00.0: firmware: failed to load iwlwifi-ty-a0-gf-a0-67.ucode (-2)
[   19.541937] iwlwifi 0000:a6:00.0: Direct firmware load for iwlwifi-ty-a0-gf-a0-67.ucode failed with error -2
[   19.544244] iwlwifi 0000:a6:00.0: firmware: direct-loading firmware iwlwifi-ty-a0-gf-a0-66.ucode
[   19.544257] iwlwifi 0000:a6:00.0: api flags index 2 larger than supported by driver
[   19.544270] iwlwifi 0000:a6:00.0: TLV_FW_FSEQ_VERSION: FSEQ Version: 0.63.2.1
[   19.544523] iwlwifi 0000:a6:00.0: firmware: failed to load iwl-debug-yoyo.bin (-2)
[   19.544528] iwlwifi 0000:a6:00.0: firmware: failed to load iwl-debug-yoyo.bin (-2)
[   19.544530] iwlwifi 0000:a6:00.0: loaded firmware version 66.55c64978.0 ty-a0-gf-a0-66.ucode op_mode iwlmvm
Some of those are available in the latest upstream firmware package
(iwlwifi-ty-a0-gf-a0-71.ucode, -68, and -67), but not all
(e.g. iwlwifi-ty-a0-gf-a0-72.ucode is missing) . It's unclear what
those do or don't, as the WiFi seems to work well without them.
I still copied them in from the latest linux-firmware package in the
hope they would help with power management, but I did not notice a
change after loading them.
There are also multiple knobs on the iwlwifi and iwlmvm
drivers. The latter has a power_schmeme setting which defaults to
2 (balanced), setting it to 3 (low power) could improve
battery usage as well, in theory. The iwlwifi driver also has
power_save (defaults to disabled) and power_level (1-5, defaults
to 1) settings. See also the output of modinfo iwlwifi and
modinfo iwlmvm for other driver options.
Graphics acceleration
After loading the latest upstream firmware and setting up a
compositing manager (compton, above), I tested the classic
glxgears.
Running in a window gives me odd results, as the gears basically grind
to a halt:
Running synchronized to the vertical refresh.  The framerate should be
approximately the same as the monitor refresh rate.
137 frames in 5.1 seconds = 26.984 FPS
27 frames in 5.4 seconds =  5.022 FPS
Ouch. 5FPS!
But interestingly, once the window is in full screen, it does hit the
monitor refresh rate:
300 frames in 5.0 seconds = 60.000 FPS
I'm not really a gamer and I'm not normally using any of that fancy
graphics acceleration stuff (except maybe my browser does?).
I installed intel-gpu-tools for the intel_gpu_top
command to confirm the GPU was engaged when doing those simulations. A
nice find. Other useful diagnostic tools include glxgears and
glxinfo (in mesa-utils) and (vainfo in vainfo).
Following to this post, I also made sure to have those settings
in my about:config in Firefox, or, in user.js:
user_pref("media.ffmpeg.vaapi.enabled", true);
Note that the guide suggests many other settings to tweak, but those
might actually be overkill, see this comment and its parents. I
did try forcing hardware acceleration by setting gfx.webrender.all
to true, but everything became choppy and weird.
The guide also mentions installing the intel-media-driver package,
but I could not find that in Debian.
The Arch wiki has, as usual, an excellent reference on hardware
acceleration in Firefox.
Chromium / Signal desktop bugs
It looks like both Chromium and Signal Desktop misbehave with my
compositor setup (compton + i3). The fix is to add a persistent
flag to Chromium. In Arch, it's conveniently in
~/.config/chromium-flags.conf but that doesn't actually work in
Debian. I had to put the flag in
/etc/chromium.d/disable-compositing, like this:
It's possible another one of the hundreds of flags might fix this
issue better, but I don't really have time to go through this entire,
incomplete, and unofficial list (!?!).
Signal Desktop is a similar problem, and doesn't reuse those flags
(because of course it doesn't). Instead I had to rewrite the wrapper
script in /usr/local/bin/signal-desktop to use this instead:
exec /usr/bin/flatpak run --branch=stable --arch=x86_64 org.signal.Signal --disable-gpu-compositing "$@"
This was mostly done in this Puppet commit.
I haven't figured out the root of this problem. I did try using
picom and xcompmgr; they both suffer from the same issue. Another
Debian testing user on Wayland told me they haven't seen this problem,
so hopefully this can be fixed by switching to
wayland.
Graphics card hangs
I believe I might have this bug which results in a total
graphical hang for 15-30 seconds. It's fairly rare so it's not too
disruptive, but when it does happen, it's pretty alarming.
The comments on that bug report are encouraging though: it seems this
is a bug in either mesa or the Intel graphics driver, which means many
people have this problem so it's likely to be fixed. There's actually
a merge request on mesa already (2022-12-29).
It could also be that bug because the error message I get is
actually:
Jan 20 12:49:10 angela kernel: Asynchronous wait on fence 0000:00:02.0:sway[104431]:cb0ae timed out (hint:intel_atomic_commit_ready [i915])
Jan 20 12:49:15 angela kernel: i915 0000:00:02.0: [drm] GPU HANG: ecode 12:0:00000000
Jan 20 12:49:15 angela kernel: i915 0000:00:02.0: [drm] Resetting chip for stopped heartbeat on rcs0
Jan 20 12:49:15 angela kernel: i915 0000:00:02.0: [drm] GuC firmware i915/adlp_guc_70.1.1.bin version 70.1
Jan 20 12:49:15 angela kernel: i915 0000:00:02.0: [drm] HuC firmware i915/tgl_huc_7.9.3.bin version 7.9
Jan 20 12:49:15 angela kernel: i915 0000:00:02.0: [drm] HuC authenticated
Jan 20 12:49:15 angela kernel: i915 0000:00:02.0: [drm] GuC submission enabled
Jan 20 12:49:15 angela kernel: i915 0000:00:02.0: [drm] GuC SLPC enabled
It's a solid 30 seconds graphical hang. Maybe the keyboard and
everything else keeps working. The latter bug report is quite long,
with many comments, but this one from January 2023 seems to say
that Sway 1.8 fixed the problem. There's also an earlier patch to
add an extra kernel parameter that supposedly fixes that too. There's
all sorts of other workarounds in there, for example this:
from this comment... So that one is unsolved, as far as the
upstream drivers are concerned, but maybe could be fixed through Sway.
Weird USB hangs / graphical glitches
I have had weird connectivity glitches better described in this
post, but basically: my USB keyboard and mice (connected over a
USB hub) drop keys, lag a lot or hang, and I get visual glitches.
The fix was to tighten the screws around the CPU on the motherboard
(!), which is, thankfully, a rather simple repair.
USB docks are hell
Note that the monitors are hooked up to angela through a USB-C /
Thunderbolt dock from Cable Matters, with the lovely name of
201053-SIL. It has issues, see this blog
post for an in-depth discussion.
Shipping details
I ordered the Framework in August 2022 and received it about a month
later, which is sooner than expected because the August batch was
late.
People (including me) expected this to have an impact on the September
batch, but it seems Framework have been able to fix the delivery
problems and keep up with the demand.
As of early 2023, their website announces that laptops ship "within 5
days". I have myself ordered a few expansion cards in November 2022,
and they shipped on the same day, arriving 3-4 days later.
The supply pipeline
There are basically 6 steps in the Framework shipping pipeline, each
(except the last) accompanied with an email notification:
pre-order
preparing batch
preparing order
payment complete
shipping
(received)
This comes from the crowdsourced spreadsheet, which should be
updated when the status changes here.
I was part of the "third batch" of the 12th generation laptop, which
was supposed to ship in September. It ended up arriving on my door
step on September 27th, about 33 days after ordering.
It seems current orders are not processed in "batches", but in real
time, see this blog post for details on shipping.
Shipping trivia
I don't know about the others, but my laptop shipped through no less
than four different airplane flights. Here are the hops it took:
I can't quite figure out how to calculate exactly how much mileage
that is, but it's huge. The ride through Alaska is surprising enough
but the bounce back through Winnipeg is especially weird. I guess
the route happens that way because of Fedex shipping hubs.
There was a related oddity when I had my Purism laptop shipped: it
left from the west coast and seemed to enter on an endless, two week
long road trip across the continental US.
Akvorado collects sFlow and IPFIX flows, stores them in a
ClickHouse database, and presents them in a web console. Although it lacks
built-in DDoS detection, it s possible to create one by crafting custom
ClickHouse queries.
DDoS detection
Let s assume we want to detect DDoS targeting our customers. As an example, we
consider a DDoS attack as a collection of flows over one minute targeting a
single customer IP address, from a single source port and matching one
of these conditions:
an average bandwidth of 1 Gbps,
an average bandwidth of 200 Mbps when the protocol is UDP,
more than 20 source IP addresses and an average bandwidth of 100 Mbps, or
more than 10 source countries and an average bandwidth of 100 Mbps.
Here is the SQL query to detect such attacks over the last 5 minutes:
DDoS remediation
Once detected, there are at least two ways to stop the attack at the network
level:
blackhole the traffic to the targeted user (RTBH), or
selectively drop packets matching the attack patterns (Flowspec).
Traffic blackhole
The easiest method is to sacrifice the attacked user. While this helps the
attacker, this protects your network. It is a method supported by all routers.
You can also offload this protection to many transit providers. This is useful
if the attack volume exceeds your internet capacity.
This works by advertising with BGP a route to the attacked user with a specific
community. The border router modifies the next hop address of these routes to a
specific IP address configured to forward the traffic to a null interface. RFC 7999 defines 65535:666 for this purpose. This is known as a
remote-triggered blackhole (RTBH) and is explained in more detail in RFC 3882.
It is also possible to blackhole the source of the attacks by leveraging
unicast Reverse Path Forwarding (uRPF) from RFC 3704, as explained in RFC 5635. However, uRPF can be a serious tax on your router resources. See
NCS5500 uRPF: Configuration and Impact on Scale for an example of the kind
of restrictions you have to expect when enabling uRPF.
On the advertising side, we can use BIRD. Here is a complete configuration
file to allow any router to collect them:
log stderr all;
router id 192.0.2.1;protocol device
scan time 10;protocol bgp exporter
ipv4
import none;
export where proto = "blackhole4"; ;
ipv6
import none;
export where proto = "blackhole6"; ;
local as 64666; neighbor range 192.0.2.0/24 external;
multihop;
dynamic name "exporter";
dynamic name digits 2;
graceful restart yes;
graceful restart time 0; long lived graceful restart yes;
long lived stale time 3600;# keep routes for 1 hour!protocol static blackhole4
ipv4;
route 203.0.113.206/32 blackhole bgp_community.add((65535, 666));
; route 203.0.113.68/32 blackhole bgp_community.add((65535, 666));
;protocol static blackhole6
ipv6;
We use BGP long-lived graceful restart to ensure routes are kept for
one hour, even if the BGP connection goes down, notably during maintenance.
On the receiver side, if you have a Cisco router running IOS XR, you can use the
following configuration to blackhole traffic received on the BGP session. As the
BGP session is dedicated to this usage, The community is not used, but you can
also forward these routes to your transit providers.
router static
vrf public
address-family ipv4 unicast
192.0.2.1/32 Null0 description "BGP blackhole" !address-family ipv6 unicast
2001:db8::1/128 Null0 description "BGP blackhole" ! !!route-policy blackhole_ipv4_in_public
if destination in (0.0.0.0/0 le 31) then
dropendifset next-hop 192.0.2.1doneend-policy!route-policy blackhole_ipv6_in_public
if destination in (::/0 le 127) then
dropendifset next-hop 2001:db8::1doneend-policy!router bgp 12322neighbor-group BLACKHOLE_IPV4_PUBLIC
remote-as64666ebgp-multihop255update-source Loopback10
address-family ipv4 unicast
maximum-prefix10090route-policy blackhole_ipv4_in_public in
route-policy drop out
long-lived-graceful-restart stale-time send 86400 accept 86400 !address-family ipv6 unicast
maximum-prefix10090route-policy blackhole_ipv6_in_public in
route-policy drop out
long-lived-graceful-restart stale-time send 86400 accept 86400 ! !vrf public
neighbor192.0.2.1use neighbor-group BLACKHOLE_IPV4_PUBLIC
description akvorado-1
When the traffic is blackholed, it is still reported by IPFIX and sFlow.
In Akvorado, use ForwardingStatus >= 128 as a filter.
While this method is compatible with all routers, it makes the attack successful
as the target is completely unreachable. If your router supports it, Flowspec
can selectively filter flows to stop the attack without impacting the
customer.
FlowspecFlowspec is defined in RFC 8955 and enables the transmission of flow
specifications in BGP sessions. A flow specification is a set of matching
criteria to apply to IP traffic. These criteria include the source and
destination prefix, the IP protocol, the source and destination port, and the
packet length. Each flow specification is associated with an action, encoded as an
extended community: traffic shaping, traffic marking, or redirection.
To announce flow specifications with BIRD, we extend our configuration. The
extended community used shapes the matching traffic to 0 bytes per second.
flow4 table flowtab4;
flow6 table flowtab6;
protocol bgp exporter
flow4
import none;
export where proto = "flowspec4"; ;
flow6
import none;
export where proto = "flowspec6"; ;# [ ]protocol static flowspec4
flow4;
route flow4
  dst 203.0.113.68/32;
  sport = 53;
  length >= 1476 && <= 1500;
  proto = 17;

  bgp_ext_community.add((generic, 0x80060000, 0x00000000));
 ;
route flow4
dst 203.0.113.206/32;
sport = 123;
length = 468;
proto = 17;
bgp_ext_community.add((generic, 0x80060000, 0x00000000));
;protocol static flowspec6
flow6;
If you have a Cisco router running IOS XR, the configuration may look like
this:
vrf public
address-family ipv4 flowspec
address-family ipv6 flowspec
!router bgp 12322address-family vpnv4 flowspec
address-family vpnv6 flowspec
neighbor-group FLOWSPEC_IPV4_PUBLIC
remote-as64666ebgp-multihop255update-source Loopback10
address-family ipv4 flowspec
long-lived-graceful-restart stale-time send 86400 accept 86400route-policy accept in
route-policy drop out
maximum-prefix10090validation disable
!address-family ipv6 flowspec
long-lived-graceful-restart stale-time send 86400 accept 86400route-policy accept in
route-policy drop out
maximum-prefix10090validation disable
! !vrf public
address-family ipv4 flowspec
address-family ipv6 flowspec
neighbor192.0.2.1use neighbor-group FLOWSPEC_IPV4_PUBLIC
description akvorado-1
Then, you need to enable Flowspec on all interfaces with:
As with the RTBH setup, you can filter dropped flows with ForwardingStatus >=
128.
DDoS detection (continued)
In the example using Flowspec, the flows were also filtered on the length of the packet:
route flow4
dst 203.0.113.68/32;
sport = 53;
length >= 1476 && <= 1500;
proto = 17;
bgp_ext_community.add((generic, 0x80060000, 0x00000000));
;
This is an important addition: legitimate DNS requests are smaller than this and
therefore not filtered.2 With ClickHouse, you can get the 10th
and 90th percentiles of the packet sizes with quantiles(0.1,
0.9)(Bytes/Packets).
The last issue we need to tackle is how to optimize the request: it may need
several seconds to collect the data and it is likely to consume substantial
resources from your ClickHouse database. One solution is to create a
materialized view to pre-aggregate results:
The ddos_logs table is using the SummingMergeTree engine. When the table
receives new data, ClickHouse replaces all the rows with the same sorting key,
as defined by the ORDER BY directive, with one row which contains summarized
values using either the sum() function or the explicitly specified aggregate
function (uniqCombined and quantiles in our example).3
Finally, we can modify our initial query with the following one:
Gluing everything together
To sum up, building an anti-DDoS system requires to following these steps:
define a set of criteria to detect a DDoS attack,
translate these criteria into SQL requests,
pre-aggregate flows into SummingMergeTree tables,
query and transform the results to a BIRD configuration file, and
configure your routers to pull the routes from BIRD.
A Python script like the following one can handle the fourth step. For each
attacked target, it generates both a Flowspec rule and a blackhole route.
importsocketimporttypesfromclickhouse_driverimportClientasCHClient# Put your SQL query here!SQL_QUERY=" "# How many anti-DDoS rules we want at the same time?MAX_DDOS_RULES=20defempty_ruleset():ruleset=types.SimpleNamespace()ruleset.flowspec=types.SimpleNamespace()ruleset.blackhole=types.SimpleNamespace()ruleset.flowspec.v4=[]ruleset.flowspec.v6=[]ruleset.blackhole.v4=[]ruleset.blackhole.v6=[]returnrulesetcurrent_ruleset=empty_ruleset()client=CHClient(host="clickhouse.akvorado.net")whileTrue:results=client.execute(SQL_QUERY)seen=new_ruleset=empty_ruleset()for(t,addr,proto,port,gbps,mpps,sources,countries,size)inresults:if(addr,proto,port)inseen:continueseen[(addr,proto,port)]=True# Flowspecifaddr.ipv4_mapped:address=addr.ipv4_mappedrules=new_ruleset.flowspec.v4table="flow4"mask=32nh="proto"else:address=addrrules=new_ruleset.flowspec.v6table="flow6"mask=128nh="next header"ifsize[0]==size[1]:length=f"length = int(size[0])"else:length=f"length >= int(size[0]) && <= int(size[1])"header=f"""# Time: t# Source: address, protocol: proto, port: port# Gbps/Mpps: gbps:.3/mpps:.3, packet size: int(size[0])<=X<=int(size[1])# Flows: flows, sources: sources, countries: countries"""rules.append(f"""headerroute table dst address/mask; sport = port;length;nh = socket.getprotobyname(proto); bgp_ext_community.add((generic, 0x80060000, 0x00000000));;""")# Blackholeifaddr.ipv4_mapped:rules=new_ruleset.blackhole.v4else:rules=new_ruleset.blackhole.v6rules.append(f"""headerroute address/mask blackhole bgp_community.add((65535, 666));;""")new_ruleset.flowspec.v4=list(set(new_ruleset.flowspec.v4[:MAX_DDOS_RULES]))new_ruleset.flowspec.v6=list(set(new_ruleset.flowspec.v6[:MAX_DDOS_RULES]))# TODO: advertise changes by mail, chat, ...current_ruleset=new_rulesetchanges=Falseforrules,pathin((current_ruleset.flowspec.v4,"v4-flowspec"),(current_ruleset.flowspec.v6,"v6-flowspec"),(current_ruleset.blackhole.v4,"v4-blackhole"),(current_ruleset.blackhole.v6,"v6-blackhole"),):path=os.path.join("/etc/bird/",f"path.conf")withopen(f"path.tmp","w")asf:forrinrules:f.write(r)changes=(changesornotos.path.exists(path)ornotsamefile(path,f"path.tmp"))os.rename(f"path.tmp",path)ifnotchanges:continueproc=subprocess.Popen(["birdc","configure"],stdin=subprocess.DEVNULL,stdout=subprocess.PIPE,stderr=subprocess.PIPE,)stdout,stderr=proc.communicate(None)stdout=stdout.decode("utf-8","replace")stderr=stderr.decode("utf-8","replace")ifproc.returncode!=0:logger.error(" error:\n\n".format("birdc reconfigure","\n".join([" O: ".format(line)forlineinstdout.rstrip().split("\n")]),"\n".join([" E: ".format(line)forlineinstderr.rstrip().split("\n")]),))
Until Akvorado integrates DDoS detection and mitigation, the ideas presented
in this blog post provide a solid foundation to get started with your own
anti-DDoS system.
ClickHouse can export results using Markdown format when
appending FORMAT Markdown to the query.
While most DNS clients should retry with TCP on failures, this is not
always the case: until recently, musl libc did not implement this.
The materialized view also aggregates the data at hand, both
for efficiency and to ensure we work with the right data types.
Armadillo is a powerful
and expressive C++ template library for linear algebra and scientific
computing. It aims towards a good balance between speed and ease of use,
has a syntax deliberately close to Matlab, and is useful for algorithm
development directly in C++, or quick conversion of research code into
production environments. RcppArmadillo
integrates this library with the R environment and language and is
widely used by (currently) 1042 other packages on CRAN, downloaded 28.1 million
times (per the partial logs from the cloud mirrors of CRAN), and the CSDA paper (preprint
/ vignette) by Conrad and myself has been cited 513 times according
to Google Scholar.
This release brings a new upstream release 12.0.1. We found a small
regression with the 12.0.0 release when we tested prior to a CRAN
upload. Conrad very promptly fixed
this with a literal one liner and made it 12.0.1 which we
wrapped up as 0.12.0.1.0. Subsequent testing revealed no issues for us,
and CRAN autoprocessed it as I
tweeted earlier. This is actually quite impressive given the over
1000 CRAN packages using it all of which got tested again by CRAN. All
this is testament to the rigour, as well as the well-oiled process at
the repository. Our thanks go to the tireless maintainers!
The releases actually has a rather nice set of changes (detailed
below) to which we added one robustification thanks to Kevin.
The full set of changes follows. We include the previous changeset as
we may have skipped the usual blog post here.
Changes
in RcppArmadillo version 0.12.0.1.0 (2023-02-20)
Upgraded to Armadillo release 12.0.1 (Cortisol Profusion)
faster fft() and ifft() via optional
use of FFTW3
faster min() and max()
faster index_min() and
index_max()
added .col_as_mat() and .row_as_mat()
which return matrix representation of cube column and cube row
added csv_opts::strict option to loading CSV files
to interpret missing values as NaN
added check_for_zeros option to form 4 of sparse
matrix batch constructors
inv() and inv_sympd() with options
inv_opts::no_ugly or inv_opts::allow_approx
now use a scaled threshold similar to pinv()
set_cout_stream() and set_cerr_stream()
are now no-ops; instead use the options ARMA_WARN_LEVEL, or
ARMA_COUT_STREAM, or ARMA_CERR_STREAM
fix regression (mis-compilation) in shift() function
(reported by us in #409)
The include directory order is now more robust (Kevin Ushey in #407
addressing #406)
Changes
in RcppArmadillo version 0.11.4.4.0 (2023-02-09)
Upgraded to Armadillo release 11.4.4 (Ship of Theseus)
extended pow() with various forms of element-wise
power operations
added find_nan() to find indices of NaN
elements
faster handling of compound expressions by
sum()
The package no longer sets a compilation standard, or progagates
on in the generated packages as R ensures C++11 on all non-ancient
versions
The CITATION file was updated to the current format
Back in September last year I chose to back the StarFiveVisionFive 2 on Kickstarter. I don t have a particular use in mind for it, but I felt it was one of the first RISC-V systems that were relatively capable (mentally I have it as somewhere between a Raspberry Pi 3 + a Pi 4). In particular it s a quad 1.5GHz 64-bit RISC-V core with 8G RAM, USB3, GigE ethernet and a single M.2 PCIe slot. More than ample as a personal machine for playing around with RISC-V and doing local builds. I ended up paying 67 for the Early Bird variant (dual GigE ethernet rather than 1 x 100Mb and 1 x GigE). A couple of weeks ago I got an email with a tracking number and last week it finally turned up.
Being impatient the first thing I did was plug it into a monitor, connect up a keyboard, and power it on. Nothing except some flashing lights. Looking at the boot selector DIP switches suggested it was configured to boot from UART, so I flipped them to (what I thought was) the flash setting. It wasn t - turns out the ON marking on the switches represents logic 0 and it was correctly setup when I got it. I went to read the documentation which talked about writing an image to a MicroSD card, but also had details of the UART connection. Wanting to make sure the device was at least doing something before I actually tried an OS on it I hooked up a USB/serial dongle and powered the board up again. Success! U-Boot appeared and I could interact with it.
I went to the VisionFive2 Debian page and proceeded to torrent the Image-69 image, writing it to a MicroSD card and inserting it in the slot on the bottom of the board. It booted fine. I can t even tell you what graphical environment it booted up because I don t remember; it worked fine though (at 1080p, I ve seen reports that 4K screens will make it croak).
Poking around the image revealed that it s built off a snapshot.debian.org snapshot from 20220616T194833Z, which is a little dated at this point but I understand the rationale behind picking something that works and sticking with it. The kernel is of course a vendor special, based on 5.15.0. Further investigation revealed that the entire X/graphics stack is living in /usr/local, which isn t overly surprising; it s Imagination based. I was pleasantly surprised to discover there is work to upstream the Imagination support, but I m not planning to run the board with a monitor attached so it s not a high priority for me.
Having discovered all that I decided to see how well a clean Debian unstable install from Debian Ports would go. I had a spare Intel Optane lying around (it s a stupid 22110 M.2 which is too long for any machine I own), so I put it in the slot on the bottom of the board. To my surprise it Just Worked and was detected ok:
I created a single partition with an ext4 filesystem (initially tried btrfs, but the StarFive kernel doesn t support it), and kicked off a debootstrap with:
The u-boot setup has a convoluted set of vendor scripts that eventually ends up reading a /boot/extlinux/extlinux.conf config from /dev/mmcblk1p2, so I added an additional entry there using the StarFive kernel but pointing to the NVMe device for /. Made sure to set a root password (not that I ve been bitten by that before, too many times), and rebooted. Success! Well. Sort of. I hit a bunch of problems with having a getty running on ttyS0 as well as one running on hvc0. The second turns out to be a console device from the RISC-V SBI. I did a systemctl mask serial-getty@hvc0.service which made things a bit happier, but I was still seeing odd behaviour and output. Turned out I needed to reboot the initramfs as well; the StarFive one was using Plymouth and doing some other stuff that seemed to be confusing matters. An update-initramfs -k 5.15.0-starfive -c built me a new one and everything was happy.
Next problem; the StarFive kernel doesn t have IPv6 support. StarFive are good citizens and make their 5.15 kernel tree available, so I grabbed it, fed it the existing config, and tweaked some options (including adding IPV6 and SECCOMP, which chrony wanted). Slight hiccup when it turned out trying to do things like make sound modular caused it to fail to compile, and having to backport the fix that allowed the use of GCC 12 (as present in sid), but it got there. So I got cocky and tried to update it to the latest 5.15.94. A few manual merge fixups (which I may or may not have got right, but it compiles and boots for me), and success. Timings:
$ time make -j 4 bindeb-pkg
  [linux-image-5.15.94-00787-g1fbe8ac32aa8]
real	37m0.134s
user	117m27.392s
sys	6m49.804s
On the subject of kernels I am pleased to note that there are efforts to upstream the VisionFive 2 support, with what appears to be multiple members of StarFive engaging in multiple patch submission rounds. It s really great to see this and I look forward to being able to run an unmodified mainline kernel on my board.
Niggles? I have a few. The provided u-boot doesn t have NVMe support enabled, so at present I need to keep a MicroSD card to boot off, even though root is on an SSD. I m also seeing some errors in dmesg from the SSD:
It doesn t seem to cause any actual issues, and it could be the SSD, the 5.15 kernel or an actual hardware thing - I ll keep an eye on it (I will probably end up with a different SSD that actually fits, so that ll provide another data point).
More annoying is the temperature the CPU seems to run at. There s no heatsink or fan, just the metal heatspreader on top of the CPU, and in normal idle operation it sits at around 60 C. Compiling a kernel it hit 90 C before I stopped the job and sorted out some additional cooling in the form of a desk fan, which kept it as just over 30 C.
I haven t seen any actual stability problems, but I wouldn t want to run for any length of time like that. I ve ordered a heatsink and also realised that the board supports a Raspberry Pi style PoE Hat , so I ve got one of those that includes a fan ordered (I am a complete convert to PoE especially for small systems like this).
With the desk fan setup I ve been able to run the board for extended periods under load (I did a full recompile of the Debian 6.1.12-1 kernel package and it took about 10 hours). The M.2 slot is unfortunately only a single PCIe v2 lane, and my testing topped out at about 180MB/s. IIRC that is about half what the slot should be capable of, and less than a 10th of what the SSD can do. Ethernet testing with iPerf3 sustained about 941Mb/s, so basically maxing out the port. The board as a whole isn t going to set any speed records, but it s perfectly usable, and pretty impressive for the price point.
On the Debian side I ve not hit any surprises. There s work going on to move RISC-V to a proper release architecture, and I m hoping to be able to help out with that, but the version of unstable I installed from the ports infrastructure has looked just like any other Debian install. Which is what you want. And that pretty much sums up my overall experience of the VisionFive 2; it s not noticeably different than any other single board computer. That s a good thing, FWIW, and once the kernel support lands properly upstream (it ll be post 6.3 at least it seems) it ll be a boring mainline supported platform that just happens to be RISC-V.
The Dell T320
Almost 2 years ago I made a Dell PowerEdge T320 my home server [1]. It was a decent upgrade from the PowerEdge T110 II that I had used previously. One benefit of that system was that I needed more RAM and the PowerEdge T1xx series use unbuffered ECC RAM which is unreasonably expensive as well as the DIMMs tending to be smaller (no Load Reduced DIMMS) and only having 4 slots. As I had bought two T320s I put all the RAM in a single server getting a total of 96G and then put some cheap DIMMs in the other one and sold it with 48G.
The T320 has all the server reliability features including hot-swap redundant PSUs and hot-swap hard drives. One thing it doesn t have redundancy on is the motherboard management system known as iDRAC. 3 days ago my suburb had a power outage and when power came back on the T320 gave an error message about a failure to initialise the iDRAC and put all the fans on maximum speed, which is extremely loud. When a T320 is running in a room that s not particularly hot and it doesn t have SAS disks it s a very quiet server, one of the quietest I ve ever owned. When it goes into emergency cooling mode due to iDRAC failure it s loud enough to be heard from the other end of the house with doors closed in between.
Googling this failure gave a few possible answers. One was for some combinations of booting with the iDRAC button held down, turning off for a while and booting with the iDRAC button held down, etc (this didn t work). One was for putting a iDRAC firmware file on the SD card so iDRAC could automatically load it (which I tested even though I didn t have the flashing LED which indicates that it is likely to work, but it didn t do anything). The last was to enable serial console and configure the iDRAC to load new firmware via TFTP, I didn t get a iDRAC message from the serial console just the regular BIOS stuff.
So it looks like I ll have to sell the T320 for parts or find someone who wants to run it in it s current form. Currently to boot it I have to press F1 a few times to bypass BIOS messages (someone on the Internet reported making a device to key-jam F1). Then when it boots it s unreasonably loud, but apparently if you are really keen you can buy fans that have temperature sensors to control their own speed and bypass the motherboard control.
I d appreciate any advice on how to get this going. At this stage I m not going to go back to it but if I can get it working properly I can sell it for a decent price.
The HP Z640
I ve replaced the T320 with a HP Z640 workstation with 32G of RAM which I had recently bought to play with Stable Diffusion. There were hundreds of Z640 workstations with NVidia Quadro M6000 GPUs going on eBay for under $400 each, it looked like a company that did a lot of ML work had either gone bankrupt or upgraded all their employees systems. The price for the systems was surprisingly cheap, at regular eBay prices it seems that the GPU and the RAM go for about the same price as the system. It turned out that Stable Diffusion didn t like the video card in my setup for unknown reasons but also that the E5-1650v3 CPU could render an image in 15 minutes which is fast enough to test it out but not fast enough for serious use. I had been planning to blog about that.
When I bought the T320 server the DDR3 Registered ECC RAM it uses cost about $100 for 8*8G DIMMs, with 16G DIMMs being much more expensive. Now the DDR4 Registered ECC RAM used by my Z640 goes for about $120 for 2*16G DIMMs. In the near future I ll upgrade that system to 64G of RAM. It s disappointing that the Z640 only has 4 DIMM sockets per CPU so if you get a single-CPU version (as I did) and don t get the really expensive Load Reduced RAM then you are limited to 64G. So the supposed capacity benefit of going from DDR3 to DDR4 doesn t seem to apply to this upgrade.
The Z640 I got has 4 bays for hot-swap SAS/SATA 2.5 SSD/HDDs and 2 internal bays for 3.5 hard drives. The T320 has 8*3.5 hot swap bays and I had 3 hard drives in them in a BTRFS RAID-10 configuration. Currently I ve got one hard drive attached via USB but that s obviously not a long-term solution. The 3 hard drives are 4TB, they have worked since 4TB was a good size. I have a spare 8TB disk so I could buy a second ($179 for a shingle HDD) to make a 8TB RAID-1 array. The other option is to pay $369 for a 4TB SSD (or $389 for a 4TB NVMe + $10 for the PCIe card) to keep the 3 device RAID-10. As tempting as 4TB SSDs are I ll probably get a cheap 8TB disk which will take capacity from 6TB to 8TB and I could use some extra 4TB disks for backups.
I haven t played with the AMT/MEBX features on this system, I presume that they will work the same way as AMT/MEBX on the HP Z420 I ve used previously [2].
Update:
HP has free updates for the BIOS etc available here [3]. Unfortunately it seems to require loading a kernel module supplied by HP to do this. This is a bad thing, kernel code that isn t in the mainline kernel is either of poor quality or isn t licensed correctly.
I had to change my monitoring system to alert on temperatures over 100% of the high range while on the T320 I had it set at 95% of high and never got warnings. This is disappointing, enterprise class gear running in a reasonably cool environment (ambient temperature of about 22C) should be able to run all CPU cores at full performance without hitting 95% of the high temperature level.
I recently got a new NVME drive. My plan was to create a fresh Debian install on an F2FS root partition with compression for maximum performance. As it turns out, this is not entirely trivil to accomplish.
For one, the Debian installer does not support F2FS (here is my attempt to add it from 2021).
And even if it did, grub does not support F2FS with the extra_attr flag that is required for compression support (at least as of grub 2.06).
Luckily, we can install Debian anyway with all these these shiny new features when we go the manual road with debootstrap and using systemd-boot as bootloader.
We can break down the process into several steps:
Warning: Playing around with partitions can easily result in data if you mess up! Make sure to double check your commands and create a data backup if you don t feel confident about the process.
Creating the partition partble
The first step is to create the GPT partition table on the new drive. There are several tools to do this, I recommend the ArchWiki page on this topic for details.
For simplicity I just went with the GParted since it has an easy GUI, but feel free to use any other tool.
The layout should look like this:
Type         Partition        Suggested size

EFI          /dev/nvme0n1p1           512MiB
Linux swap   /dev/nvme0n1p2             1GiB
Linux fs     /dev/nvme0n1p3        remainder
Notes:
The disk names are just an example and have to be adjusted for your system.
Don t set disk labels, they don t appear on the new install anyway and some UEFIs might not like it on your boot partition.
The size of the EFI partition can be smaller, in practive it s unlikely that you need more than 300 MiB. However some UEFIs might be buggy and if you ever want to install an additional kernel or something like memtest86+ you will be happy to have the extra space.
The swap partition can be omitted, it is not strictly needed. If you need more swap for some reason you can also add more using a swap file later (see ArchWiki page). If you know you want to use suspend-to-RAM, you want to increase the size to something more than the size of your memory.
If you used GParted, create the EFI partition as FAT32 and set the esp flag. For the root partition use ext4 or F2FS if available.
Creating and mounting the root partition
To create the root partition, we need to install the f2fs-tools first:
sudo apt install f2fs-tools
Now we can create the file system with the correct flags:
--arch sets the CPU architecture (see Debian Wiki).
--components sets the archive components, if you don t want non-free pacakges you might want to remove some entries here.
unstable is the Debian release, you might want to change that to testing or bookworm.
$DFS points to the mounting point of the root partition.
http://deb.debian.org/debian is the Debian mirror, you might want to set that to http://ftp.de.debian.org/debian or similar if you have a fast mirror in you area.
Chrooting into the system
Before we can chroot into the newly created system, we need to prepare and mount virtual kernel file systems. First create the directories:
Then bind-mount the directories from your system to the mount point of the new system:
sudo mount -v -B /dev $DFS/dev
sudo mount -v -B /dev/pts $DFS/dev/pts
sudo mount -v -B /proc $DFS/proc
sudo mount -v -B /sys $DFS/sys
sudo mount -v -B /run $DFS/run
sudo mount -v -B /sys/firmware/efi/efivars $DFS/sys/firmware/efi/efivars
As a last step, we need to mount the EFI partition:
sudo mount -v -B /dev/nvme0n1p1 $DFS/boot/efi
Now we can chroot into new system:
sudo chroot $DFS /bin/bash
Configure the base system
The first step in the chroot is setting the locales. We need this since we might leak the locales from our base system into the chroot and if this happens we get a lot of annoying warnings.
Now you have a fully functional Debian chroot! However, it is not bootable yet, so let s fix that.
Define static file system information
The first step is to make sure the system mounts all partitions on startup with the correct mount flags.
This is done in /etc/fstab (see ArchWiki page).
Open the file and change its content to:
# file system                               mount point   type   options                                                            dump   pass
# NVME efi partition
UUID=XXXX-XXXX                              /boot/efi     vfat   umask=0077                                                         0      0
# NVME swap
UUID=XXXXXXXX-XXXX-XXXX-XXXX-XXXXXXXXXXXX   none          swap   sw                                                                 0      0
# NVME main partition
UUID=XXXXXXXX-XXXX-XXXX-XXXX-XXXXXXXXXXXX   /             f2fs   compress_algorithm=zstd:6,compress_chksum,atgc,gc_merge,lazytime   0      1
You need to fill in the UUIDs for the partitions. You can use
ls -lAph /dev/disk/by-uuid/
to match the UUIDs to the more readable disk name under /dev.
Installing the kernel and bootloader
First install the systemd-boot and efibootmgr packages:
apt install systemd-boot efibootmgr
Now we can install the bootloader:
bootctl install --path=/boot/efi
You can verify the procedure worked with
efibootmgr -v
The next step is to install the kernel, you can find a fitting image with:
apt search linux-image-*
In my case:
apt install linux-image-amd64
After the installation of the kernel, apt will add an entry for systemd-boot automatically. Neat!
However, since we are in a chroot the current settings are not bootable.
The first reason is the boot partition, which will likely be the one from your current system.
To change that, navigate to /boot/efi/loader/entries, it should contain one config file.
When you open this file, it should look something like this:
title      Debian GNU/Linux bookworm/sid
version    6.1.0-3-amd64
machine-id 2967cafb6420ce7a2b99030163e2ee6a
sort-key   debian
options    root=PARTUUID=f81d4fae-7dec-11d0-a765-00a0c91e6bf6 ro systemd.machine_id=2967cafb6420ce7a2b99030163e2ee6a
linux      /2967cafb6420ce7a2b99030163e2ee6a/6.1.0-3-amd64/linux
initrd     /2967cafb6420ce7a2b99030163e2ee6a/6.1.0-3-amd64/initrd.img-6.1.0-3-amd64
The PARTUUID needs to point to the partition equivalent to /dev/nvme0n1p3 on your system. You can use
ls -lAph /dev/disk/by-partuuid/
to match the PARTUUIDs to the more readable disk name under /dev.
The second problem is the ro flag in options which tell the kernel to boot in read-only mode.
The default is rw, so you can just remove the ro flag.
Once this is fixed, the new system should be bootable. You can change the boot order with:
efibootmgr --bootorder
However, before we reboot we might add well add a user and install some basic software.
Protocol Buffers are a popular choice for serializing structured data
due to their compact size, fast processing speed, language independence, and
compatibility. There exist other alternatives, including Cap n Proto,
CBOR, and Avro.
Usually, data structures are described in a proto definition file
(.proto). The protoc compiler and a language-specific plugin convert it into
code:
Akvorado collects network flows using IPFIX or sFlow, decodes them
with GoFlow2, encodes them to Protocol Buffers, and sends them to
Kafka to be stored in a ClickHouse database. Collecting a new field,
such as source and destination MAC addresses, requires modifications in multiple
places, including the proto definition file and the ClickHouse migration code.
Moreover, the cost is paid by all users.1 It would be nice to have an
application-wide schema and let users enable or disable the fields they
need.
While the main goal is flexibility, we do not want to sacrifice performance. On
this front, this is quite a success: when upgrading from 1.6.4 to 1.7.1, the
decoding and encoding performance almost doubled!
Faster Protocol Buffers encoding
I use the following code to benchmark both the decoding and
encoding process. Initially, the Decode() method is a thin layer above
GoFlow2 producer and stores the decoded data into the in-memory structure
generated by protoc. Later, some of the data will be encoded directly during
flow decoding. This is why we measure both the decoding and the
encoding.2
The canonical Go implementation for Protocol Buffers,
google.golang.org/protobuf is not the most
efficient one. For a long time, people were relying on gogoprotobuf.
However, the project is now deprecated. A good replacement is
vtprotobuf.3
Dynamic Protocol Buffers encoding
We have our baseline. Let s see how to encode our Protocol Buffers without a
.proto file. The wire format is simple and rely a lot on variable-width
integers.
Variable-width integers, or varints, are an efficient way of encoding unsigned
integers using a variable number of bytes, from one to ten, with small values
using fewer bytes. They work by splitting integers into 7-bit payloads and using
the 8th bit as a continuation indicator, set to 1 for all payloads
except the last.
Variable-width integers encoding in Protocol Buffers
For our usage, we only need two types: variable-width
integers and byte sequences. A byte sequence is encoded by prefixing it by its
length as a varint. When a message is encoded, each key-value pair is turned
into a record consisting of a field number, a wire type, and a payload. The
field number and the wire type are encoded as a single variable-width integer
called a tag.
Message encoded with Protocol Buffers
We use the following low-level functions to build the output buffer:
Our schema abstraction contains the appropriate information to encode a message
(ProtobufIndex) and to generate a proto definition file (fields starting with
Protobuf):
typeColumnstructKeyColumnKeyNamestringDisabledbool// [ ]// For protobuf.ProtobufIndexprotowire.NumberProtobufTypeprotoreflect.Kind// Uint64Kind, Uint32Kind, ProtobufEnummap[int]stringProtobufEnumNamestringProtobufRepeatedbool
We have a few helper methods around the protowire functions to directly
encode the fields while decoding the flows. They skip disabled fields or
non-repeated fields already encoded. Here is an excerpt of the sFlow
decoder:
For fields that are required later in the pipeline, like source and destination
addresses, they are stored unencoded in a separate structure:
typeFlowMessagestructTimeReceiveduint64SamplingRateuint32// For exporter classifierExporterAddressnetip.Addr// For interface classifierInIfuint32OutIfuint32// For geolocation or BMPSrcAddrnetip.AddrDstAddrnetip.AddrNextHopnetip.Addr// Core component may override themSrcASuint32DstASuint32GotASPathbool// protobuf is the protobuf representation for the information not contained above.protobuf[]byteprotobufSetbitset.BitSet
The protobuf slice holds encoded data. It is initialized with a capacity of
500 bytes to avoid resizing during encoding. There is also some reserved room at
the beginning to be able to encode the total size as a variable-width integer.
Upon finalizing encoding, the remaining fields are added and the message length
is prefixed:
func(schema*Schema)ProtobufMarshal(bf*FlowMessage)[]byteschema.ProtobufAppendVarint(bf,ColumnTimeReceived,bf.TimeReceived)schema.ProtobufAppendVarint(bf,ColumnSamplingRate,uint64(bf.SamplingRate))schema.ProtobufAppendIP(bf,ColumnExporterAddress,bf.ExporterAddress)schema.ProtobufAppendVarint(bf,ColumnSrcAS,uint64(bf.SrcAS))schema.ProtobufAppendVarint(bf,ColumnDstAS,uint64(bf.DstAS))schema.ProtobufAppendIP(bf,ColumnSrcAddr,bf.SrcAddr)schema.ProtobufAppendIP(bf,ColumnDstAddr,bf.DstAddr)// Add length and move it as a prefixend:=len(bf.protobuf)payloadLen:=end-maxSizeVarintbf.protobuf=protowire.AppendVarint(bf.protobuf,uint64(payloadLen))sizeLen:=len(bf.protobuf)-endresult:=bf.protobuf[maxSizeVarint-sizeLen:end]copy(result,bf.protobuf[end:end+sizeLen])returnresult
Minimizing allocations is critical for maintaining encoding performance. The
benchmark tests should be run with the -benchmem flag to monitor allocation
numbers. Each allocation incurs an additional cost to the garbage collector. The
Go profiler is a valuable tool for identifying areas of code that can be
optimized:
$ gotest-run=__nothing__-bench=Netflow/with_encoding\> -benchmem-cpuprofileprofile.out\> akvorado/inlet/flow
goos: linuxgoarch: amd64pkg: akvorado/inlet/flowcpu: AMD Ryzen 5 5600X 6-Core ProcessorNetflow/with_encoding-12 143953 7955 ns/op 8256 B/op 134 allocs/opPASSok akvorado/inlet/flow 1.418s$ gotoolpprofprofile.out
File: flow.testType: cpuTime: Feb 4, 2023 at 8:12pm (CET)Duration: 1.41s, Total samples = 2.08s (147.96%)Entering interactive mode (type "help" for commands, "o" for options)(pprof)web
After using the internal schema instead of code generated from the
proto definition file, the performance improved. However, this comparison is not
entirely fair as less information is being decoded and previously GoFlow2 was
decoding to its own structure, which was then copied to our own version.
As for testing, we use github.com/jhump/protoreflect: the
protoparse package parses the proto definition file we generate and the
dynamic package decodes the messages. Check the ProtobufDecode()
method for more details.4
To get the final figures, I have also optimized the decoding in GoFlow2. It
was relying heavily on binary.Read(). This function may use
reflection in certain cases and each call allocates a byte array to read data.
Replacing it with a more efficient version provides the following
improvement:
It is now easier to collect new data and the inlet component is faster!
Notice
Some paragraphs were editorialized by ChatGPT, using
editorialize and keep it short as a prompt. The result was proofread by a
human for correctness. The main idea is that ChatGPT should be better at
English than me.
While empty fields are not serialized to Protocol Buffers, empty
columns in ClickHouse take some space, even if they compress well.
Moreover, unused fields are still decoded and they may clutter the
interface.
There is a similar function using NetFlow. NetFlow and IPFIX
protocols are less complex to decode than sFlow as they are using a simpler
TLV structure.
vtprotobuf generates more optimized Go code by removing an
abstraction layer. It directly generates the code encoding each field to
bytes:
The script will configure radvd to advertise v6 routes to a /64 of clients on each of the interfaces delimited by a comma in LAN_IFACE. Current interface limit is 9. I can patch something to go up to 0xff, but I don t want to at this time.
If you have some static configuration that you want to preserve, place them into the file pointed to by $ HEADER_FILE and it will be prepended to the generated /etc/radvd.conf file. The up script will remove the file and re-create it every time your ppp link comes up, so keep that in mind and don t manually modify the file and expect it to perist. You ve been warned :-)
So here s the script. It s also linked above if you want to curl it.
#!/bin/bash
#
# Copyright 2023 Collier Technologies LLC
# https://wp.c9h.org/cj/?p=1844
#
# # These variables are for the use of the scripts run by run-parts
# PPP_IFACE="$1"
# PPP_TTY="$2"
# PPP_SPEED="$3"
# PPP_LOCAL="$4"
# PPP_REMOTE="$5"
# PPP_IPPARAM="$6"
$ PPP_IFACE:="ppp0"
if [[ -z $ PPP_LOCAL  ]]; then
    PPP_LOCAL=$(curl -s https://icanhazip.com/)
fi
6rd_prefix="2602::/24"
#printf "%x%x:%x%x\n" $(echo $PPP_LOCAL   tr . ' ')
# This configuration option came from CenturyLink:
# https://www.centurylink.com/home/help/internet/modems-and-routers/advanced-setup/enable-ipv6.html
border_router=205.171.2.64
TUNIFACE=6rdif
first_ipv6_network=$(printf "2602:%02x:%02x%02x:%02x00::" $(echo $ PPP_LOCAL    tr . ' '))
ip tunnel del $ TUNIFACE  2>/dev/null
ip -l 5 -6 addr flush scope global dev $ IFACE
ip tunnel add $ TUNIFACE  mode sit local $ PPP_LOCAL  remote $ border_router
ip tunnel 6rd dev $ TUNIFACE  6rd-prefix "$ first_ipv6_network 0/64" 6rd-relay_prefix $ border_router /32
ip link set up dev $ TUNIFACE
ip -6 route add default dev $ TUNIFACE
ip addr add $ first_ipv6_network 1/64 dev $ TUNIFACE
rm /etc/radvd.conf
i=1
DEFAULT_FILE="/etc/default/centurylink-6rd"
if [[ -f $ DEFAULT_FILE  ]]; then
    source $ DEFAULT_FILE
    if [[ -f $ HEADER_FILE  ]]; then
	cp $ HEADER_FILE  /etc/radvd.conf
    fi
else
    LAN_IFACE="setThis"
fi

for IFACE in $( echo $ LAN_IFACE    tr , ' ' ) ; do
    ipv6_network=$(printf "2602:%02x:%02x%02x:%02x0$ i ::" $(echo $ PPP_LOCAL    tr . ' '))
    ip addr add $ ipv6_network 1/64 dev $ TUNIFACE
    ip -6 route replace "$ ipv6_network /64" dev $ IFACE  metric 1
    echo "
interface $ IFACE
   AdvSendAdvert on;
   MinRtrAdvInterval 3;
   MaxRtrAdvInterval 10;
   AdvLinkMTU 1280;
   prefix $ ipv6_network /64
     AdvOnLink on;
     AdvAutonomous on;
     AdvRouterAddr on;
     AdvValidLifetime 86400;
     AdvPreferredLifetime 86400;
    ;
 ;
" >> /etc/radvd.conf
    let "i=i+1"
done
systemctl restart radvd
I was passing through London on Friday and I had time to get to The Horror Show! Exhibit at Somerset House, over by Victoria embankment. I learned about the exhibition from Gazelle Twin s website: she wrote music for the final part of the exhibit, with Maxine Peake delivering a monologue over the top.
I loved it. It was almost like David Keenan s book England s Hidden Reverse had been made into an exhibition. It s divided into three themes: Monster, Ghost and Witch, although the themes are loose with lots of cross over and threads running throughout.
Thatcher (right)
Derek Jarman's Blue
The show is littered with artefacts from culturally significant works from a recently-bygone age. There s a strong theme of hauntology. The artefacts that stuck out to me include some of Leigh Bowery s costumes; the spitting image doll of Thatcher; the cover of a Radio Times featuring the cult BBC drama Threads; Nigel Kneale s the stone tape VHS alongside more recent artefacts from Inside Number 9 and a MR James adaptation by Mark Gatiss (a clear thread of inspiration there); various bits relating to Derek Jarman including the complete Blue screening in a separate room; Mica Levi s eerie score to under the skin playing in the Witch section, and various artefacts and references to the underground music group Coil. Too much to mention!
Having said that, the things which left the most lasting impression are the some of the stand-alone works of art: the charity box boy model staring fractured and refracted through a glass door (above); the glossy drip of blood running down a wall; the performance piece on a Betamax tape; the self portrait of a drowned man; the final piece, "The Neon Heiroglyph".
Jonathan Jones at the Guardian liked it.
The show runs until the 19th February and is worth a visit if you can.
There's a bunch of ways you can store cryptographic keys. The most obvious is to just stick them on disk, but that has the downside that anyone with access to the system could just steal them and do whatever they wanted with them. At the far end of the scale you have Hardware Security Modules (HSMs), hardware devices that are specially designed to self destruct if you try to take them apart and extract the keys, and which will generate an audit trail of every key operation. In between you have things like smartcards, TPMs, Yubikeys, and other platform secure enclaves - devices that don't allow arbitrary access to keys, but which don't offer the same level of assurance as an actual HSM (and are, as a result, orders of magnitude cheaper).
The problem with all of these hardware approaches is that they have entirely different communication mechanisms. The industry realised this wasn't ideal, and in 1994 RSA released version 1 of the PKCS#11 specification. This defines a C interface with a single entry point - C_GetFunctionList. Applications call this and are given a structure containing function pointers, with each entry corresponding to a PKCS#11 function. The application can then simply call the appropriate function pointer to trigger the desired functionality, such as "Tell me how many keys you have" and "Sign this, please". This is both an example of C not just being a programming language and also of you having to shove a bunch of vendor-supplied code into your security critical tooling, but what could possibly go wrong.
(Linux distros work around this problem by using p11-kit, which is a daemon that speaks d-bus and loads PKCS#11 modules for you. You can either speak to it directly over d-bus, or for apps that only speak PKCS#11 you can load a module that just transports the PKCS#11 commands over d-bus. This moves the weird vendor C code out of process, and also means you can deal with these modules without having to speak the C ABI, so everyone wins)
One of my work tasks at the moment is helping secure SSH keys, ensuring that they're only issued to appropriate machines and can't be stolen afterwards. For Windows and Linux machines we can stick them in the TPM, but Macs don't have a TPM as such. Instead, there's the Secure Enclave - part of the T2 security chip on x86 Macs, and directly integrated into the M-series SoCs. It doesn't have anywhere near as many features as a TPM, let alone an HSM, but it can generate NIST curve elliptic curve keys and sign things with them and that's good enough. Things are made more complicated by Apple only allowing keys to be used by the app that generated them, so it's hard for applications to generate keys on behalf of each other. This can be mitigated by using CryptoTokenKit, an interface that allows apps to present tokens to the systemwide keychain. Although this is intended for allowing a generic interface for access to such tokens (kind of like PKCS#11), an app can generate its own keys in the Secure Enclave and then expose them to other apps via the keychain through CryptoTokenKit.
Of course, applications then need to know how to communicate with the keychain. Browsers mostly do so, and Apple's version of SSH can to an extent. Unfortunately, that extent is "Retrieve passwords to unlock on-disk keys", which doesn't help in our case. PKCS#11 comes to the rescue here! Apple ship a module called ssh-keychain.dylib, a PKCS#11 module that's intended to allow SSH to use keys that are present in the system keychain. Unfortunately it's not super well maintained - it got broken when Big Sur moved all the system libraries into a cache, but got fixed up a few releases later. Unfortunately every time I tested it with our CryptoTokenKit provider (and also when I retried with SecureEnclaveToken to make sure it wasn't just our code being broken), ssh would tell me "provider /usr/lib/ssh-keychain.dylib returned no slots" which is not especially helpful. Finally I realised that it was actually generating more debug output, but it was being sent to the system debug logs rather than the ssh debug output. Well, when I say "more debug output", I mean "Certificate []: algorithm is not supported, ignoring it", which still doesn't tell me all that much. So I stuck it in Ghidra and searched for that string, and the line above it was
with it immediately failing if the key isn't RSA. Which it isn't, since the Secure Enclave doesn't support RSA. Apple's PKCS#11 module appears incapable of making use of keys generated on Apple's hardware.
There's a couple of ways of dealing with this. The first, which is taken by projects like Secretive, is to implement the SSH agent protocol and have SSH delegate key management to that agent, which can then speak to the keychain. But if you want this to work in all cases you need to implement all the functionality in the existing ssh-agent, and that seems like a bunch of work. The second is to implement a PKCS#11 module, which sounds like less work but probably more mental anguish. I'll figure that out tomorrow.
Parallelizing the compilation of a large codebase is a breeze with distcc, which allows you to spread the load across multiple nodes and speed up the compilation time.Here s a sample network topology for a distributed build:Install distcc on the three Debian/Ubuntu-based nodes:
# apt install distcc
Edit /etc/default/distcc and set:
STARTDISTCC="true"

# Customize for your environment
ALLOWEDNETS="192.168.2.0/24"

# Specify your network device
LISTENER="192.168.2.146"
Additionally, the JOBS and NICE variables can be tweaked to suit the compute power that you have available.Start distcc:
# systemctl start distcc
Do the same all the nodes, and if you have a firewall enabled with ufw, you will need to open up the port 3632 to the master node.
# ufw allow 3632/tcp
Additionally, if you d like to use ssh over untrusted networks so code and communication with the worker nodes happen over a secure channel, ensure that SSH is running and is opened up to the master node in the same manner as above with the key of the master node in ~/.ssh/authorized_keys of the worker nodes. Opening port 3632 in this manner is a security hole, so take precautions over untrusted networks.Back in the master node, setup a DISTCC_HOSTS environment variable that lists the worker nodes, including the master node. Note the order of the hosts, as it is important. The first host will be more heavily used, and distcc has no way of knowing the capacity and capability of the hosts, so specify the most powerful host first.
At this point, you re ready to compile.Go to your codebase, in this case we use the Linux kernel source code for the purpose of example.
$ make tinyconfig
$ time make -j$(nproc) CC=distcc bzImage
On another terminal, you can monitor the status of the distributed compilation with distmoncc-text or tools such as top or bpytop.Network throughput and latency will be a big factor in how much distcc will help speed up your build process. Using ssh may additionally introduce overhead, so play with the variables to see how much distcc can help speed up or optimize the build for your specific scenario. You may want to additionally consider ccache to speed up the build process.There are some aspects of the build process that are not effectively parallizable in this manner, such as the final linking step of the executable, for which you will not see any performance improvement with distcc.Give distcc a spin, and put any spare compute you have lying around in your home lab to good use.
 This isn't a book review, although the reason that I am typing this now is
because of a book, You Are Not Alone: from the creator and host of
Griefcast, Cariad Lloyd, ISBN: 978-1526621870 and I include a handful of
quotes from Cariad where there is really no better way of describing things.
Many people experience death for the first time as a child, often relating to a
family pet. Death is universal but every experience of death is unique. One of
the myths of grief is the idea of the Five Stages but this is a
misinterpretation. Denial, Anger, Bargaining, Depression and Acceptance
represent the five stage model of death and have nothing to do with
grief. The five stages were developed from studying those who are
terminally ill, the dying, not those who then grieve for the dead person and
have to go on living without them. Grief is for those who loved the person who
has died and it varies between each of those people just as people vary in how
they love someone. The Five Stages end at the moment of death, grief is what
comes next and most people do not grieve in stages, it can be more like a
tangled knot.
Death has a date and time, so that is why the last stage of the model is
Acceptance. Grief has no timetable, those who grieve will carry that grief for
the rest of their lives. Death starts the process of grief in those who go on
living just as it ends the life of the person who is loved. "Grief eases and
changes and returns but it never disappears.".
I suspect many will have already stopped reading by this point. People do not
talk about death and grief enough and this only adds to the burden of those who
carry their grief. It can be of enormous comfort to those who have carried
grief for some time to talk directly about the dead, not in vague pleasantries
but with specific and strong memories. Find a safe place without distractions
and talk with the person grieving face to face. Name the dead person. Go to
places with strong memories and be there alongside. Talk about the times with
that person before their death. Early on, everything about grief is painful and
sad. It does ease but it remains unpredictable. Closing it away in a box inside
your head (as I did at one point) is like cutting off a damaged limb but
keeping the pain in a box on the shelf. You still miss the limb and eventually,
the box starts leaking.
For me, there were family pets which died but my first job out of university
was to work in hospitals, helping the nurses manage the medication regimen and
providing specialist advice as a pharmacist. It will not be long in that
environment before everyone on the ward gets direct experience of the death of
a person. In some ways, this helped me to separate the process of death from
the process of grief. I cared for these people as patients but these were not
my loved ones. Later, I worked in specialist terminal care units, including
providing potential treatments as part of clinical trials. Here, it was not
expected for any patient to be discharged alive. The more aggressive
chemotherapies had already been tried and had failed, this was about pain
relief, symptom management and helping the loved ones. Palliative care is not
just about the patient, it involves helping the loved ones to accept what is
happening as this provides comfort to the patient by closing the loop.
Grief is stressful. One of the most common causes of personal stress is
bereavement.
The death of your loved one is outside of your control, it has happened, no
amount of regret can change that. Then come all the other stresses, maybe about
money or having somewhere to live as a result of what else has changed after
the death or having to care for other loved ones.
In the early stages, the first two years, I found it helpful to imagine my life
as a box containing a ball and a button. The button triggers new waves of pain
and loss each time it is hit. The ball bounces around the box and hits the
button at random. Initially, the button is large and the ball is enormous, so
the button is hit almost constantly. Over time, both the button and the ball
change size. Starting off at maximum, initially there is only one direction of
change. There are two problems with this analogy. First is that the grief ball
has infinite energy which does not happen in reality. The ball may get smaller
and the button harder to hit but the ball will continue bouncing. Secondly, the
life box is not a predictable shape, so the pattern of movement of the ball is
unpredictable.
A single stress is one thing, but what has happened since has just kept adding
more stress for me. Shortly before my father died 5 years ago now, I had moved
house. Then, I was made redundant on the day of the first anniversary of my
father's death. A year or so later, my long term relationship failed and a few
months after that COVID-19 appeared. As the country eased out of the pandemic
in 2021, my mother died (unrelated to COVID itself). A year after that, I had
to take early retirement. My brother and sister, of course, share a lot of
those stressors. My brother, in particular, took the responsibility for
organising both funerals and did most of the visits to my mother before her
death. The grief is different for each of the surviving family.
Cariad's book helped me understand why I was getting frequent ideas about going
back to visit places which my father and I both knew. My parents encouraged
each of us to work hard to leave Port Talbot (or Pong Toilet locally) behind,
in no small part due to the unrestrained pollution and deprivation that is
common to small industrial towns across Wales, the midlands and the north of
the UK. It wasn't that I wanted to move house back to our ancestral roots. It
was my grief leaking out of the box. Yes, I long for mountains and the sea
because I'm now living in a remorselessly flat and landlocked region after
moving here for employment. However, it was my grief driving those longings -
not for the physical surroundings but out of the shared memories with my
father. I can visit those memories without moving house, I just need to arrange
things so that I can be undisturbed and undistracted.
I am not alone with my grief and I am grateful to my friends who have helped
whilst carrying their own grief. It is necessary for everyone to think and talk
about death and grief. In respect of your own death, no matter how far ahead
that may be, consider Advance Care Planning and Expressions of Wish as well
as your Will.
This isn't a book review, although the reason that I am typing this now is
because of a book, You Are Not Alone: from the creator and host of
Griefcast, Cariad Lloyd, ISBN: 978-1526621870 and I include a handful of
quotes from Cariad where there is really no better way of describing things.
Many people experience death for the first time as a child, often relating to a
family pet. Death is universal but every experience of death is unique. One of
the myths of grief is the idea of the Five Stages but this is a
misinterpretation. Denial, Anger, Bargaining, Depression and Acceptance
represent the five stage model of death and have nothing to do with
grief. The five stages were developed from studying those who are
terminally ill, the dying, not those who then grieve for the dead person and
have to go on living without them. Grief is for those who loved the person who
has died and it varies between each of those people just as people vary in how
they love someone. The Five Stages end at the moment of death, grief is what
comes next and most people do not grieve in stages, it can be more like a
tangled knot.
Death has a date and time, so that is why the last stage of the model is
Acceptance. Grief has no timetable, those who grieve will carry that grief for
the rest of their lives. Death starts the process of grief in those who go on
living just as it ends the life of the person who is loved. "Grief eases and
changes and returns but it never disappears.".
I suspect many will have already stopped reading by this point. People do not
talk about death and grief enough and this only adds to the burden of those who
carry their grief. It can be of enormous comfort to those who have carried
grief for some time to talk directly about the dead, not in vague pleasantries
but with specific and strong memories. Find a safe place without distractions
and talk with the person grieving face to face. Name the dead person. Go to
places with strong memories and be there alongside. Talk about the times with
that person before their death. Early on, everything about grief is painful and
sad. It does ease but it remains unpredictable. Closing it away in a box inside
your head (as I did at one point) is like cutting off a damaged limb but
keeping the pain in a box on the shelf. You still miss the limb and eventually,
the box starts leaking.
For me, there were family pets which died but my first job out of university
was to work in hospitals, helping the nurses manage the medication regimen and
providing specialist advice as a pharmacist. It will not be long in that
environment before everyone on the ward gets direct experience of the death of
a person. In some ways, this helped me to separate the process of death from
the process of grief. I cared for these people as patients but these were not
my loved ones. Later, I worked in specialist terminal care units, including
providing potential treatments as part of clinical trials. Here, it was not
expected for any patient to be discharged alive. The more aggressive
chemotherapies had already been tried and had failed, this was about pain
relief, symptom management and helping the loved ones. Palliative care is not
just about the patient, it involves helping the loved ones to accept what is
happening as this provides comfort to the patient by closing the loop.
Grief is stressful. One of the most common causes of personal stress is
bereavement.
The death of your loved one is outside of your control, it has happened, no
amount of regret can change that. Then come all the other stresses, maybe about
money or having somewhere to live as a result of what else has changed after
the death or having to care for other loved ones.
In the early stages, the first two years, I found it helpful to imagine my life
as a box containing a ball and a button. The button triggers new waves of pain
and loss each time it is hit. The ball bounces around the box and hits the
button at random. Initially, the button is large and the ball is enormous, so
the button is hit almost constantly. Over time, both the button and the ball
change size. Starting off at maximum, initially there is only one direction of
change. There are two problems with this analogy. First is that the grief ball
has infinite energy which does not happen in reality. The ball may get smaller
and the button harder to hit but the ball will continue bouncing. Secondly, the
life box is not a predictable shape, so the pattern of movement of the ball is
unpredictable.
A single stress is one thing, but what has happened since has just kept adding
more stress for me. Shortly before my father died 5 years ago now, I had moved
house. Then, I was made redundant on the day of the first anniversary of my
father's death. A year or so later, my long term relationship failed and a few
months after that COVID-19 appeared. As the country eased out of the pandemic
in 2021, my mother died (unrelated to COVID itself). A year after that, I had
to take early retirement. My brother and sister, of course, share a lot of
those stressors. My brother, in particular, took the responsibility for
organising both funerals and did most of the visits to my mother before her
death. The grief is different for each of the surviving family.
Cariad's book helped me understand why I was getting frequent ideas about going
back to visit places which my father and I both knew. My parents encouraged
each of us to work hard to leave Port Talbot (or Pong Toilet locally) behind,
in no small part due to the unrestrained pollution and deprivation that is
common to small industrial towns across Wales, the midlands and the north of
the UK. It wasn't that I wanted to move house back to our ancestral roots. It
was my grief leaking out of the box. Yes, I long for mountains and the sea
because I'm now living in a remorselessly flat and landlocked region after
moving here for employment. However, it was my grief driving those longings -
not for the physical surroundings but out of the shared memories with my
father. I can visit those memories without moving house, I just need to arrange
things so that I can be undisturbed and undistracted.
I am not alone with my grief and I am grateful to my friends who have helped
whilst carrying their own grief. It is necessary for everyone to think and talk
about death and grief. In respect of your own death, no matter how far ahead
that may be, consider Advance Care Planning and Expressions of Wish as well
as your Will.
 Twenty years A seemingly big, very round number, at least for me.
I can recall several very well-known songs mentioning this
timespan:
Twenty years A seemingly big, very round number, at least for me.
I can recall several very well-known songs mentioning this
timespan:
 Maybe by sheer chance it was today also that we spent the evening at
Max s house I never worked directly with Max, but we both worked at
Universidad Pedag gica Nacional at the same time back then.
But Of course, a single twentyversary is not enough!
I don t have the exact date, but I guess I might be off by some two or
three months due to other things I remember from back then.
This year, I am forty years old as an Emacs and TeX user!
Back in 1983, on Friday nights, I went with my father to IIMAS (where
I m currently adscribed to as a PhD student, and where he was a
researcher between 1971 and the mid-1990s) and used the computer
one of the two big computers they had in the Institute. And what could
a seven-year-old boy do? Of course use the programs this great
Foonly F2 system had. Emacs and TeX (this is still before LaTeX).
40 years And I still use the same base tools for my daily work, day
in, day out.
Maybe by sheer chance it was today also that we spent the evening at
Max s house I never worked directly with Max, but we both worked at
Universidad Pedag gica Nacional at the same time back then.
But Of course, a single twentyversary is not enough!
I don t have the exact date, but I guess I might be off by some two or
three months due to other things I remember from back then.
This year, I am forty years old as an Emacs and TeX user!
Back in 1983, on Friday nights, I went with my father to IIMAS (where
I m currently adscribed to as a PhD student, and where he was a
researcher between 1971 and the mid-1990s) and used the computer
one of the two big computers they had in the Institute. And what could
a seven-year-old boy do? Of course use the programs this great
Foonly F2 system had. Emacs and TeX (this is still before LaTeX).
40 years And I still use the same base tools for my daily work, day
in, day out.
 Nitrokey Start
 The nineteenth release of
  US-11604662-B2
 (no site yet)
 in October 2021. they generally seem to keep up with
shipping. update (august 2022): they rolled out a second line of
laptops (12th gen), first batch shipped, second batch
in October 2021. they generally seem to keep up with
shipping. update (august 2022): they rolled out a second line of
laptops (12th gen), first batch shipped, second batch 
 Back in September last year I chose to back the
 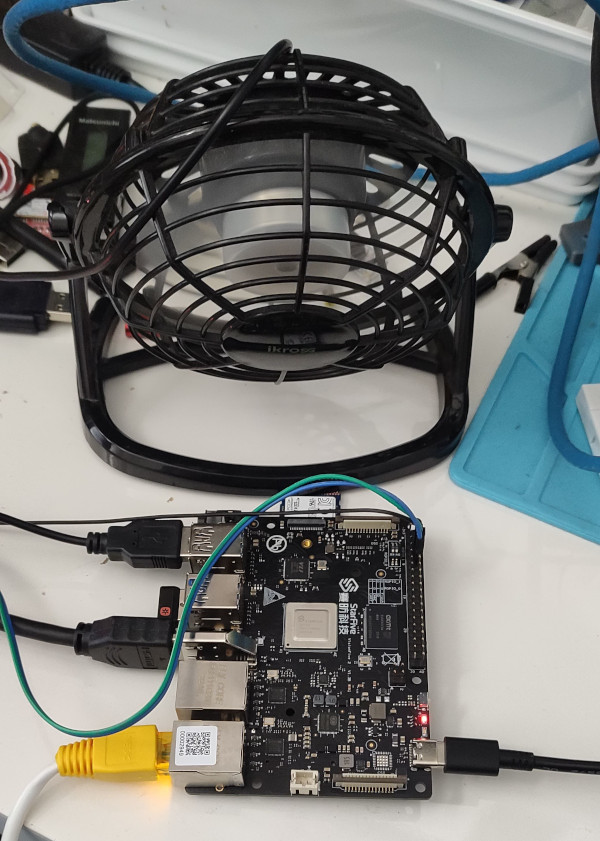 I haven t seen any actual stability problems, but I wouldn t want to run for any length of time like that. I ve ordered a heatsink and also realised that the board supports a Raspberry Pi style PoE Hat , so I ve got one of those that includes a fan ordered (I am a complete convert to PoE especially for small systems like this).
With the desk fan setup I ve been able to run the board for extended periods under load (I did a full recompile of the Debian 6.1.12-1 kernel package and it took about 10 hours). The M.2 slot is unfortunately only a single PCIe v2 lane, and my testing topped out at about 180MB/s. IIRC that is about half what the slot should be capable of, and less than a 10th of what the SSD can do. Ethernet testing with
I haven t seen any actual stability problems, but I wouldn t want to run for any length of time like that. I ve ordered a heatsink and also realised that the board supports a Raspberry Pi style PoE Hat , so I ve got one of those that includes a fan ordered (I am a complete convert to PoE especially for small systems like this).
With the desk fan setup I ve been able to run the board for extended periods under load (I did a full recompile of the Debian 6.1.12-1 kernel package and it took about 10 hours). The M.2 slot is unfortunately only a single PCIe v2 lane, and my testing topped out at about 180MB/s. IIRC that is about half what the slot should be capable of, and less than a 10th of what the SSD can do. Ethernet testing with 

 In case you want to know how to configure IPv6 using CenturyLink s 6rd tunneling service.
There are four files to update with my script:
In case you want to know how to configure IPv6 using CenturyLink s 6rd tunneling service.
There are four files to update with my script:


 There's a bunch of ways you can store cryptographic keys. The most obvious is to just stick them on disk, but that has the downside that anyone with access to the system could just steal them and do whatever they wanted with them. At the far end of the scale you have Hardware Security Modules (HSMs), hardware devices that are specially designed to self destruct if you try to take them apart and extract the keys, and which will generate an audit trail of every key operation. In between you have things like smartcards, TPMs, Yubikeys, and other platform secure enclaves - devices that don't allow arbitrary access to keys, but which don't offer the same level of assurance as an actual HSM (and are, as a result, orders of magnitude cheaper).